基于湖库一体架构,统一管理结构化、半结构化与非结构化等多模态数据,一个系统承载事务处理、实时分析与 AI 工作负载。


基于 OB Cloud 搭建离线数仓和可视化看板
更新时间:2026-05-14 14:28:04
分享
说明
本篇教程也同步在 OB Cloud 控制台上线了交互式教程,可以跟随教程在真实的 OB Cloud 环境中进行互动体验,登录 OB Cloud 控制台 后,单击左侧导航栏的 实践教程 即可查看全部已上线的交互式教程。
背景信息
随着社会向数字化转型的加速,企业对于数据分析的要求日益提高。数据处理主要集中在处理大量历史数据的离线场景,可以通过搭建数据仓库解决。OB Cloud 可以通过搭建数据仓库解决离线数据的分析问题。通过定时任务来实现从原始数据层 (ODS) 到明细数据层 (DWD) 最终到达应用数据层 (ADS) 的数据层级构建,创建基于 OB Cloud的数据仓库。同时通过配套的生态工具搭建可视化看板。
前提条件
- 您拥有当前实例的实例管理员和数据读取权限,如无权限,可联系组织管理员进行添加。
- 您有可用的分析型(MySQL)集群实例,请参考创建租户 创建租户。
- 您使用的数据库内核版本高于 4.3.0,源端开启 Binlog 服务。
- 您拥有组织管理员权限,并已创建集群实例,详细内容参见创建集群实例。
- 您拥项目管理员或实例管理员可对项目中的实例进行操作,如无权限,可联系组织管理员添加权限。
- 您已部署 Flink CDC,DBT,airflow,Grafana,Prometheus。
- 已通过 Prometheus 完成监控指标采集,并确保 Grafana 和 Prometheus 网络互通,同时下载 OB Cloud 监控大盘配置文件:主机监控 和 实例监控。这两个文件为预先配置好的大盘示例文件。
准备工作
创建账号
- 选择您的 tutorial_tenant 租户。
- 进入租户控制台页面。
- 单击 创建账号。
- 在弹出框中填写账号名称为
tutorial_user,您可自定义您的租户账号名称。 - 账号类型选择为普通账号。
- 单击图标,授权数据库选择 default_database 。
说明
OB Cloud 为您自动创建了一个空的 default_database 数据库,您也可以根据实际使用情况选择或创建其它数据库,更多内容参见创建数据库。
单击图标,为当前账号授读写权限。
单击随机生成,单击后系统将为您自动生成密码,请复制后妥善保存。您也可自定义密码,密码长度为 10-32 位,且至少包含 2 个大写英文字符、2 个小写英文字符、2 个数字和 2 个特殊字符;支持的特殊字符为:
~ ! @ # % ^ & * _ - + = \| ( ) { } [ ] : ; , . ? / |。单击 创建。
创建数据库并建表
- 进入 租户控制台 页面。
- 单击 创建数据库,在弹出框中填写数据库名称 tptest,选择字符集,作为 TP 库。
- 单击 创建。
- 重复 步骤 1-3 创建 aptest 数据库,作为 AP 库。
- 分别在 TP 库和 AP 库中建表。
进入 SQL 控制台 页面。
选择
tutorial_user账号并填入密码登录,单击 确认。双击左侧
tptest数据库,打开一个新的 SQL 窗口。执行如下 SQL。
CREATE TABLE `orders` (
order_id bigint not null primary key,
user_id varchar(50) not null,
shop_id bigint not null,
product_id bigint not null,
buy_fee numeric(20,2) not null,
create_time timestamp not null,
update_time timestamp not null default now(),
state int not null
);

CREATE TABLE `orders_pay` (
pay_id bigint not null primary key,
order_id bigint not null,
pay_platform varchar(64) not null,
create_time timestamp not null
);

CREATE TABLE `product_catalog` (
product_id bigint not null primary key,
catalog_name varchar(50) not null
);
单击图标,执行 SQL 语句。执行记录 页签将显示创建的表信息。
重复上述 3-5 步,在
aptest数据库 创建同样的 3 张表。双击左侧
tptest数据库,重新打开一个新的 SQL 窗口。执行如下 SQL,给
tptest数据库的三张表模拟若干数据。INSERT INTO product_catalog VALUES(1, 'iphone 14'),(2, 'iphone 14 pro max'),(3, 'iphone 15'),(4, 'huawei mate 60'),(5, 'huawei pura 70'); insert into `tptest`.`orders_pay`(`pay_id`,`order_id`,`pay_platform`,`create_time`) values(1,1,'test','2024-10-01 00:00:00'); insert into `tptest`.`orders_pay`(`pay_id`,`order_id`,`pay_platform`,`create_time`) values(2,2,'test','2024-10-02 00:00:00'); insert into `tptest`.`orders_pay`(`pay_id`,`order_id`,`pay_platform`,`create_time`) values(3,3,'test','2024-10-03 00:00:00'); insert into `tptest`.`orders_pay`(`pay_id`,`order_id`,`pay_platform`,`create_time`) values(4,4,'test','2024-10-04 00:00:00'); insert into `tptest`.`orders_pay`(`pay_id`,`order_id`,`pay_platform`,`create_time`) values(1,1,'test','2024-10-01 00:00:00'); insert into `tptest`.`orders_pay`(`pay_id`,`order_id`,`pay_platform`,`create_time`) values(2,2,'test','2024-10-02 00:00:00'); insert into `tptest`.`orders_pay`(`pay_id`,`order_id`,`pay_platform`,`create_time`) values(3,3,'test','2024-10-03 00:00:00'); insert into `tptest`.`orders_pay`(`pay_id`,`order_id`,`pay_platform`,`create_time`) values(4,4,'test','2024-10-04 00:00:00');单击图标,执行 SQL 语句。执行记录 页签将显示相关信息。
构建 flink 同步链路
启动 flink CDC 后,进入部署 flink 文件夹下,执行 ./bin/sql-client.sh 命令,打开 Flink SQL 界面。依次执行如下 SQL。
```sql
CREATE TABLE mysql_orders (
order_id bigint not null primary key NOT ENFORCED,
user_id varchar(50) not null,
shop_id bigint not null,
product_id bigint not null,
buy_fee numeric(20,2) not null,
create_time timestamp not null,
update_time timestamp not null,
state int not null
) WITH (
    'connector' = 'mysql-cdc',
    'server-time-zone' = 'Asia/Shanghai',
    'hostname' = '******.huawei-cn-southwest-2.oceanbase.cloud',
    'port' = '3306',
    'username' = 'wktest',
    'password' = '******',
    'database-name' = 'tptest',
    'table-name' = 'orders');

CREATE TABLE `mysql_orders_pay` (
pay_id bigint not null primary key NOT ENFORCED,
order_id bigint not null,
pay_platform varchar(64) not null,
create_time timestamp not null
) WITH (
    'connector' = 'mysql-cdc',
    'server-time-zone' = 'Asia/Shanghai',
    'hostname' = '******.huawei-cn-southwest-2.oceanbase.cloud',
    'port' = '3306',
    'username' = 'wktest',
    'password' = '******',
    'database-name' = 'tptest',
    'table-name' = 'orders_pay');

CREATE TABLE `mysql_product_catalog` (
product_id bigint not null primary key NOT ENFORCED,
catalog_name varchar(50) not null
) WITH (
    'connector' = 'mysql-cdc',
    'server-time-zone' = 'Asia/Shanghai',
    'hostname' = '******.huawei-cn-southwest-2.oceanbase.cloud',
    'port' = '3306',
    'username' = 'wktest',
    'password' = '******',
    'database-name' = 'tptest',
    'table-name' = 'product_catalog');

CREATE TABLE `orders` (
order_id bigint not null primary key NOT ENFORCED,
user_id varchar(50) not null,
shop_id bigint not null,
product_id bigint not null,
buy_fee numeric(20,2) not null,
create_time timestamp not null,
update_time timestamp not null,
state int not null
) WITH (
    'connector' = 'jdbc',
    'url' = 'jdbc:mysql://******.huawei-cn-southwest-2.oceanbase.cloud:3306/aptest',
    'username' = 'wktest',
    'password' = '******',
    'table-name' = 'orders');

CREATE TABLE `orders_pay` (
pay_id bigint not null primary key NOT ENFORCED,
order_id bigint not null,
pay_platform varchar(64) not null,
create_time timestamp not null
) WITH (
    'connector' = 'jdbc',
    'url' = 'jdbc:mysql://******.huawei-cn-southwest-2.oceanbase.cloud:3306/aptest',
    'username' = 'wktest',
    'password' = '******',
    'table-name' = 'orders_pay');

CREATE TABLE `product_catalog` (
product_id bigint not null primary key NOT ENFORCED,
catalog_name varchar(50) not null
) WITH (
    'connector' = 'jdbc',
    'url' = 'jdbc:mysql://******.huawei-cn-southwest-2.oceanbase.cloud:3306/aptest',
    'username' = 'wktest',
    'password' = '******',
    'table-name' = 'product_catalog',
    'sink.buffer-flush.max-rows' = '0',
    'sink.buffer-flush.interval' = '0');

INSERT INTO product_catalog SELECT * FROM mysql_product_catalog;
INSERT INTO orders_pay SELECT * FROM mysql_orders_pay;
INSERT INTO orders SELECT * FROM mysql_orders;
```
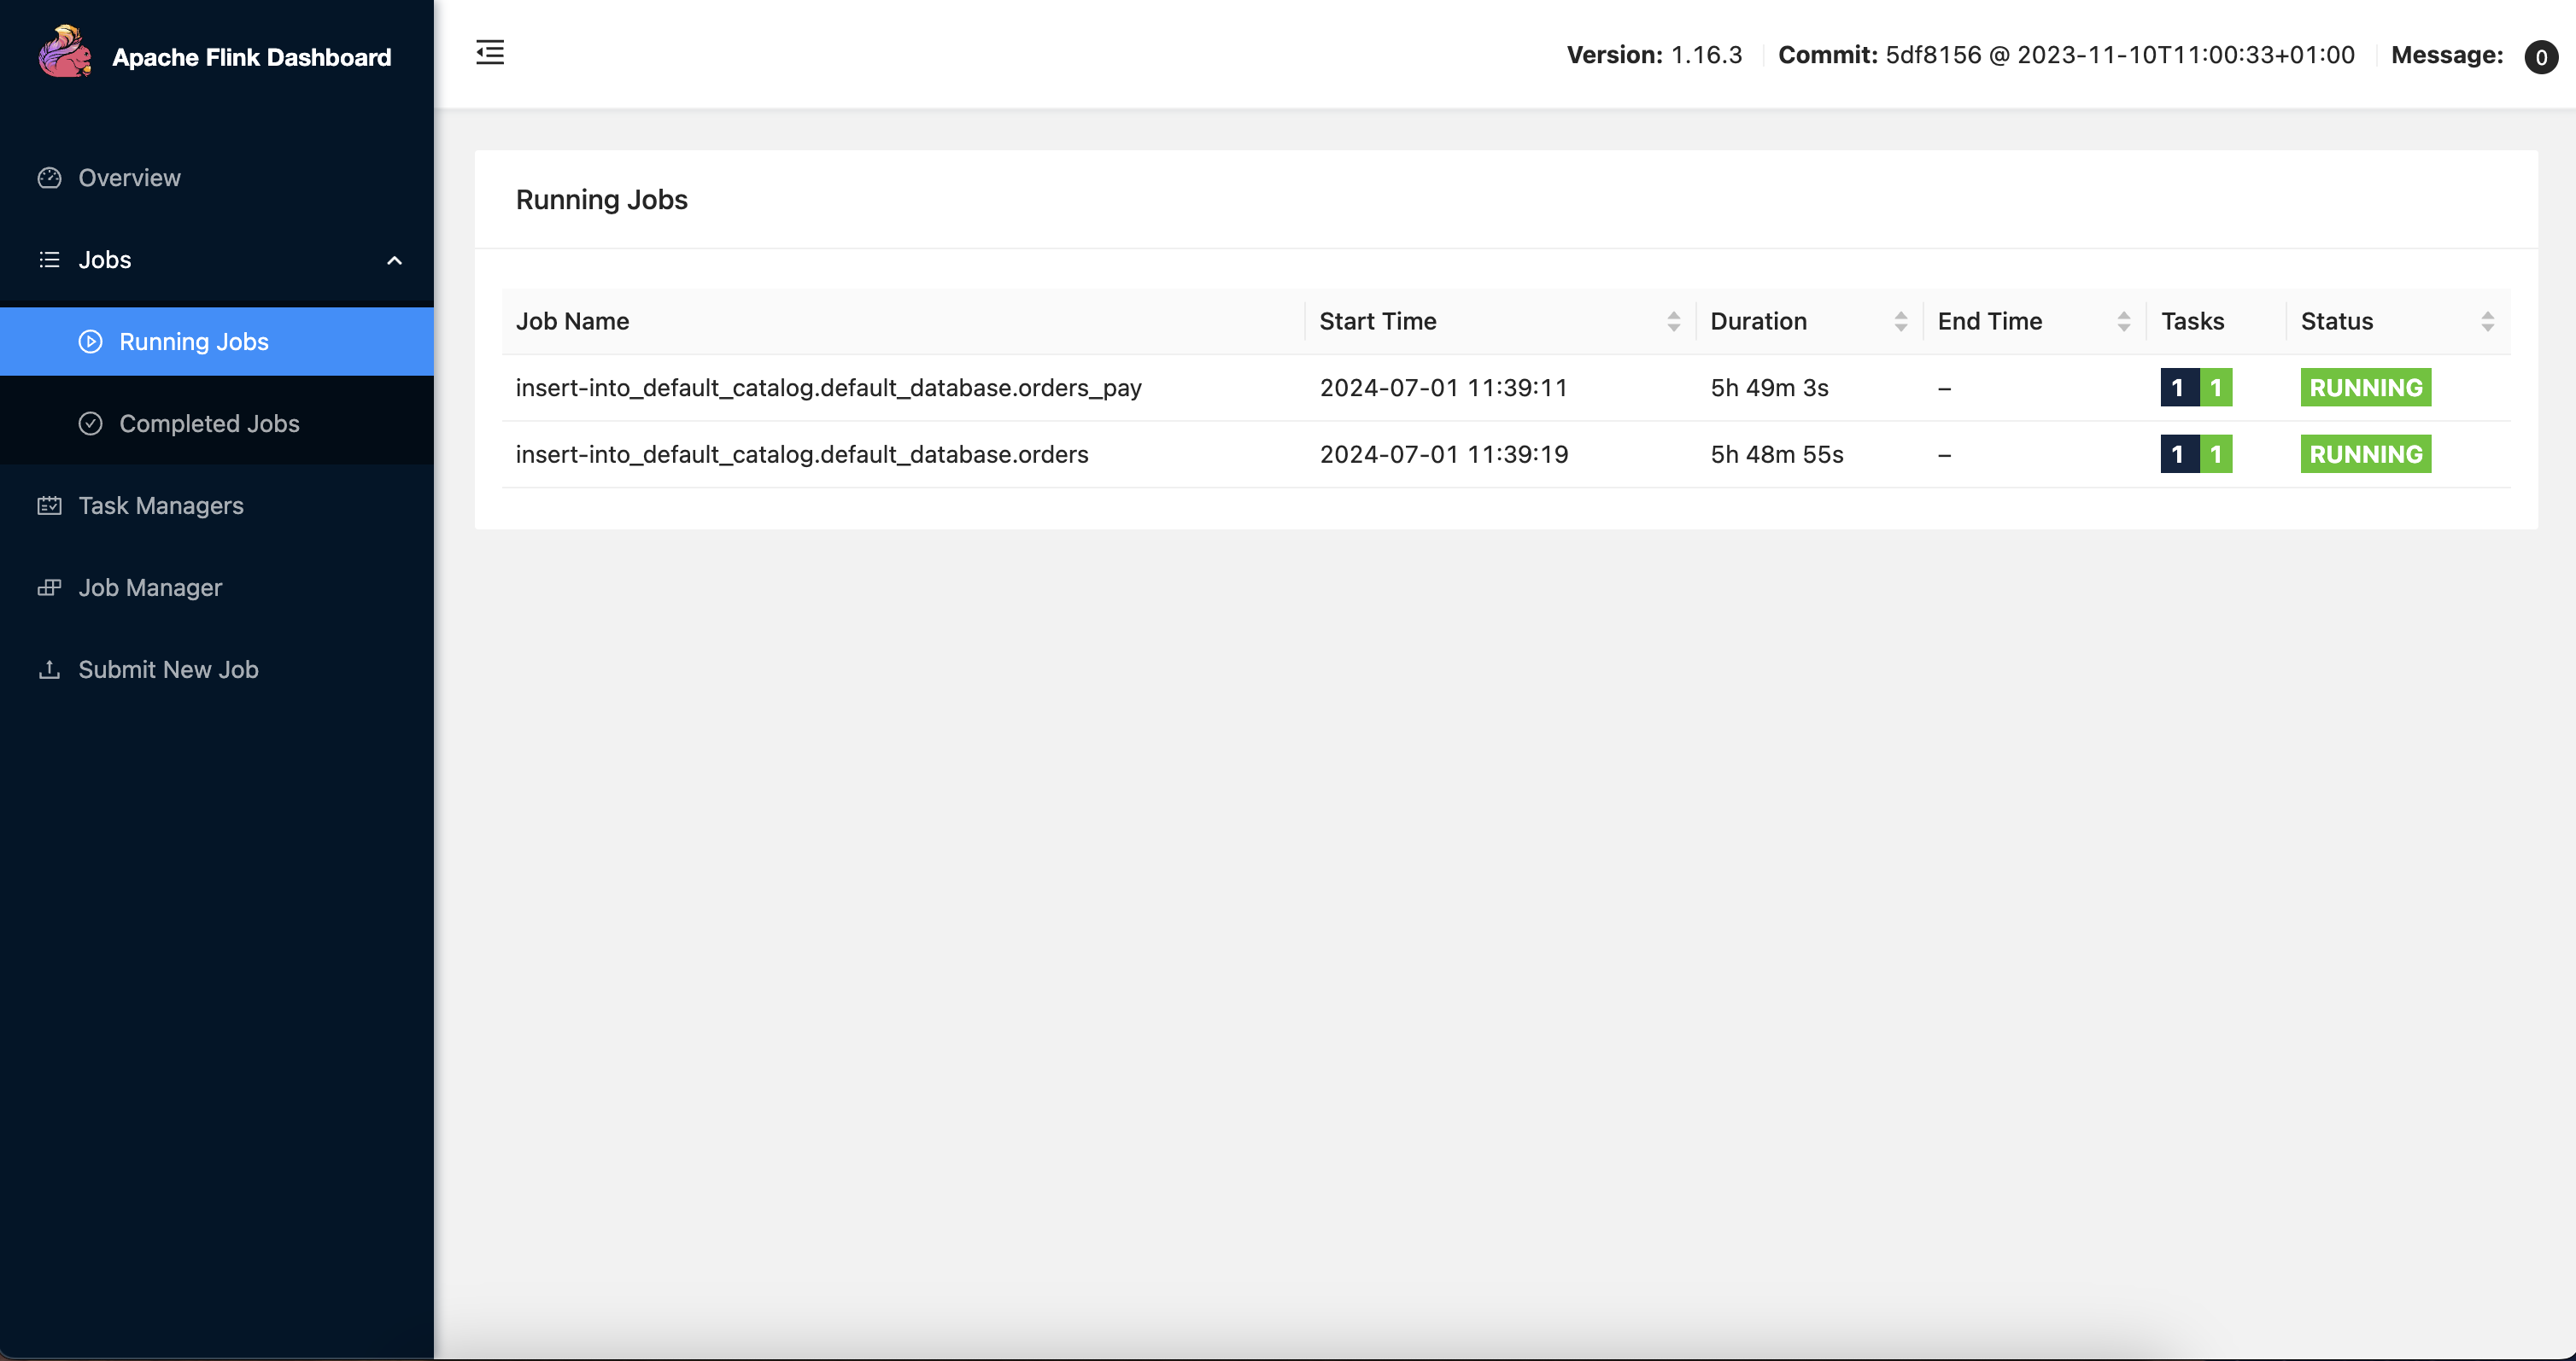
创建上述 Flink CDC 同步链路后,数据会实时从 tptest 数据库同步到 aptest 数据库。可以从 SQL 控制台查看对应的表数据。
计算层构建
构建 DBT 项目
原始的 TP 表结构不适用于直接进行数据分析与展示,需要一定的转换。这里通过使用 DBT 项目进行数据转换。根据 Demo 的原本范例我们构建一个 DBT 项目,并定义模型。详细步骤如下。
DBT 安装部署后,执行
dbt init my_project创建一个名为my_project的 DBT 项目,在弹出的对话框中按照提示输入数据库信息。这里要注意的是 user 只填用户名即可。创建后会在文件/root/.dbt/profiles.yml记录刚才输入的信息,并用于数据库连接。执行
cd my_project进入项目目录。在
/my_project/models/example目录下编写 SQL 文件来定义数据模型。# models/example/dwd_orders.sql {{ config( materialized='view') }} select o.order_id as order_id, o.user_id as order_user_id, o.shop_id as order_shop_id, o.product_id as order_product_id, o.buy_fee as order_fee, o.create_time as order_create_time, o.update_time as order_update_time, o.state as order_state, c.catalog_name as order_product_catalog_name, p.pay_id as pay_id, p.pay_platform as pay_platform, p.create_time as pay_create_time from orders o left join product_catalog c on o.product_id = c.product_id left join orders_pay p on o.order_id = p.order_id# models/example/dwd_shops.sql {{ config(materialized='table') }} select order_shop_id, str_to_date(date_format(pay_create_time, '%Y%m%d'), '%Y%m%d') as ds, sum(order_fee) as sum_fee from {{ ref('dwd_orders') }} where order_state=1 GROUP BY order_shop_id, date_format(pay_create_time, '%Y%m%d')# models/example/dwd_shops_all.sql {{ config(materialized='table') }} select str_to_date(date_format(pay_create_time, '%Y%m%d'), '%Y%m%d') as ds, sum(order_fee) as sum_fee from {{ ref('dwd_orders') }} where order_state=1 GROUP BY date_format(pay_create_time, '%Y%m%d')# models/example/dwd_users.sql {{ config(materialized='table') }} select order_user_id, str_to_date(concat(date_format(pay_create_time, '%Y%m'), '01'), '%Y%m%d') as ds, sum(order_fee) as sum_fee from {{ ref('dwd_orders') }} where order_state = 1 group by order_user_id, date_format(pay_create_time, '%Y%m')执行
dbt compile,编译模型即将 SQL 转换为数据库特定的语句。执行
dbt run,运行所有模型。
创建 DAG 调度任务
这里采用 Airflow 作为基本的 DAG 和调度平台。首次安装部署后,需要执行 airflow db init 初始化 Airflow 的数据库。部署 Airflow 后,执行 airflow scheduler 启动 Scheduler,可以对DAG 做实时调度;执行 airflow webserver,启动 Web 服务器,在 web 界面上能够完整看到整个调度任务。
通过访问 Airflow 的 Web 界面(默认端口 8080),可以在工作流程中访问数据库。首先,需要在 Airflow 的连接设置中配置 OceanBase 数据库连接。可以在 Airflow 的 Web UI 中完成这一步。访问数据库的步骤如下。
- 打开 Airflow Web UI。
- 导航到 Admin -> Connections。
- 点击 "+" 号来添加一个新的连接。
- 填写以下字段:
- Connection Id: 连接ID,这里可以是任何标识符。
- Connection Type: 连接的数据库类型,这里以 OceanBase 的 MySQL 模式为例,因此需要填 MySQL。
- Host: OceanBase 数据库的主机地址,这里填连接串 -h 后面的参数。
- Schema: 数据库名,这里填需要连接的数据库的名字。
- Login: 数据库用户名,这里格式为 username@tenantname。
- Password: 数据库密码。
- Port: OceanBase 端口(默认是 3306)
配置好访问的数据库后,从后台登录部署 Airflow 的机器,将你的 DAG 文件(.py文件)放在 Airflow 的 dags 目录下,Airflow 会自动发现并加载这些 DAG。这里定义 2 个计算节点,一个用于运行 DBT 项目,完成数仓计算任务,另一个用于完成计算任务后发送邮件提示使用者。DAG 定义如下。
# Copyright (c) 2023 OceanBase.
#
# Licensed under the Apache License, Version 2.0 (the "License");
# you may not use this file except in compliance with the License.
# You may obtain a copy of the License at
#
#     http://www.apache.org/licenses/LICENSE-2.0
#
# Unless required by applicable law or agreed to in writing, software
# distributed under the License is distributed on an "AS IS" BASIS,
# WITHOUT WARRANTIES OR CONDITIONS OF ANY KIND, either express or implied.
# See the License for the specific language governing permissions and
# limitations under the License.
from datetime import datetime, timedelta

from airflow import DAG
from airflow.operators.email import EmailOperator
from airflow_dbt import DbtRunOperator

default_args = {
    "owner": "airflow",
    "depends_on_past": False,
    "start_date": datetime(2024, 7, 12, 8, 35),
    "email": ["******@oceanbase.com"],
    "email_on_failure": True,
    "email_on_retry": False,
    "retries": 1,
    "retry_delay": timedelta(minutes=5),
}

dag = DAG("warehouse_demo", default_args=default_args, schedule=timedelta(minutes=1))

t4 = EmailOperator(
    task_id="sending_email",
    to="******@oceanbase.com",
    subject="AirFlow Notice",
    html_content="<h1>Your Airflow Has been completed</h1>",
    dag=dag,
)

dbt_operator = DbtRunOperator(
    task_id="dbt_run", dir="xxx", dag=dag
)

dbt_operator >> t4
上述文件部署后,在 Airflow 的 web 界面能够完整看到整个调度任务,可以根据需要对该任务进行调度。 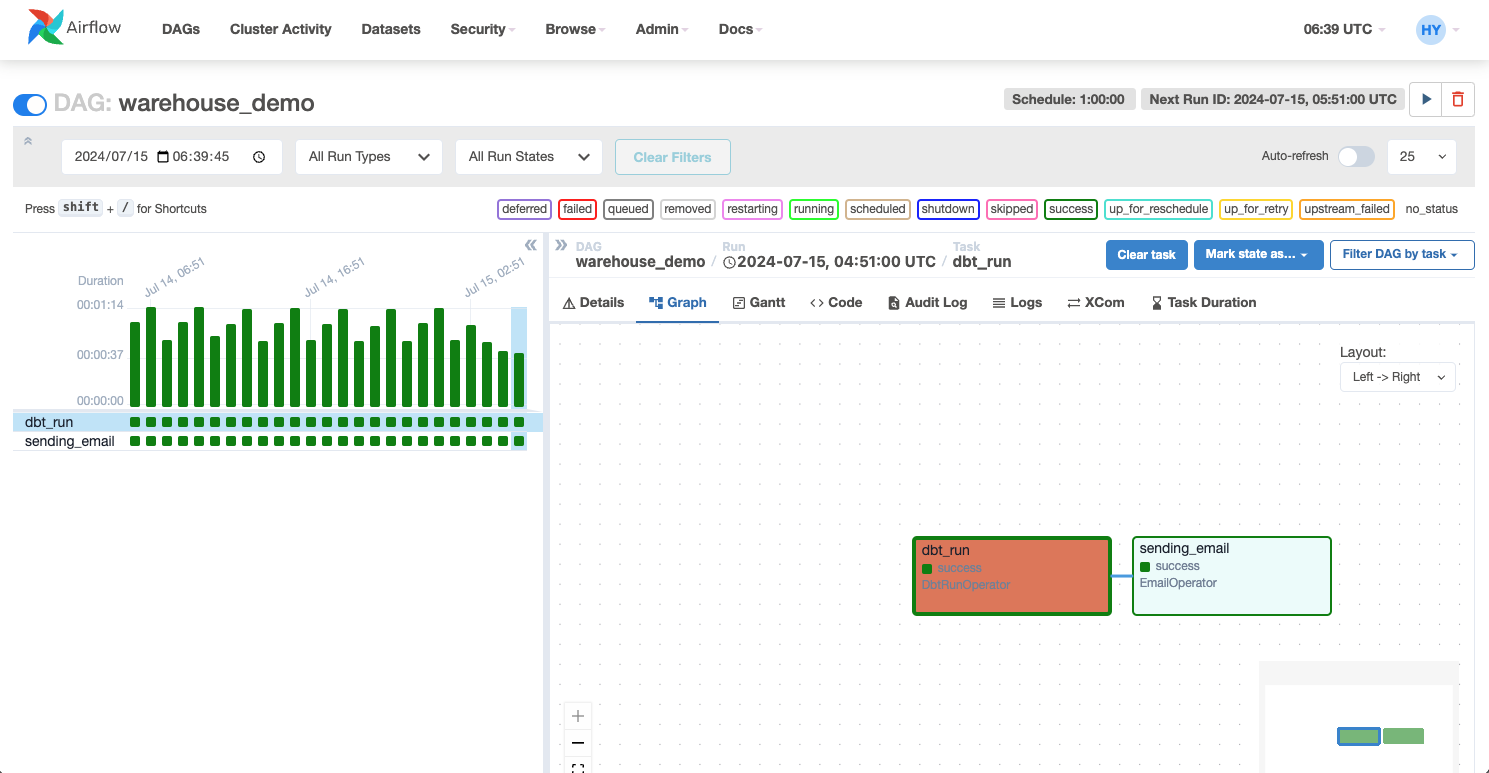
集成 grafana
添加 Prometheus 数据源
- 在 Grafana 首页的左上角,单击
 图标展开左侧边栏,然后选择 Connections > Data sources。
 - 单击 Add data sources,然后选择 Prometheus 为数据源。
- 在 Prometheus 数据源配置页面的 Connection 选项下,输入您的 Prometheus 服务器地址。然后在页面底部,单击 Save & test。
配置 Grafana 大盘
单击
图标展开左侧边栏,然后单击 Dashboards。单击 + Create Dashboard,然后在创建页面的 Import a dashboard 卡片中,单击 Import Dashboard。
上传下载的任意一个大盘配置文件,然后单击 Load。
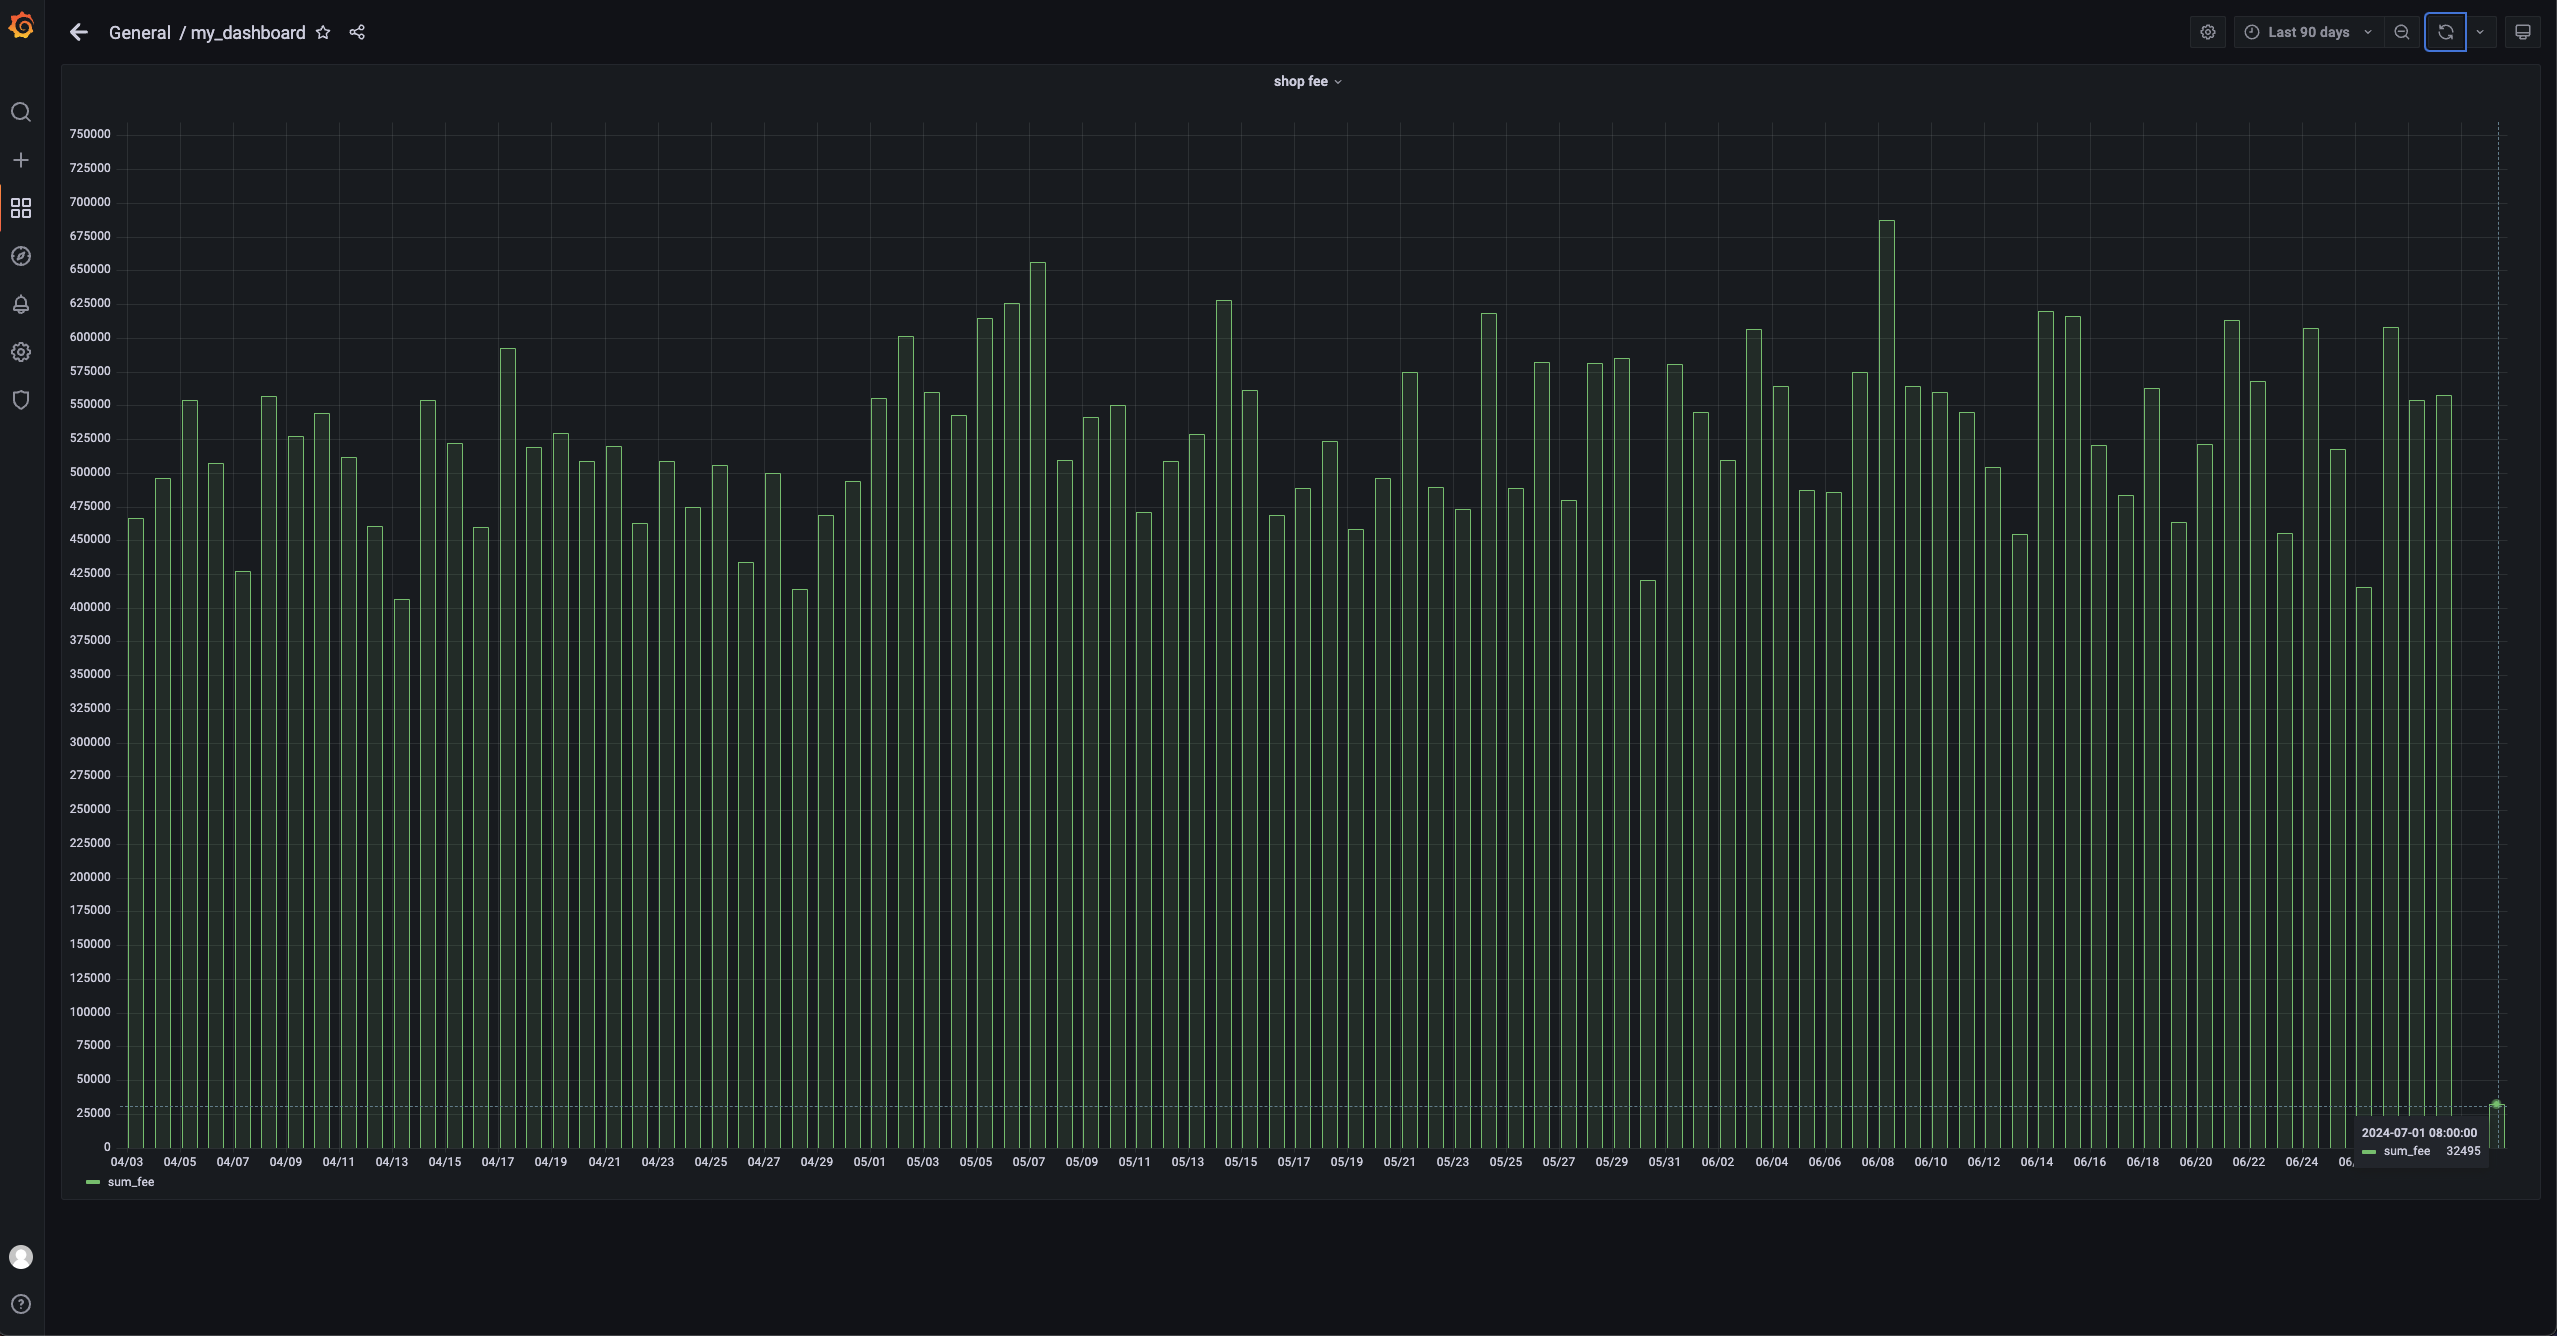
在 Options 页面输入自定义的大盘名称,然后单击 Import,即可查看您的监控大盘数据。或者可以根据需要展示 单 SQL 数据信息。这里我们只展示店铺按日的销售额,我们只关注其中一个店铺的销售额以及所有店铺的销售额。SQL 如下。
SELECT
    ds AS "time",
    sum_fee AS "sum_fee"
FROM dwd_shops
WHERE
    order_shop_id = 35
ORDER BY ds
实施
模拟购买行为
编写一个简单的 python 脚本 test.py 用于模拟用户的购买行为。
# Copyright (c) 2023 OceanBase.
#
# Licensed under the Apache License, Version 2.0 (the "License");
# you may not use this file except in compliance with the License.
# You may obtain a copy of the License at
#
#     http://www.apache.org/licenses/LICENSE-2.0
#
# Unless required by applicable law or agreed to in writing, software
# distributed under the License is distributed on an "AS IS" BASIS,
# WITHOUT WARRANTIES OR CONDITIONS OF ANY KIND, either express or implied.
# See the License for the specific language governing permissions and
# limitations under the License.
import dataclasses
from typing import Dict

import mysql.connector

PRODUCT_ID_2_FEE: Dict[int, float] = {
    1: 5399,
    2: 10099,
    3: 4599,
    4: 5499,
    5: 6499,
}

@dataclasses.dataclass
class Phone:
    product_id: int
    catalog_name: str
    buy_fee: float

def get_max_order_id(cur):
    cur.execute("select order_id from orders order by order_id desc limit 1")
    id = cur.fetchone()
    return next(iter(id))

def get_max_pay_id(cur):
    cur.execute("select pay_id from orders_pay order by pay_id desc limit 1")
    id = cur.fetchone()
    return next(iter(id))

def buy_phone(product_id: int, cursor, user_id=15, shop_id=35):
    cursor.execute("select product_id, catalog_name from product_catalog")
    tuples = cursor.fetchall()
    phones = [
        Phone(
            **{
                "product_id": p_id,
                "catalog_name": c_name,
                "buy_fee": PRODUCT_ID_2_FEE.get(p_id),
            }
        )
        for p_id, c_name in tuples
    ]
    target = next(filter(lambda p: p.product_id == product_id, phones))
    order_id = get_max_order_id(cursor) + 1
    sql = f"insert into `orders`(`order_id`, `user_id`, `shop_id`, `product_id`, `buy_fee`, `create_time`, `update_time`, `state`) values({order_id}, {user_id}, {shop_id}, {product_id}, {target.buy_fee}, now(), now(), 0)"
    cursor.execute(sql)
    pay_id = get_max_pay_id(cursor) + 1
    sql = f"insert into `orders_pay`(`pay_id`, `order_id`, `pay_platform`, `create_time`) values({pay_id}, {order_id}, 'Alipay', now())"
    cursor.execute(sql)
    sql = f"update orders set state=1 where order_id={order_id}"
    cursor.execute(sql)
    cursor.execute("commit")
    print(target)

if __name__ == "__main__":
    with mysql.connector.connect(
        **{
            "host": "******.huawei-cn-southwest-2.oceanbase.cloud",
            "port": "3306",
            "database": "tptest",
            "user": "wktest",
        }
    ) as conn:
        with conn.cursor() as cursor:
            buy_phone(5, cursor)
执行 sh python.py 命令,运行该脚本。
Airflow 调度
等待 1 分钟,Airflow 将会调度之前配置的 DAG,可以根据 Web 界面上的状态判断节点的运行状态同时可以查看任务的日志。
查看数据大盘
查看数据大盘,可以看到最新的数据。这里仅展示店铺按日的销售额,只关注其中一个店铺的销售额以及所有店铺的销售额,可以看到,7.1 的销售额已经变成 32495。