
基于湖库一体架构,统一管理结构化、半结构化与非结构化等多模态数据,一个系统承载事务处理、实时分析与 AI 工作负载。


轻量运维部署方案
更新时间:2026-08-18 17:27:46
编辑
分享
根据不同的业务场景,OceanBase 集中式数据库提供了轻量运维部署方案和平台运维部署方案。本文介绍如何基于轻量运维部署方案进行部署。
有关轻量运维部署方案和平台运维部署方案的介绍,参见 选择合适的部署方案。
注意
两种部署方案下虽然使用的安装包不同,但是其中 OceanBase 集中式数据库的能力是一致的。
您可以根据实际情况选择以下三种方式来进行部署:
(推荐)使用交互式部署:交互安装以脚本实现数据库安装过程中的各种配置选择。
使用 yaml 配置文件部署:如果您有规模化部署的诉求,可以选择该种部署方式。
部署前准备
在开始之前,请确保您已满足以下条件:
准备部署所需的机器资源,且机器满足软硬件要求。详细信息可参见 准备服务器。
生产环境下,您需要进行环境和配置检查,具体操作请参考 部署前配置 章节。
已经获取部署所需的安装包
oceanbase-standalone-all-in-one-x.x.x_xxx_xxx_xxxxxxxx.el7.x86_64.tar.gz。详细信息参见 准备安装包。注意
轻量运维部署方案和平台运维部署方案使用的安装包不同,在获取安装包的时候,务必确保获取到相应的安装包。
说明
可以通过 OceanBase 官网软件下载中心获取集中式数据库安装包。该安装包配置有试用版许可证(非生产用途),有效期为 180 天,仅供您进行学习、测试或适配使用,不提供技术支持及 SLA 保障,不得用于营利性、商业性或生产目的。试用许可证过期后,您将无法继续使用数据库功能。如果您需要将软件用于生产环境,或营利性、商业性目的,并需要专业的技术支持保障,请联系 OceanBase 获取商业版许可。
部署用户拥有 sudo 权限。
说明
部署 OceanBase 集中式数据库推荐使用 admin 用户,也可以使用其他用户(不推荐 root 用户)。但是要求用户具备 sudo 权限和作为数据库相关目录的所有者。
当前机器可以访问待创建 OceanBase 集群的机器,建议机器之间设置免密登录,免密登录设置可参考 (可选)设置无密码 SSH 登录。
使用交互式部署
步骤一:解压集中式数据库安装包
执行如下命令解压安装包 oceanbase-standalone-all-in-one-x.x.x_xxx_xxx_xxxxxxxx.el7.x86_64.tar.gz。
[admin@test001 ~]$ tar -xzf oceanbase-standalone-all-in-one-x.x.x_xxx_xxx_xxxxxxxx.el7.x86_64.tar.gz
步骤二:安装 obd
进入 oceanbase-standalone-all-in-one 的安装目录,执行 install_obd.sh 脚本安装 obd。
[admin@test001 ~]$ cd oceanbase-standalone-all-in-one
[admin@test001 oceanbase-standalone-all-in-one]$ bash bin/install_obd.sh
注意
执行 install_obd.sh 不需要加 sudo 。
该脚本会安装 obd 和 OBClient,并将安装目录下 rpms 目录中的所有安装包复制到 obd 的本地镜像库中,同时关闭远程镜像库。执行成功后输出如下,您可复制并执行输出中的 source ~/.oceanbase-all-in-one/bin/env.sh 命令以应用环境配置。
Disable remote ok
Trace ID: 7bd73a1a-0e08-11f0-b275-00163e49899d
If you want to view detailed obd logs, please run: obd display-trace 7bd73a1a-0e08-11f0-b275-00163e49899d

add auto set env logic to profile: /root/.bash_profile

Execute this command to apply the environment config:` source ~/.oceanbase-all-in-one/bin/env.sh `
步骤三:查看机器可用内存
为了确保能够顺利完成 OceanBase 集中式数据库的安装,安装之前,建议查询下机器的可用内存,确保可用内存满足数据库的资源要求。
运行以下命令,查看内存:
free -g
返回结果如下:
              total        used        free      shared  buff/cache   available
Mem:            174          38           6           0         129         123
Swap:             0           0           0
此处需要保障 available 的 Mem 值足够满足 准备服务器 内 服务器配置要求内 的配置,如果不够,可以尝试清理缓存来释放资源或者更换服务器。
执行以下命令,清理缓存:
sudo sysctl -w vm.drop_caches=3
# 或
sudo echo 3 > /proc/sys/vm/drop_caches
清理完缓存之后,可以运行以上命令,再次确认可用内存是否满足 OceanBase 集中式数据库的要求。
步骤四:启动交互式安装
在 oceanbase-standalone-all-in-one 的安装目录下,执行 install_ob.sh 脚本启动交互式安装流程。
[admin@test001 oceanbase-standalone-all-in-one]$ bash bin/install_ob.sh
您需在交互式安装流程中输入如下内容。
填写当前用户信息。
进入交互式安装流程后,需在打印内容的对应位置输入待安装 OceanBase 集中式数据库的机器 IP 及密码,并二次确认当前用户的登录密码,示例如下:
Enter the IP (Default: 10.xx.xx.x) (only support local IP):
Enter the current user password : *******
Re-enter the current user password : *******
若已为当前用户设置免密登录,可直接单击键盘上
Enter跳过。修改系统参数。
配置节点信息后,若当前机器之前未执行过
install_ob.sh脚本,脚本会获取节点的系统参数,并向您确认是否需要修改,具体如下:get system config ok +----------------------------------------------------------------+ | System Parameter Change List | +--------------+------------------+---------------+--------------+ | ip | need_change_var | current_value | target_value | +--------------+------------------+---------------+--------------+ | 10.xx.xx.x | fs.aio-max-nr | 65536 | 1048576 | | 10.xx.xx.x | vm.max_map_count | 65530 | 655360 | | 10.xx.xx.x | fs.file-max | 3175323 | 6573688 | | 10.xx.xx.x | nofile | 65535 | 655350 | +--------------+------------------+---------------+--------------+ Trace ID: ca3a71c4-0e06-11f0-9c8d-00163e49899d If you want to view detailed obd logs, please run: obd display-trace ca3a71c4-0e06-11f0-9c8d-00163e49899d Do you want to modify the parameters above? (y/n) (Default: y):您可在如上输出位置输入
y或n:若您输入为
y,程序会开始修改对应系统参数,并输出如下提示。get system config ok 10.xx.xx.x: ( fs.aio-max-nr,vm.max_map_count,fs.file-max,nofile ) have been successfully modified! Trace ID: d3011dee-0e06-11f0-ab76-00163e49899d If you want to view detailed obd logs, please run: obd display-trace d3011dee-0e06-11f0-ab76-00163e49899d Do you want to quit the script and manually restart the machine to apply the optimizations? (y/n) (Default: n):此处输入
y会退出部署脚本,输入n则继续部署流程。若您输入为
n,对应系统参数不会被修改,并继续部署流程。
配置集群信息。
您需在对应位置设置 OceanBase 集群的端口、密码和资源信息,直接单击键盘
Enter表示使用默认值,示例如下:说明
脚本会根据机器的资源情况自动获取集群资源配置的取值范围和默认值,机器资源情况不同时,输出的取值范围和默认值也不相同。
#设置集群名,支持大小写字母、数字和下划线,不区分首字符类型
Enter the cluster name (Default: myoceanbase; allowed characters: letters, numbers, and underscores):
#设置集群的 SQL 端口,对应配置文件中的 mysql_port
Enter the OB SQL port (Default: 2881):
#设置集群的 RPC 端口,对应配置文件中的 rpc_port
Enter the OB RPC port (Default: 2882):
#设置集群的 obshell 端口,对应配置文件中的 obshell_port
Enter the obshell port (Default: 2886):
#设置集群 root@sys 用户密码,对应配置文件中的 root_password。未设置时默认会生成一个随机字符串
Enter the OB root password (Default: h**********Wn):
#二次确认 root@sys 用户密码
Confirm the OB root password:
#设置集群可用 CPU 总数,对应配置文件中的 cpu_count。配置的值不能小于 8,小于 8 时会自动将值置为 8。未设置时 obd 会自动检测
Enter the OB cpu count (Default: 8):
#设置集群所用内存,对应配置文件中的 memory_limit
Enter the OB memory limit (Configurable Range[6, 28], Default: 28, Unit: G): 8
#设置 OceanBase 集群的安装目录,对应配置文件中的 home_path,未设置时默认在用户家目录下创建集群同名文件夹
Enter the OB installation directory (Default: /home/admin/myoceanbase):
#设置存储 SSTable 等数据的目录,对应配置文件中的 data_dir,未设置时默认为 /data/1/${cluster_name}
Enter the OB data directory (Default: /data/1/myoceanbase):
#设置存储日志的目录,对应配置文件中的 redo_dir,未设置时默认为 /data/log1/${cluster_name}
Enter the OB log directory (Default: /data/log1/myoceanbase):
#设置集群应用场景优化方案,未设置时默认为 htap
Cluster optimization scenario not specified, please specify the scenario you want to optimize.
1. express_oltp
2. complex_oltp
3. olap
4. htap (default)
5. kv
Please input the scenario you want to optimize [default: 4]:
#设置集群的磁盘数据文件自动扩容的最大空间,对应配置文件中的 datafile_maxsize
Enter the OB datafile maxsize (Configurable Range[16, 134], Default: 134, Unit: G): 20
#设置集群的日志磁盘大小,对应配置文件中的 log_disk_size,推荐为内存规格的三倍以上
Enter the OB log disk size (Configurable Range[16, 136], Default: 22, Unit: G): 20
#控制是否设置开机自启动,对应配置文件中的 enable_auto_start
#仅在非容器环境下展示,开启自启动功能需确保部署用户拥有 sudo 权限,否则部署会报错
#此内容在 obd V3.6.0 版本开始存在,之前版本不存在该内容
Do you want to enable the OceanBase service to start automatically when the system boots up? [y/n] [Default: n]:
#控制是否创建业务租户
Do you want to create tenant for your business workload? (y/n)(Default: y):
(可选)配置租户信息。
若上文询问是否创建业务租户处输入
y,可参照本步骤介绍设置租户信息,若输入n,可跳过本步骤继续部署流程。# sys 租户资源信息 Tenant: sys conifguration: 2C/1G/2G(CPU/Memory/Log disk) system_memory configuration(Unit: G): 1 #设置租户名,支持大小写字母、数字和下划线,不区分首字符类型 Enter the tenant name (Default: test; allowed characters: letters, numbers, and underscores): obmysql #设置租户兼容模式,支持设置为 Oracle 模式和 MySQL 模式,默认为 MySQL 模式 Please select the tenant mode (enter the corresponding number): 1) MySQL 2) Oracle Please enter your choice [1/2] [default 1]: 1 #设置租户的 root 用户密码,未设置时默认为空 Enter the tenant password: #二次确认 root 用户密码 Confirm the tenant password: #设置待创建租户的可用 CPU Enter the tenant cpu (Configurable Range[1, 6], Default: 6): 2 #设置待创建租户的可用内存 Enter the tenant memory (Configurable Range[1, 6], Default: 6, Unit: G): 2 #设置待创建租户的可用日志磁盘大小,配置的大小不能小于 6G Enter the tenant log disk size(Configurable Range[6, 17], Default: 6, Unit: G): 6 #设置创建租户的字符集,默认为 utf8mb4 <main id="notice" type='notice'> <h4>注意</h4> <p>如果创建的 Oracle 模式租户,字符集只有 utf8mb4、gbk、gb18030 这三种可选。</p> </main> Please select the character (enter the corresponding number): 1) utf8mb4 2) utf16 3) gbk 4) gb18030 5) binary Enter the tenant charset (Default: 1): #设置创建租户的排序规则,默认为 utf8mb4_general_ci Please select the tenant collation (enter the corresponding number): 1) utf8mb4_general_ci 2) utf8mb4_bin 3) utf8mb4_unicode_ci 4) utf8mb4_unicode_520_ci 5) utf8mb4_croatian_ci 6) utf8mb4_czech_ci 7) utf8mb4_0900_ai_ci Enter the tenant collation (Default: 1): #设置创建租户的时区,默认为中国标准时间 +08:00(China Standard Time) Please select the tenant time zone (enter the corresponding number): 1) -12:00(International Date Line West) 2) -11:00(Samoa Standard Time) 3) -10:00(Hawaii-Aleutian Standard Time) 4) -09:00(Alaska Standard Time) 5) -08:00(Pacific Standard Time) 6) -07:00(Mountain Standard Time) 7) -06:00(Central Standard Time) 8) -05:00(Eastern Standard Time) 9) -04:00(Atlantic Standard Time) 10) -03:00(Brasilia Standard Time) 11) -02:00(Mid-Atlantic Standard Time) 12) -01:00(Azores Standard Time) 13) +00:00(Greenwich Mean Time) 14) +01:00(Central European Time) 15) +02:00(Eastern European Time) 16) +03:00(Moscow Standard Time) 17) +04:00(Gulf Standard Time) 18) +05:00(Pakistan Standard Time) 19) +06:00(Bangladesh Standard Time) 20) +07:00(Indochina Time) 21) +08:00(China Standard Time) 22) +09:00(Japan Standard Time) 23) +10:00(Australian Eastern Standard Time) 24) +11:00(Solomon Islands Time) 25) +12:00(New Zealand Standard Time) 26) +13:00(Tonga Standard Time) 27) +14:00(Line Islands Time) Enter the tenant time zone (Default: 21): #选择表名是否区分大小写,默认表名以小写存储,不区分大小写 <main id="notice" type='notice'> <h4>注意</h4> <p>此步骤只存在创建 MySQL 模式租户。</p> </main> Please select case sensitivity for table names: 0) Table names are stored as specified and compared case-sensitively # 表名按指定存储,并区分大小写进行比较 1) Table names are stored in lowercase and compared case-insensitively # 表名以小写存储,不区分大小写 2) Table names are stored as specified but compared case-insensitively # 表名按指定存储,但不区分大小写 Please enter your choice [0/1/2] [default 1]:(可选)配置监控信息。
若您在
Do you need to install the monitoring components处输入y,您需设置监控相关信息,具体如下:#设置 OBAgent 监控服务端口,对应配置文件中的 monagent_http_port Enter the OBAgent monitoring service port (Default: 8088): #设置 OBAgent 管理服务端口,对应配置文件中的 mgragent_http_port Enter the OBAgent management service port (Default: 8089): #设置 Prometheus 端口 Enter the Prometheus port (Default: 9090): #设置 Grafana 端口 Enter the Grafana port (Default: 3000):确认配置。
程序会输出您刚刚设置的配置,您需确认这些配置是否正确,示例如下:
#Saved configurations:
 cluster name: myoceanbase
 mysql port: 2881
 rpc port: 2882
 obshell port: 2886
 cpu count: 8
 memory limit: 8G
 home path: /home/admin/myoceanbase
 data dir: /data/1/myoceanbase
 log dir: /data/log1/myoceanbase
 datafile maxsize: 20G
 log disk size: 20G
 tenant name: obmysql
 tenant cpu: 2
 tenant memory: 2G
 tenant log disk size: 6G
 OBAgent monitoring service port: 8088
 OBAgent management service port: 8089
 Prometheus port: 9090
 Grafana port: 3000

 Are you sure these configurations are correct? (y/n) (Default: y):
您需在确认位置输入
y或n:若您输入为y,程序会开始根据配置部署 OceanBase 集群;若您输入为n,部署流程会直接结束。控制是否开启密码加密功能。
Do you want to enable encryption for password security (default_encryption_passkey: ******)? [y/n] [Default: n]:您可在上文位置输入
n选择不开启密码加密功能,输入n将跳过本环节继续部署流程。您也可以输入y设置密码加密,设置后查看集群信息时,密码输出为加密状态,具体可参见官网《OceanBase 安装部署工具》文档密码命令组一文介绍。输入y后需设置一个通行密钥,具体如下:First time setting the encryption passkey. please enter the encryption passkey: Please enter the encryption passkey again: First time setting the encryption passkey successful! Encrypt password ok部署成功。
集群部署成功后会输出组件的部署情况以及对应连接串,具体如下:
.......
.......
Wait for observer init ok
+--------------------------------------------------+
|               oceanbase-standalone               |
+----------------+---------+------+-------+--------+
| ip             | version | port | zone  | status |
+----------------+---------+------+-------+--------+
| 10.xx.xx.x     | 4.4.2.1 | 2881 | zone1 | ACTIVE |
+----------------+---------+------+-------+--------+
obclient -h10.xx.xx.x -P2881 -uroot@sys -p'******' -Doceanbase -A

cluster unique id: 63325ce3-166b-5f23-bdee-c61fd5821959-195ac5efe76-03050204

Connect to Obagent ok
+----------------------------------------------------------------------+
|                               obagent                                |
+-------------------+--------------------+--------------------+--------+
| ip                | mgragent_http_port | monagent_http_port | status |
+-------------------+--------------------+--------------------+--------+
| 10.xx.xx.x        | 8089               | 8088               | active |
+-------------------+--------------------+--------------------+--------+
Connect to Prometheus ok
+-------------------------------------------------------------+
|                          prometheus                         |
+-------------------------------+-------+------------+--------+
| url                           | user  | password   | status |
+-------------------------------+-------+------------+--------+
| http://10.xx.xx.x:9090        | admin | ********   | active |
+-------------------------------+-------+------------+--------+
Connect to grafana ok
+------------------------------------------------------------------------+
|                                grafana                                 |
+-------------------------------------------+-------+-----------+--------+
| url                                       | user  | password  | status |
+-------------------------------------------+-------+-----------+--------+
| http://10.xx.xx.x:3000/d/oceanbase        | admin | ********  | active |
+-------------------------------------------+-------+-----------+--------+

myoceanbase running
Get local repositories ok
Open ssh connection ok
Connect to observer 10.xx.xx.x:2881 ok
Create tenant test ok
obclient -h10.xx.xx.x -P'2881' -p'******' -uroot@obmysql -Doceanbase -A

optimize tenant with scenario: htap ok
If this cluster is for production use, please import a commercial license in time.
See https://www.oceanbase.com/product/ob-deployer/error-codes .
Trace ID: f23bab16-6d15-11f0-8069-00163e0ccfa0
If you want to view detailed obd logs, please run: obd display-trace f23bab16-6d15-11f0-8069-00163e0ccfa0
步骤五:验证部署结果
查看集群列表。
可执行
obd cluster list命令查看集群列表,输入如下,存在部署名为myoceanbase的集群且状态为running,表示集群处于运行中。+----------------------------------------------------------------------+ | Cluster List | +-------------+--------------------------------------+-----------------+ | Name | Configuration Path | Status (Cached) | +-------------+--------------------------------------+-----------------+ | myoceanbase | /home/admin/.obd/cluster/myoceanbase | running | +-------------+--------------------------------------+-----------------+查看集群具体状态。
[admin@test001 ~]$ obd cluster display myoceanbase输出如下:
Get local repositories and plugins ok
Open ssh connection ok
Connect to observer 10.xx.xx.x:2881 ok
Wait for observer init ok
+--------------------------------------------------+
|               oceanbase-standalone               |
+----------------+---------+------+-------+--------+
| ip             | version | port | zone  | status |
+----------------+---------+------+-------+--------+
| 10.xx.xx.x     | 4.4.2.1 | 2881 | zone1 | ACTIVE |
+----------------+---------+------+-------+--------+
obclient -h10.xx.xx.x -P2881 -uroot@sys -p'******' -Doceanbase -A

cluster unique id: 2bca6200-df53-51c7-a9c7-36279ea586de-1985a44a071-03050304

Connect to Obagent ok
+----------------------------------------------------------------------+
|                               obagent                                |
+-------------------+--------------------+--------------------+--------+
| ip                | mgragent_http_port | monagent_http_port | status |
+-------------------+--------------------+--------------------+--------+
| 10.xx.xx.x        | 8089               | 8088               | active |
+-------------------+--------------------+--------------------+--------+
Connect to Prometheus ok
+-------------------------------------------------------------+
|                          prometheus                         |
+-------------------------------+-------+------------+--------+
| url                           | user  | password   | status |
+-------------------------------+-------+------------+--------+
| http://10.xx.xx.x:9090        | admin | ********   | active |
+-------------------------------+-------+------------+--------+
Connect to grafana ok
+------------------------------------------------------------------------+
|                                grafana                                 |
+-------------------------------------------+-------+-----------+--------+
| url                                       | user  | password  | status |
+-------------------------------------------+-------+-----------+--------+
| http://10.xx.xx.x:3000/d/oceanbase        | admin | ********  | active |
+-------------------------------------------+-------+-----------+--------+
Trace ID: a642fc50-046f-11f0-9123-00163e2fbf47
查看集群租户。
obd cluster tenant show myoceanbase输出如下,集群中存在
sys租户和创建的obmysql租户。Get local repositories ok Get deployment connections ok Connect to observer 10.xx.xx.x:2881 ok Select tenant ok +-----------------------------------------------------------------------------------------------------------------------------------------------------------------------------------------+ | tenant base info | +-------------+-------------+--------------------+--------------+---------+---------+-------------+---------------------+---------------------+---------------+-------------+-------------+ | tenant_name | tenant_type | compatibility_mode | primary_zone | max_cpu | min_cpu | memory_size | max_iops | min_iops | log_disk_size | iops_weight | tenant_role | +-------------+-------------+--------------------+--------------+---------+---------+-------------+---------------------+---------------------+---------------+-------------+-------------+ | sys | SYS | MYSQL | RANDOM | 2.0 | 2.0 | 1G | 9223372036854775807 | 9223372036854775807 | 2G | 3 | PRIMARY | | obmysql | USER | MYSQL | RANDOM | 2.0 | 2.0 | 2G | 9223372036854775807 | 9223372036854775807 | 6G | 3 | PRIMARY | +-------------+-------------+--------------------+--------------+---------+---------+-------------+---------------------+---------------------+---------------+-------------+-------------+连接 OceanBase 集群。
您可复制
obd cluster display命令中输出的连接串连接 OceanBase 集中式数据库的 sys 租户,也可根据配置的租户名和密码连接用户租户。连接 OceanBase 集中式数据库的具体介绍可参见 通过 OBClient 连接 OceanBase 租户。obclient -h10.xx.xx.x -P2881 -uroot@obmysql -p
使用 yaml 配置文件部署
注意
以下内容以 x86 架构的 CentOS Linux 7.9 镜像作为环境,其他环境可能略有不同。
步骤一:安装 obd
执行如下命令解压安装包 oceanbase-standalone-all-in-one-x.x.x_xxx_xxx_xxxxxxxx.el7.x86_64.tar.gz。
[admin@test001 ~]$ tar -xzf oceanbase-standalone-all-in-one-x.x.x_xxx_xxx_xxxxxxxx.el7.x86_64.tar.gz
进入 oceanbase-standalone-all-in-one 的安装目录,执行 install_obd.sh 脚本安装 obd。
[admin@test001 oceanbase-standalone-all-in-one]$ bash bin/install_obd.sh
该脚本会安装 obd 和 obclient,并将安装目录下 rpms 目录中的所有安装包复制到 obd 的本地镜像库中,同时关闭远程镜像库。执行成功后输出如下,您可复制并执行输出中的 source ~/.oceanbase-all-in-one/bin/env.sh 命令以应用环境配置。
Disable remote ok
Trace ID: 7bd73a1a-0e08-11f0-b275-00163e49899d
If you want to view detailed obd logs, please run: obd display-trace 7bd73a1a-0e08-11f0-b275-00163e49899d

add auto set env logic to profile: /root/.bash_profile

Execute this command to apply the environment config:` source ~/.oceanbase-all-in-one/bin/env.sh `
步骤二:配置 obd
创建 yaml 格式的配置文件,并参照下文介绍进行配置。完整的配置文件示例可参见下文 配置文件示例。
说明
您需根据您环境的真实情况修改下述参数。
配置用户名和密码。
## Only need to configure when remote login is required user: username: admin # password: your password if need key_file: /home/admin/.ssh/id_rsa # port: your ssh port, default 22 # timeout: ssh connection timeout (second), default 30username为部署 OceanBase 集群使用的用户名,确保待部署 OceanBase 集群的机器中存在该用户。password和key_file均用于验证用户,通常情况下只需要填写一个。注意
在配置秘钥路径后,如果您的秘钥不需要口令,请注释或者删除
password,以免password被视为秘钥口令用于登录,导致校验失败。配置 OceanBase 集中式数据库信息。
oceanbase-standalone:
  servers:
    - ip: 10.xx.xx.x
  global:
    cluster_id: 1
    # please set memory limit to a suitable value which is matching resource.
    memory_limit: 64G # The maximum running memory for an observer
    system_memory: 30G # The reserved system memory. system_memory is reserved for general tenants.
    datafile_size: 192G # Size of the data file.
    datafile_next: 200G
    datafile_maxsize: 1T
    log_disk_size: 192G # The size of disk space used by the clog files.
    enable_syslog_wf: false # Print system logs whose levels are higher than WARNING to a separate log file. The default value is true.
    max_syslog_file_count: 4 # The maximum number of reserved log files before enabling auto recycling. The default value is 0.
    # observer cluster name, consistent with obproxy's cluster_name
    enable_auto_start: true
    appname: obtest
    mysql_port: 2881 # External port for OceanBase Database. The default value is 2881. DO NOT change this value after the cluster is started.
    rpc_port: 2882 # Internal port for OceanBase Database. The default value is 2882. DO NOT change this value after the cluster is started.
    obshell_port: 2886 # Operation and maintenance port for OceanBase Database.
    # The working directory for OceanBase Database. OceanBase Database is started under this directory. This is a required field.
    home_path: /home/admin/observer
    # The directory for data storage. The default value is $home_path/store.
    data_dir: /data
    # The directory for clog. The default value is the same as the data_dir value.
    redo_dir: /redo
    root_password: ****** # root user password, can be empty
    zone: zone1
配置项 是否必选 默认值 说明 servers 必选 无 每台机器需要用 - name: 机器标识名(换行)ip: 机器 IP指定,也可以使用- <ip>的格式指定,此时- <ip>的格式相当于- name: 机器标识名(换行)ip: 机器 IP。memory_limit 可选 0 observer 进程能从环境中获取的最大内存,未配置的情况下以 memory_limit_percentage配置项为准,配置项详细介绍请参考 memory_limit 和 memory_limit_percentage。system_memory 可选 0M 保留的系统内存,该参数值会占用 memory_limit的内存,未配置的情况下 OceanBase 集中式数据库会自适应。datafile_size 可选 0 指定对应节点数据文件(block_file)大小,未配置的情况下以 datafile_disk_percentage配置项为准,详细介绍请参见 datafile_size 和 datafile_disk_percentage。datafile_next 可选 0 控制磁盘空间的增长步长,用于设置自动扩容,未配置的情况下若要开启自动扩容功能可参见 配置磁盘数据文件的动态扩容。 datafile_maxsize 可选 0 限制磁盘空间的最大可用上限,用于设置自动扩容,未配置的情况下若要开启自动扩容功能可参见 配置磁盘数据文件的动态扩容。 log_disk_size 可选 0 用于设置 Redo 日志磁盘的大小,未配置的情况下以 log_disk_percentage配置项为准,详细介绍请参考 log_disk_size 和 log_disk_percentage。enable_auto_start 可选 false 设置是否开启 observer 进程开机自启动功能,该功能需确保部署用户拥有 sudo 权限,且部署环境非容器环境。该参数在 obd V3.6.0 版本开始适用。 enable_syslog_wf 可选 true 设置是否把 WARN 以上级别的系统日志打印到一个单独的日志文件中。 max_syslog_file_count 可选 0 设置在回收日志文件之前可以容纳的日志文件数量。值为 0 时表示不自动清理。 appname 可选 obcluster 设置 OceanBase 集群名。 mysql_port 必选 2881 设置 SQL 服务协议端口号,默认为 2881。 rpc_port 必选 2882 设置远程访问的协议端口号,是 observer 进程跟其他节点进程之间的 RPC 通信端口,默认为 2882。 obshell_port 必选 2886 设置 OceanBase 集中式数据库运维端口,默认为 2886。 home_path 必选 无 OceanBase 集中式数据库安装路径,需确保部署用户拥有该目录的读写权限。 data_dir 可选 $home_path/store 设置存储 SSTable 等数据的目录,需确保部署用户拥有该目录的读写权限。建议配置为独立的磁盘。 redo_dir 可选 默认与 data_dir相同clog 的目录,默认与 data_dir 值相同,需确保部署用户拥有该目录的读写权限。建议配置为独立的磁盘。 root_password 可选 随机字符串 OceanBase 集群的超级管理员(root@sys)的密码,建议设置复杂的密码。 (可选)配置监控信息。
说明
若 OceanBase 集群中无需部署监控,您可略去本节配置。
obagent:
  depends:
    - oceanbase-standalone
  servers:
    - ip: 10.xx.xx.x
  global:
    home_path: /home/admin/obagent
    monagent_http_port: 8088
    mgragent_http_port: 8089
prometheus:
  depends:
    - obagent
  servers:
    - 10.xx.xx.x
  global:
    # The working directory for prometheus. prometheus is started under this directory. This is a required field.
    home_path: /home/admin/prometheus
    port: 9090
grafana:
  depends:
    - prometheus
  servers:
    - 10.xx.xx.x
  global:
    home_path: /home/admin/grafana
    login_password: '********' # Grafana login password.
    port: 3000
配置项 是否必选 默认值 说明 servers 必选 无 每台机器需要用 - name: 机器标识名(换行)ip: 机器 IP指定,也可以使用- <ip>的格式指定,此时- <ip>的格式相当于- name: 机器标识名(换行)ip: 机器 IP。说明
obagent组件下的servers配置需和oceanbase组件下保持一致。home_path 必选 无 组件的安装路径。 monagent_http_port 必选 8088 OBAgent 监控服务端口。 mgragent_http_port 必选 8089 OBAgent 管理服务端口。 prometheus->port 必选 9090 Prometheus 监听端口。 grafana->port 必选 3000 访问 Grafana 的 要使用的 http 端口。 login_password 可选 随机字符串 Grafana 的登录密码。
步骤三:查看机器可用内存
为了确保能够顺利完成 OceanBase 集中式数据库的安装,安装之前,建议查询下机器的可用内存,确保可用内存满足数据库的资源要求。
运行以下命令,查看内存:
free -g
返回结果如下:
              total        used        free      shared  buff/cache   available
Mem:            174          38           6           0         129         123
Swap:             0           0           0
此处需要保障 available 的 Mem 值足够满足 准备服务器 内 服务器配置要求内 的配置,如果不够,可以尝试清理缓存来释放资源或者更换服务器。
执行以下命令,清理缓存:
sudo sysctl -w vm.drop_caches=3
# 或
sudo echo 3 > /proc/sys/vm/drop_caches
清理完缓存之后,可以运行以上命令,再次确认可用内存是否满足 OceanBase 集中式数据库的要求。
步骤四:部署 OceanBase 集群
说明
本节中所使用命令的详细使用方法可参见 obd 常用命令。中集群部署下的配置文件部署。
部署 OceanBase 集群。
[admin@test001 ~]$ obd cluster deploy obtest -c obtest.yaml此处以使用配置文件
obtest.yaml部署obtest集群为例,您需根据实际配置文件名修改,并自定义部署集群名。启动 OceanBase 集群。
[admin@test001 ~]$ obd cluster start obtest部署成功后输出如下:
Connect to observer 10.xx.xx.x:2881 ok
Wait for observer init ok
+-------------------------------------------------+
|              oceanbase-standalone               |
+---------------+---------+------+-------+--------+
| ip            | version | port | zone  | status |
+---------------+---------+------+-------+--------+
| 10.xx.xx.x    | 4.4.2.1 | 2881 | zone1 | ACTIVE |
+---------------+---------+------+-------+--------+
obclient -h10.xx.xx.x -P2881 -uroot@sys -p'**********' -Doceanbase -A

cluster unique id: e2b00b0c-6646-55d9-875e-6b5bfee54f6c-195adacfbf5-03050204

Connect to Obagent ok
+------------------------------------------------------------------+
|                             obagent                              |
+---------------+--------------------+--------------------+--------+
| ip            | mgragent_http_port | monagent_http_port | status |
+---------------+--------------------+--------------------+--------+
| 10.xx.xx.x    | 8089               | 8088               | active |
+---------------+--------------------+--------------------+--------+
Connect to Prometheus ok
+----------------------------------------------------------+
|                        prometheus                        |
+----------------------------+-------+------------+--------+
| url                        | user  | password   | status |
+----------------------------+-------+------------+--------+
| http://10.xx.xx.x:9090     | admin | ********   | active |
+----------------------------+-------+------------+--------+
Connect to grafana ok
+---------------------------------------------------------------------+
|                               grafana                               |
+----------------------------------------+-------+-----------+--------+
| url                                    | user  | password  | status |
+----------------------------------------+-------+-----------+--------+
| http://10.xx.xx.x:3000/d/oceanbase     | admin | ********  | active |
+----------------------------------------+-------+-----------+--------+
obtest running
Trace ID: 250a5a24-04a2-11f0-be82-00163e2fbf47
步骤五:连接 OceanBase 集群
此处以使用 OBClient 客户端连接 OceanBase 集群为例:
obclient -h<IP> -P<PORT> -u<user_name>@<tenant_name> -p -c -A
# example
obclient -h10.xx.xx.x -P2881 -uroot@sys -p -c -A
参数说明:
-h:提供 OBServer 节点 IP。-u:提供 OceanBase 集中式数据库的连接账户。-P:提供 OceanBase 集中式数据库连接端口,为mysql_port配置项的值。-p:提供 OceanBase 集中式数据库连接密码。-c:表示在 OBClient 运行环境中不要忽略注释。说明
Hint 是特殊的注释,不受
-c影响。-A:表示在 OBClient 连接数据库时不自动获取统计信息。
更多连接 OceanBase 集群的详细操作可参见 连接 OceanBase 集中式数据库(MySQL 模式) 章节和 连接 OceanBase 集中式数据库(Oracle 模式) 章节。
后续操作
您可执行如下命令对 obd 部署的集群进行管理。更多操作详见 obd 常用命令 中的集群管理。
查看集群列表
obd cluster list查看集群状态,以部署名为
obtest为例obd cluster display obtest修改集群配置
OceanBase 集中式数据库有数百个配置项,有些配置是耦合的,在您熟悉 OceanBase 集中式数据库之前,不建议您修改示例配件文件中的配置。
执行如下命令打开配置文件,修改集群配置:
obd cluster edit-config obtest修改配置并保存退出后,obd 会告知如何使得此次修改生效,复制 obd 输出的命令即可。保存修改后输出如下:
Search param plugin and load ok
Search param plugin and load ok
Parameter check ok
Save deploy "obtest" configuration
Use `obd cluster reload obtest` to make changes take effect.
复制执行输出中的
obd cluster reload obtest命令即可使修改生效。创建用户租户,以为
obtest集群创建test租户为例obd cluster tenant create obtest -n test --max-cpu=2 --memory-size=2G --log-disk-size=3G --max-iops=10000 --iops-weight=2 --unit-num=1 --charset=utf8 -o htap -s 'ob_tcp_invited_nodes="%"'除使用 obd 命令外,您也可通过 SQL 命令创建用户租户,详细操作可参考 创建租户。
停止运行中的集群,以部署名为
obtest为例obd cluster stop obtest销毁已部署的集群,以部署名为
obtest为例obd cluster destroy obtest
配置文件示例
仅部署 OceanBase 集中式数据库
全组件集群
此处示例为仅部署 OceanBase 集中式数据库。
user:
  username: admin
  # password: ********
  key_file: /home/admin/.ssh/id_rsa
oceanbase-standalone:
  servers:
    - ip: 10.xx.xx.x
  global:
    cluster_id: 1
    # please set memory limit to a suitable value which is matching resource.
    memory_limit: 64G # The maximum running memory for an observer
    system_memory: 30G # The reserved system memory. system_memory is reserved for general tenants.
    datafile_size: 192G # Size of the data file.
    datafile_next: 200G
    datafile_maxsize: 1T
    log_disk_size: 192G # The size of disk space used by the clog files.
    enable_syslog_wf: false # Print system logs whose levels are higher than WARNING to a separate log file. The default value is true.
    max_syslog_file_count: 4 # The maximum number of reserved log files before enabling auto recycling. The default value is 0.
    # observer cluster name, consistent with obproxy's cluster_name
    appname: obtest
    mysql_port: 2881 # External port for OceanBase Database. The default value is 2881. DO NOT change this value after the cluster is started.
    rpc_port: 2882 # Internal port for OceanBase Database. The default value is 2882. DO NOT change this value after the cluster is started.
    obshell_port: 2886 # Operation and maintenance port for OceanBase Database.
    # The working directory for OceanBase Database. OceanBase Database is started under this directory. This is a required field.
    home_path: /home/admin/observer
    # The directory for data storage. The default value is $home_path/store.
    data_dir: /data
    # The directory for clog. The default value is the same as the data_dir value.
    redo_dir: /redo
    root_password: ****** # root user password, can be empty
    zone: zone1
此处示例为部署 OceanBase 集中式数据库,并同时部署监控组件。
user:
  username: admin
  # password: ********
  key_file: /home/admin/.ssh/id_rsa
oceanbase-standalone:
  servers:
    - ip: 10.xx.xx.x
  global:
    # please set memory limit to a suitable value which is matching resource.
    memory_limit: 64G # The maximum running memory for an observer
    system_memory: 30G # The reserved system memory. system_memory is reserved for general tenants.
    datafile_size: 192G # Size of the data file.
    datafile_next: 200G
    datafile_maxsize: 1T
    log_disk_size: 192G # The size of disk space used by the clog files.
    enable_syslog_wf: false # Print system logs whose levels are higher than WARNING to a separate log file. The default value is true.
    max_syslog_file_count: 4 # The maximum number of reserved log files before enabling auto recycling. The default value is 0.
    # observer cluster name, consistent with obproxy's cluster_name
    appname: obdemo
    root_password: ********
    mysql_port: 2881
    rpc_port: 2882
    obshell_port: 2886
    home_path: /home/admin/observer
    data_dir: /data
    redo_dir: /redo
    zone: zone1
obagent:
  depends:
    - oceanbase-standalone
  servers:
    - ip: 10.xx.xx.x
  global:
    home_path: /home/admin/obagent
    monagent_http_port: 8088
    mgragent_http_port: 8089
prometheus:
  depends:
    - obagent
  servers:
    - 10.xx.xx.x
  global:
    # The working directory for prometheus. prometheus is started under this directory. This is a required field.
    home_path: /home/admin/prometheus
    port: 9090
grafana:
  depends:
    - prometheus
  servers:
    - 10.xx.xx.x
  global:
    home_path: /home/admin/grafana
    login_password: '********' # Grafana login password.
    port: 3000
使用 obd 白屏部署
注意
使用 obd 白屏部署集中式数据库,需要使用 obd V3.3.0 及以上版本。
步骤一:解压集中式数据库安装包
执行如下命令解压安装包 oceanbase-standalone-all-in-one-x.x.x_xxx_xxx_xxxxxxxx.el7.x86_64.tar.gz。
[admin@test001 ~]$ tar -xzf oceanbase-standalone-all-in-one-x.x.x_xxx_xxx_xxxxxxxx.el7.x86_64.tar.gz
步骤二:安装 obd
- 安装 obd。
进入 oceanbase-standalone-all-in-one 的安装目录,执行 install_obd.sh 脚本安装 obd。
[admin@test001 oceanbase-standalone-all-in-one]$ bash bin/install_obd.sh
注意
执行 install_obd.sh 命令不需要加 sudo 。
该脚本会安装 obd 和 OBClient,并将安装目录下 rpms 目录中的所有安装包复制到 obd 的本地镜像库中,同时关闭远程镜像库。
Disable remote ok
Trace ID: 7bd73a1a-0e08-11f0-b275-00163e49899d
If you want to view detailed obd logs, please run: obd display-trace 7bd73a1a-0e08-11f0-b275-00163e49899d

add auto set env logic to profile: /root/.bash_profile

Execute this command to apply the environment config:` source ~/.oceanbase-all-in-one/bin/env.sh `
- 应用环境配置。
obd 安装完成后,需要应用环境配置,您可复制并执行 obd 安装完后输出的 source ~/.oceanbase-all-in-one/bin/env.sh 命令。
[admin@test001 oceanbase-standalone-all-in-one]$ source ~/.oceanbase-all-in-one/bin/env.sh
步骤三:查看机器可用内存
为了确保能够顺利完成 OceanBase 集中式数据库的安装,安装之前,建议查询下机器的可用内存,确保可用内存满足数据库的资源要求。
运行以下命令,查看内存:
free -g
返回结果如下:
              total        used        free      shared  buff/cache   available
Mem:            174          38           6           0         129         123
Swap:             0           0           0
此处需要保障 available 的 Mem 值足够满足 准备服务器 内 服务器配置要求内 的配置,如果不够,可以尝试清理缓存来释放资源或者更换服务器。
执行以下命令,清理缓存:
sudo sysctl -w vm.drop_caches=3
# 或
sudo echo 3 > /proc/sys/vm/drop_caches
清理完缓存之后,可以运行以上命令,再次确认可用内存是否满足 OceanBase 集中式数据库的要求。
步骤四:启动图形化界面
启动图形化界面
命令行执行
obd web命令启动图形化界面,单击输出的地址访问图形化界面。[admin@test001 ~]$ obd web start OBD WEB in 0.0.0.0:8680 please open http://10.10.10.1:8680说明
- 图形化界面默认使用 8680 端口,您可使用
obd web -p <PORT>命令指定端口。 - 在阿里云或其他云环境下,可能出现程序无法获取公网 IP,从而输出内网地址的情况,此 IP 非公网地址,您需要使用正确的地址访问图形化界面。
obd web命令绑定在 0.0.0.0 上,在多网卡部署的情况下,您可通过任意一个可访问的 IP 访问图形化界面。- 执行
obd web命令不需要加 sudo 。
- 图形化界面默认使用 8680 端口,您可使用
(可选)鼠标放置到图形化操作界面右上角的 中文 字符处可根据显示的语种单击切换中英文界面。
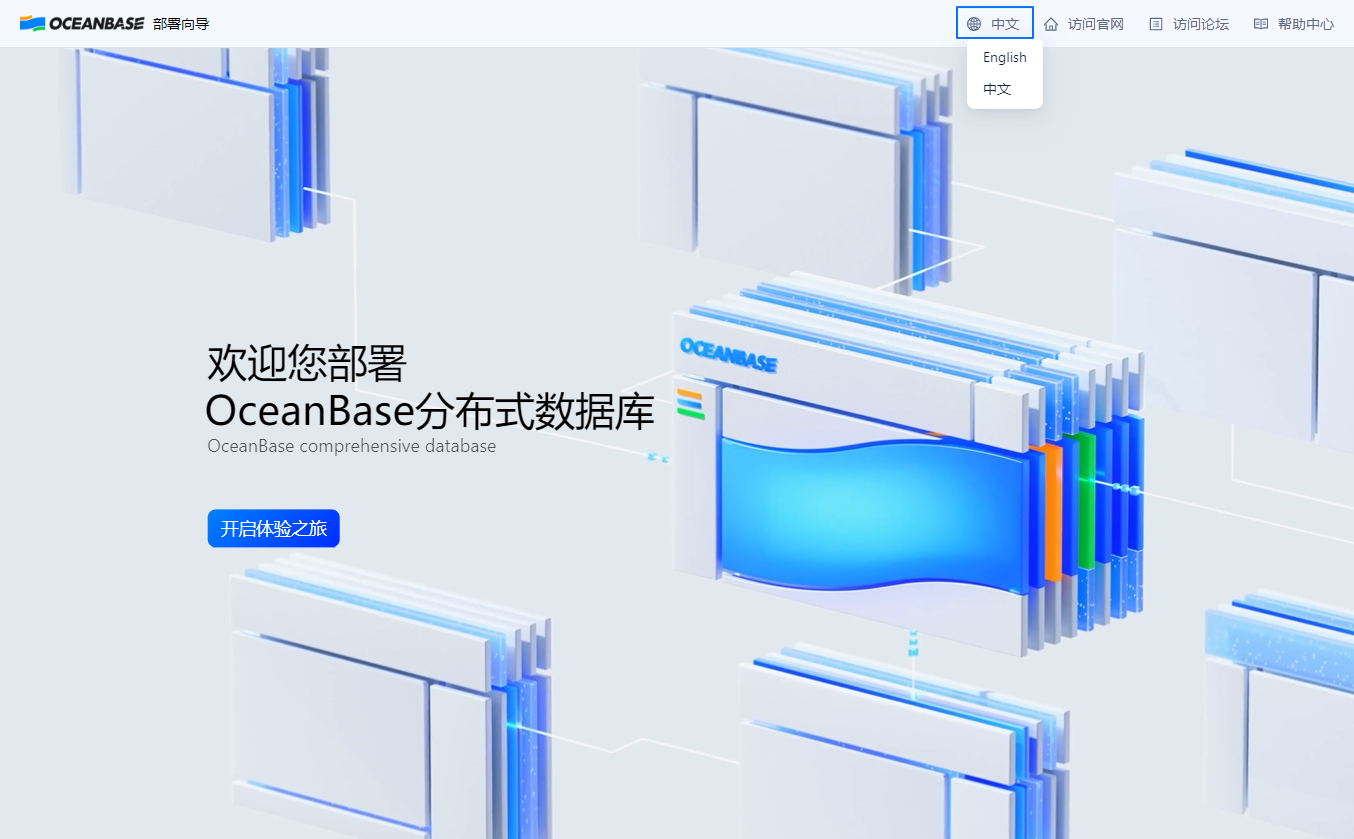
在图形化界面中单击 开启体验之旅,在显示的 欢迎使用 OceanBase 部署向导 界面选择 OceanBase 及配套工具 模块,单击 安装 后进入 OceanBase 集中式数据库部署界面。
步骤五:部署配置
您可在 部署配置 界面配置集群名称、部署模式、负载类型和部署组件,部署配置 界面内容如下。
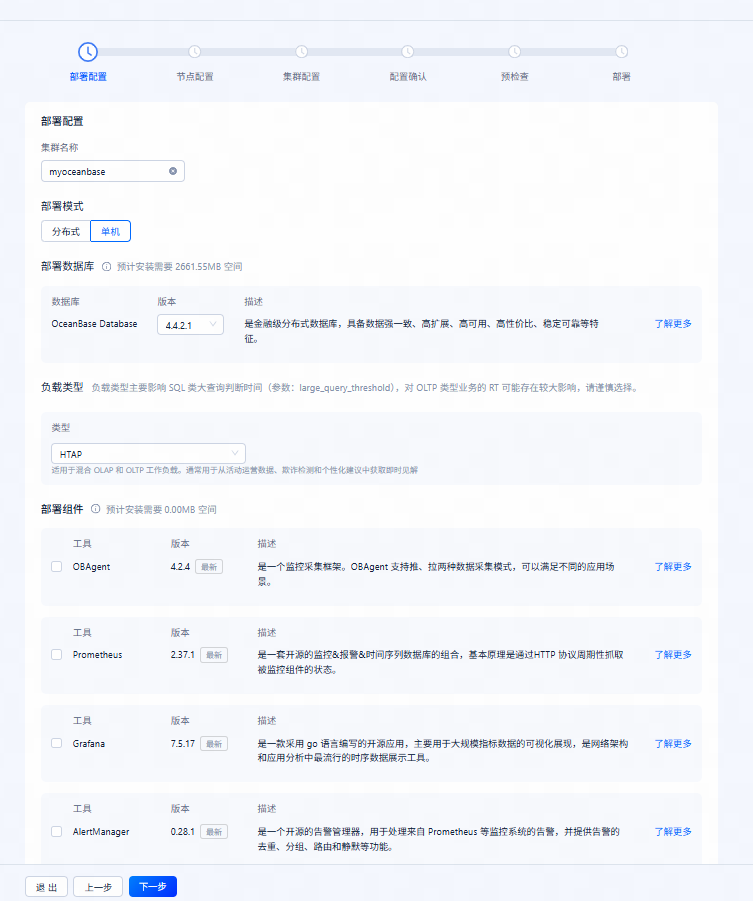
| 模块 | 说明 |
|---|---|
| 部署配置 | 集群名称为 obd 专用部署产品的唯一名称,默认为 myoceanbase,可自定义,但不可和已部署集群名重复。集群名需以英文字母开头、英文或数字结尾,可包含英文、数字和下划线,且长度在 2 ~ 32 个字符之间。您可通过 obd cluster list 命令查看 obd 中管理的集群。 |
| 部署模式 | 分为分布式和单机,部署集中式数据库请选择单机。 |
| 部署数据库 | 单击 版本 下的下拉框可自行选择 OceanBase 集中式数据库的版本,单击 了解更多 可跳转查看对应组件的文档介绍。 |
| 负载类型 | 单击 类型 下的下拉框可自行选择对应的负载类型。 |
| 可选组件 | 您可通过单击 可选组件 下对应组件前的勾选框设置是否部署对应组件,组件版本固定为最新版本,单击对应组件后的 了解更多 可跳转查看对应组件的文档介绍。
说明Grafana 和 AlertManager 组件的部署依赖 OBAgent 和 Prometheus 组件,Prometheus 组件的部署依赖 OBAgent 组件。具体体现如下:
|
配置完成之后单击 下一步 可进入到 节点配置 页面。
步骤六:节点配置
您可在 节点配置 界面配置数据库和组件节点,部署用户以及软件安装路径,节点配置 界面内容如下。
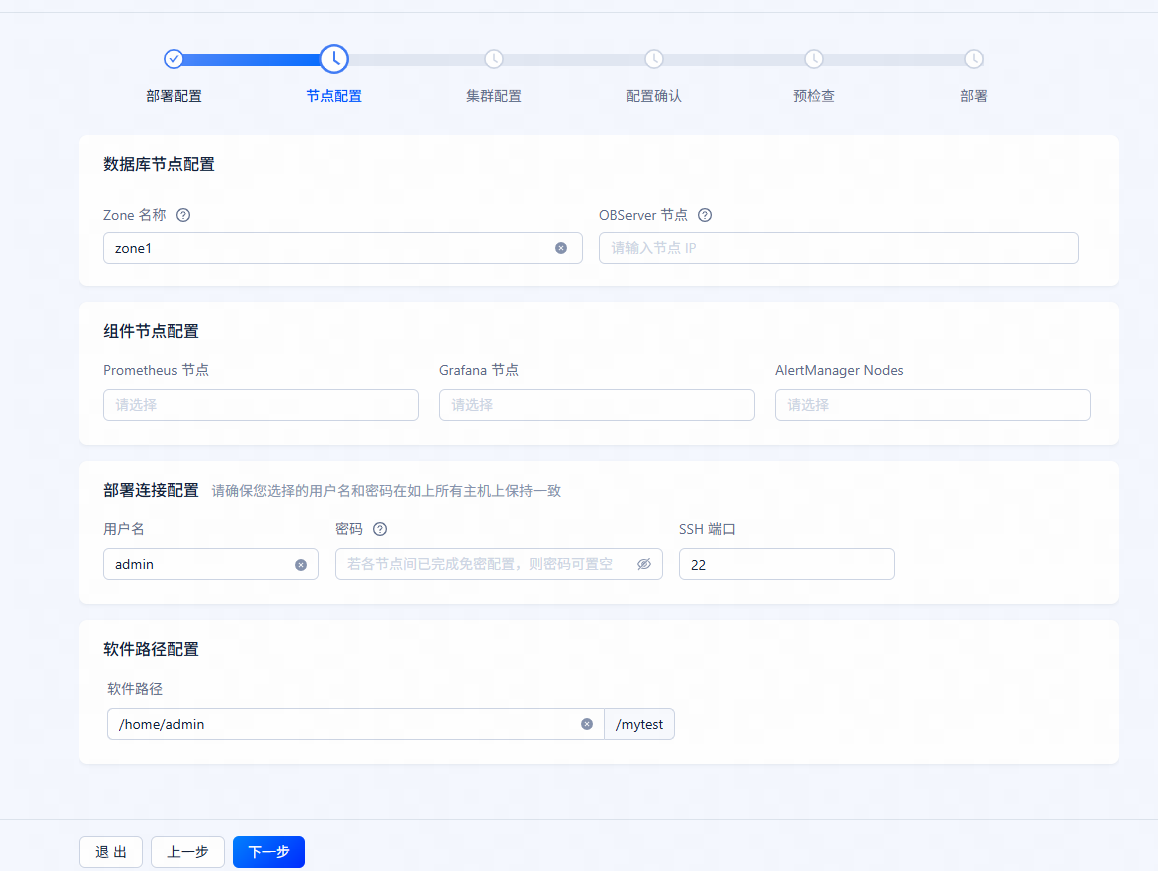
| 模块 | 参数 | 说明 |
|---|---|---|
| 数据库节点配置 | Zone 名称 | 配置 OceanBase 集中式数据库中的 Zone 名称,可自定义。Zone 名称需以英文字母开头,英文或数字结尾,可包含英文、数字和下划线且长度在 2~32 个字符之间。 |
| OBServer 节点 | 配置 OceanBase 集群中的 OBServer 节点 IP,此处只能输入一个 IP。 | |
| 组件节点配置 | Prometheus 节点 | 配置完 OBServer 节点 IP 后,会自动配置 Prometheus 节点 IP,如果 Prometheus 组件部署的节点与 OBServer 节点不一致,可以在此处手动填写节点 IP。
注意配置与 OBServer 节点不同的节点,需要以下要求:
|
| Grafana 节点 | 配置完 OBServer 节点 IP 后,会自动配置 Grafana 节点 IP,如果 Grafana 组件部署的节点与 OBServer 节点不一致,可以在此处手动填写节点 IP。
注意配置与 OBServer 节点不同的节点,需要以下要求:
|
|
| AlertManager Nodes | 配置完 OBServer 节点 IP 后,会自动配置 AlertManager Nodes IP,如果 AlertManager 组件部署的节点与 OBServer 节点不一致,可以在此处手动填写节点 IP。
注意配置与 OBServer 节点不同的节点,需要以下要求:
|
|
| 部署连接配置 | 用户名 | 配置部署 OceanBase 集群的用户名,默认为当前进程的启动用户,支持自定义用户名。 |
| 密码 | 对应用户登录服务器节点的密码,如各节点间已配置免密可免去输入密码。 | |
| SSH 端口 | 默认为 22 端口,支持自定义 SSH 端口。 | |
| 软件路径配置 | 软件路径 | 默认为部署用户的家目录,可自定义修改。配置后会在对应目录下创建 集群名称 同名文件夹。 |
配置完成之后单击 下一步 可进入到 集群配置 页面。
步骤七:集群配置
集群配置 界面可对集群进行配置,包括系统租户的管理员用户(root@sys)密码、数据和日志目录、数据库及各组件的端口和参数配置等,本节将分别进行介绍。
集群配置
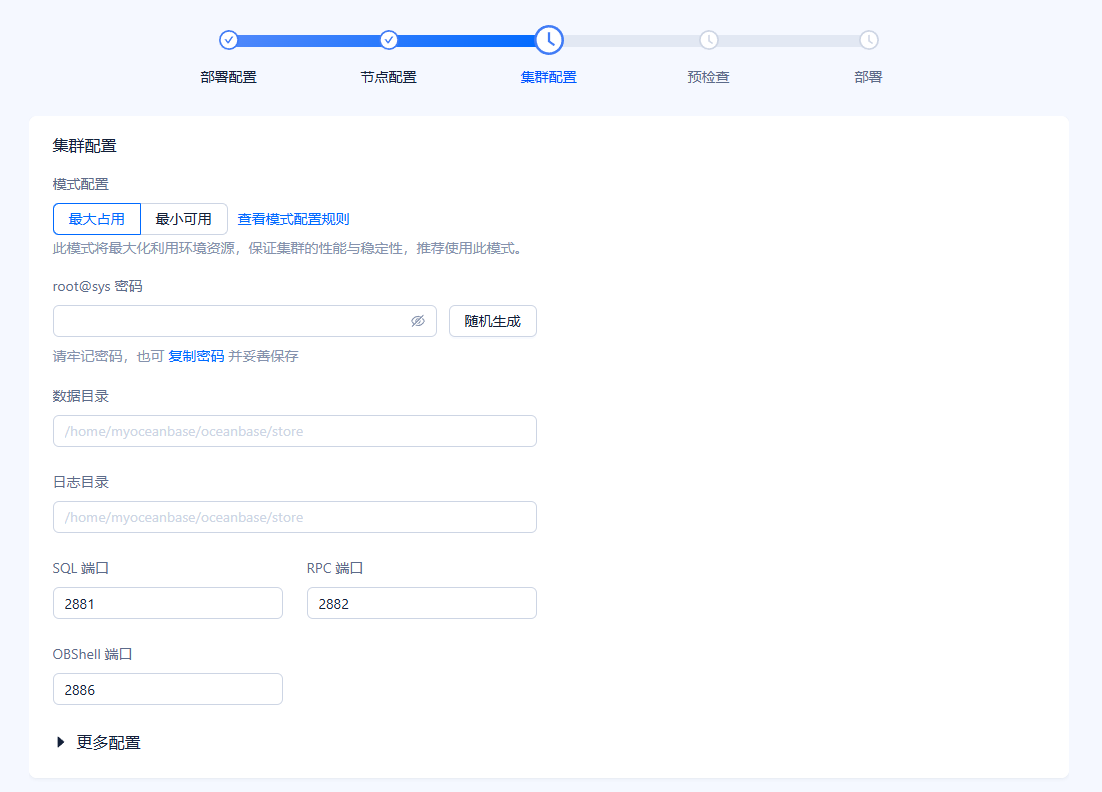
参数 说明 模式配置 可选择 最大占用 或 最小可用,最大占用 模式将最大化利用环境资源,保证集群的性能与稳定性,推荐使用;最小可用 模式配置满足集群正常运行的资源参数。两种模式的详细介绍可参考 模式配置规则 一文。 root@sys 密码 可单击 随机生成,由 obd 自动生成随机字符串,也可自定义设置。自定义设置时,密码复杂度需满足如下要求: - 长度为 8~32 位字符
- 包含以下四种类型字符中至少三种:数字(0~9)、大写字母(A~Z)、小写字母(a~z)和特殊字符(
~!@#%^&*_-+=|(){}[]:;,.?/)
数据目录 默认在 节点配置 页面中配置的 软件路径 下,需为以 /开头的绝对路径,支持自定义设置,但需确保设置的目录为空。日志目录 默认在 节点配置 页面中配置的 软件路径 下,需为以 /开头的绝对路径,支持自定义设置,但需确保设置的目录为空。SQL 端口 SQL 服务协议端口号,默认为 2881,可自定义设置(仅支持 1025~65535 范围),需确保设置的端口未被占用。RPC 端口 远程访问的协议端口号,默认为 2882,可自定义设置(仅支持 1025~65535 范围),需确保设置的端口未被占用。OBShell 端口 OceanBase 集中式数据库运维端口,默认为 2886,可自定义设置(仅支持 1025~65535 范围),需确保设置的端口未被占用。更多配置 可单击 更多配置 前的展开按钮查看并配置对应的集群参数,可使用自动分配的值进行配置,也可自定义各个参数。 说明
可通过 更多配置 中的
enable_auto_start参数控制是否开启 observer 进程开机自启动功能,启用该功能需确保部署用户拥有 sudo 权限,且部署环境非容器环境。组件配置
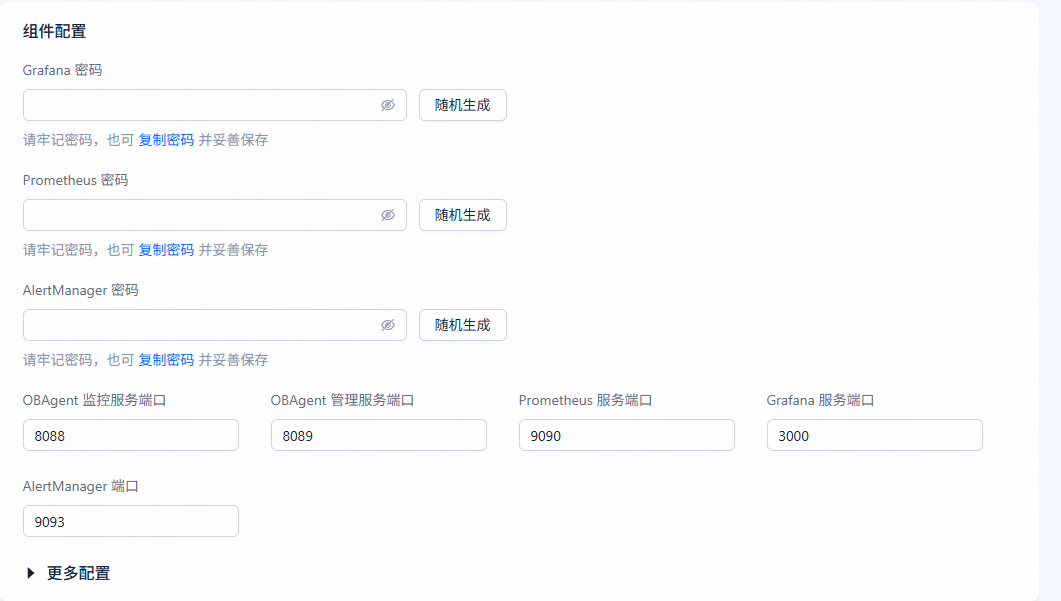
参数 说明 Grafana 密码 Grafana 管理员账号的登录密码,可单击 随机生成,由 obd 自动生成随机字符串,也可自定义设置。自定义设置时,密码复杂度需满足如下要求: - 长度为 8~32 个字符
- 至少包含以下四种类型字符各 2 个:数字(0~9)、大写字母(A~Z)、小写字母(a~z)和特殊字符(
~!@#%^&*_-+=|(){}[]:;,.?/`$"<></code>)
配置后可单击 复制密码,复制后保存已配置的密码。Prometheus 密码 Prometheus 服务的登录密码,可单击 随机生成,由 obd 自动生成随机字符串,也可自定义设置。自定义设置时,密码复杂度需满足如下要求: - 长度为 8~32 个字符
- 至少包含以下四种类型字符各 2 个:数字(0~9)、大写字母(A~Z)、小写字母(a~z)和特殊字符(
~!@#%^&*_-+=|(){}[]:;,.?/`$"<></code>)
配置后可单击 复制密码,复制后保存已配置的密码。AlertManager 密码 AlertManager 服务的登录密码,可单击 随机生成,由 obd 自动生成随机字符串,也可自定义设置。自定义设置时,密码复杂度需满足如下要求: - 长度为 8~32 个字符
- 至少包含以下四种类型字符各 2 个:数字(0~9)、大写字母(A~Z)、小写字母(a~z)和特殊字符(
~!@#%^&*_-+=|(){}[]:;,.?/`$"<></code>)
配置后可单击 复制密码,复制后保存已配置的密码。OBAgent 监控服务端口 默认为 8088,可自定义设置(仅支持 1025~65535 范围),需确保设置的端口未被占用。OBAgent 管理服务端口 默认为 8089,可自定义设置(仅支持 1025~65535 范围),需确保设置的端口未被占用。Prometheus 服务端口 Prometheus 服务监听的端口,默认为 9090,可自定义设置(仅支持 1025~65535 范围),需确保设置的端口未被占用。Grafana 服务端口 访问 Grafana 页面时使用的 HTTP 端口,默认为 3000,可自定义设置(仅支持 1025~65535 范围),需确保设置的端口未被占用。AlertManager 服务端口 默认为 9093,可自定义设置(仅支持 1025~65535 范围),需确保设置的端口未被占用。更多配置 可单击 更多配置 前的展开按钮查看并配置对应的组件参数,可使用自动分配的值进行配置,也可自定义各个参数。
全部配置完成后,单击 下一步 即可进入到 配置确认 页面。
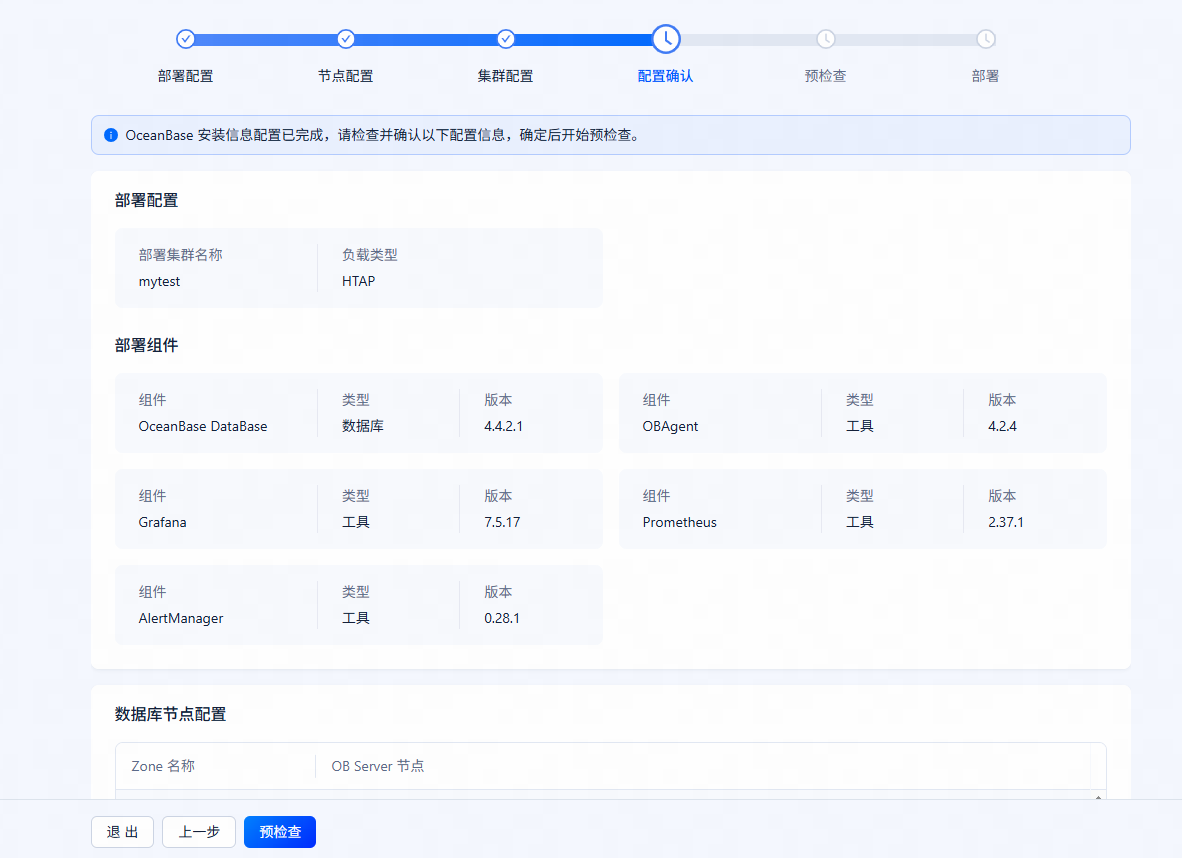
步骤八:配置确认
在 配置确认 页面查看所有配置信息,若发现问题可单击 上一步 进行修改;确认无误后,单击 预检查 进行检查。
步骤九:预检查
若预检查报错,您可根据页面建议选择 自动修复(针对可自动修复的检查项)或者单击 了解更多方案 跳转至错误码文档,参考文档自行修改。所有报错修改后,可单击 重新检查 再次进行预检查。
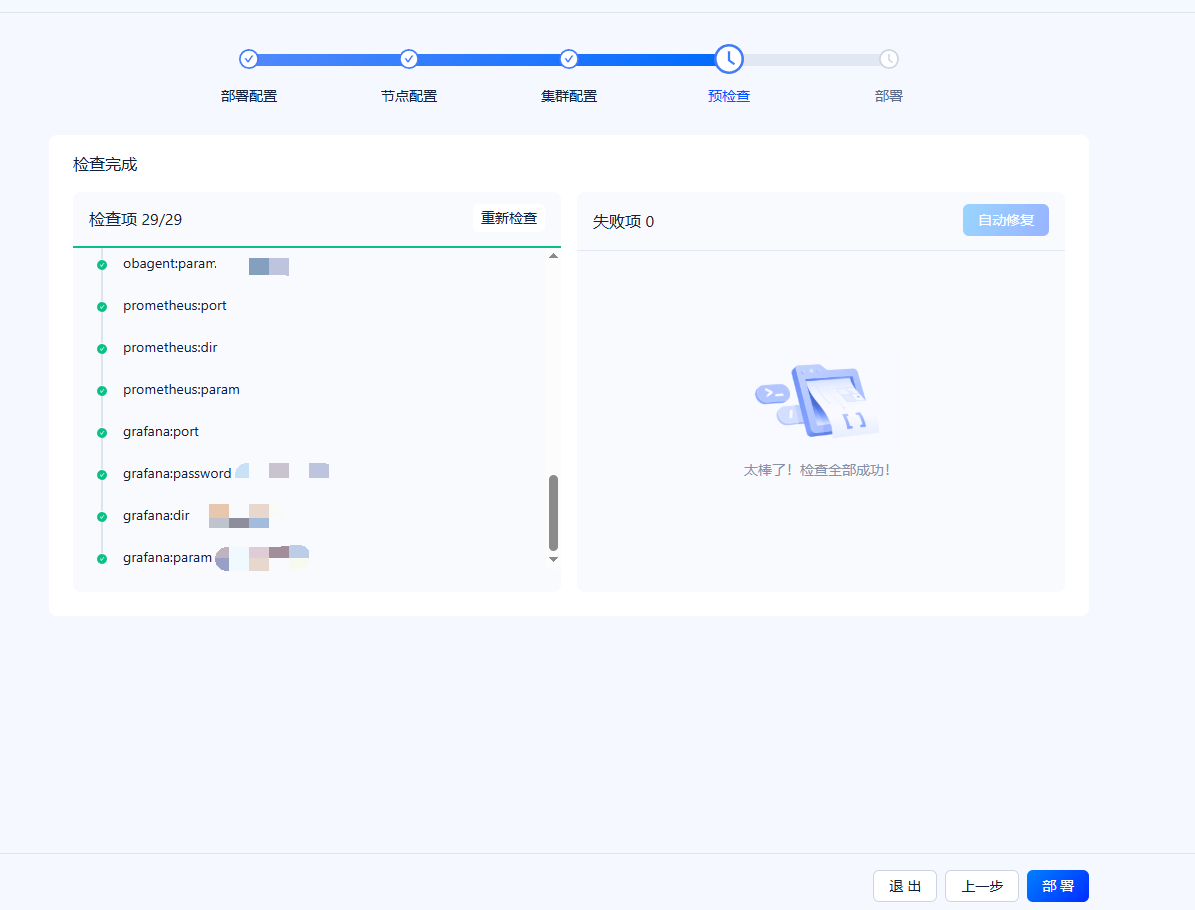
预检查通过后,单击 部署 即可开始 OceanBase 集中式数据库的部署。
步骤十:部署
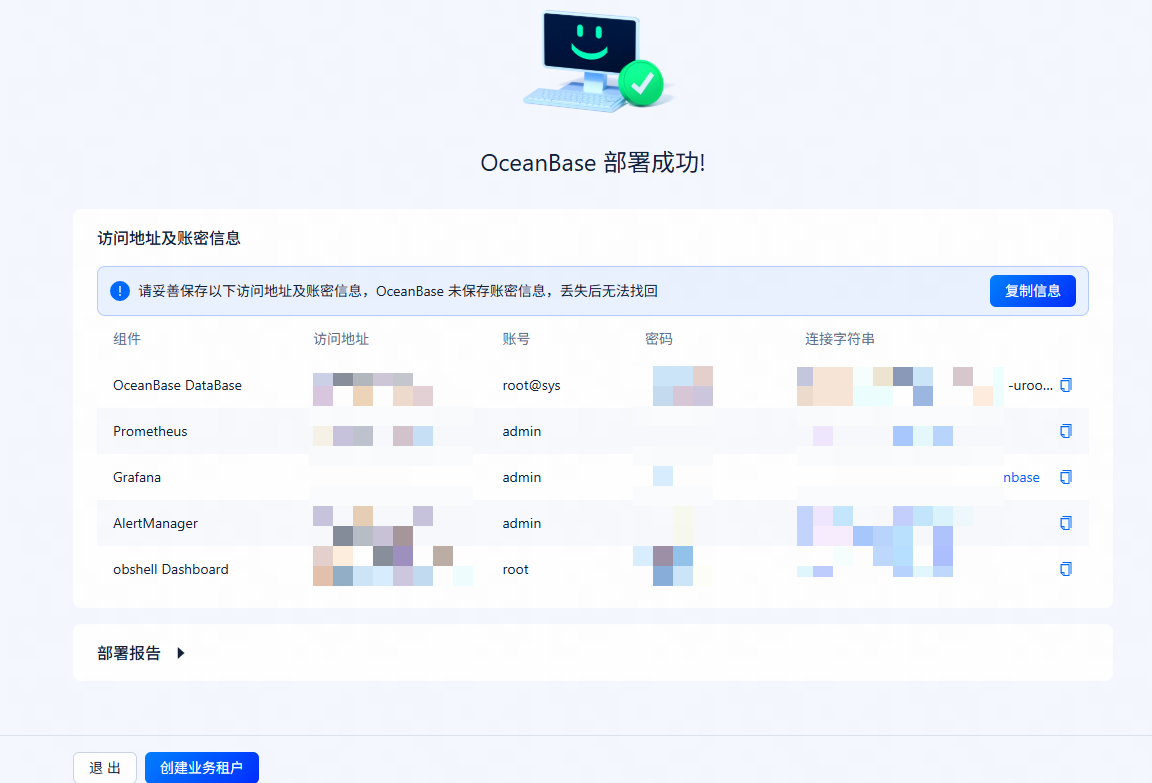
其中:
部署成功后可复制显示的连接串连接到对应组件。在黑屏界面执行 OceanBase 集中式数据库组件后的连接串会以 root@sys 用户连接到 OceanBase 集群。
单击输出的 Prometheus、Grafana 组件对应的连接串可对应跳转到 Prometheus、Grafana 的登录界面,通过部署界面展示的账号密码即可登录。
说明
在阿里云或其他云环境下,可能出现程序无法获取公网 IP,从而输出内网地址的情况,此 IP 非公网地址,您需要使用正确的地址访问图形化界面。
在 部署报告 里单击对应组件前的展开图标即可查看部署的日志信息。单击对应组件列表里的 查看详情 后,单击对应命令后的复制图标即可复制命令,复制后可在中控机中执行查看对应组件的日志位置。
单击 复制信息,在复制保存 OceanBase 集群的所有账密信息后,您可选择单击 退出 退出部署程序,也可选择单击 创建业务租户,通过图形化页面创建业务租户。建议为 OceanBase 集群创建业务租户,sys 租户仅用于管理集群,如将其作为业务租户使用,可能会引起系统运行异常。
(可选)步骤十一:创建业务租户
在 OceanBase 集群部署成功后,单击部署成功页面右下角的 创建业务租户 按钮,进入创建业务租户流程,您可参照下表介绍配置租户相关信息
| 参数 | 说明 |
|---|---|
| 租户名称 | 设置待新建租户的租户名。租户名需满足如下要求:
|
| 租户模式 | 可通过下拉框中选择 MySQL 模式或 Oracle 模式。
说明在创建 Oracle 模式时,白屏页面不支持设置密码,需用户在 Oracle 租户创建后,登录数据库手动设置密码。 |
| 租户 root 密码 | 可单击 随机生成,由 obd 自动生成随机字符串,也可自定义设置。自定义设置时,密码复杂度需满足如下要求:
|
| 模式配置 | 可选择 最大占用、最小可用 或 自定义 模式。
|
| 业务负载类型 | 默认为 HTAP,可通过下拉框中选择其他负载类型。 |
| 字符集 | 默认为 utf8mb4,可通过下拉框中选择其他字符集。 |
| 表名大小写敏感 | 可通过下拉框进行设置,支持设置为 0 1 或 2。
|
| 时区 | 默认为 (GMT+08:00)中国标准时间,可通过下拉框选择其他时区。 |
| IP 地址白名单 | 可选择自定义设置可访问的 IP,或设置为所有 IP 都可访问。选择自定义设置时,可在 自定义 IP 下的输入框中指定允许登陆的客户端 IP,输入 IP 后单击键盘 Enter 键或输入英文逗号(,)可配置多个节点 IP。光标悬停在 查看配置说明 上可查看配置 IP 的说明。
说明自定义时,设置为 |
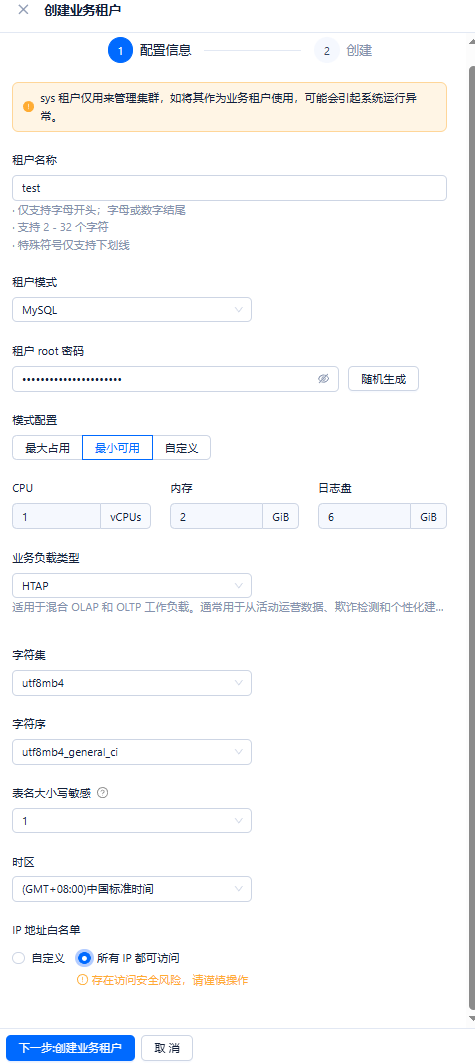
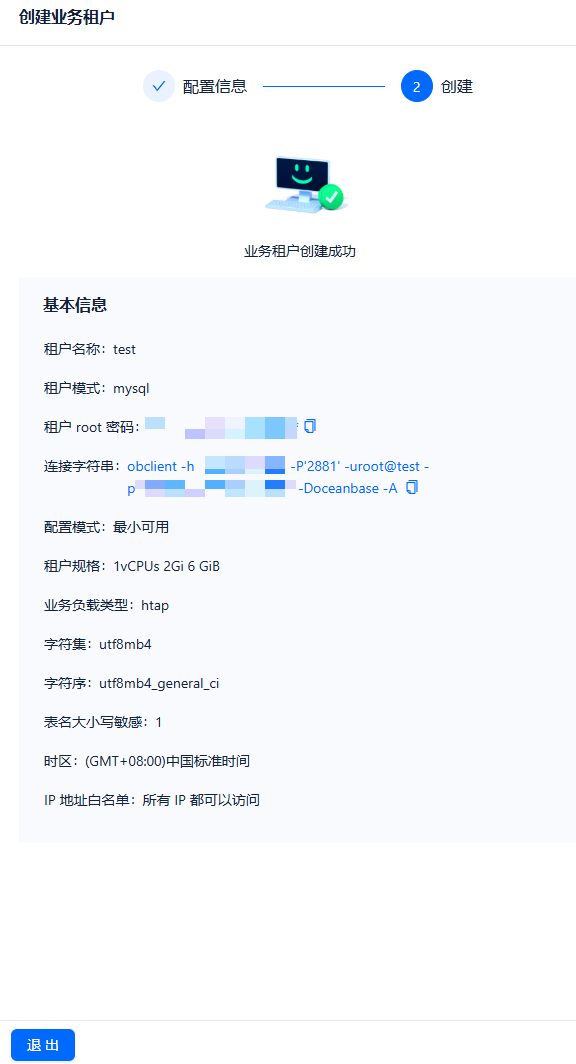
配置完成后单击 下一步:创建业务租户,系统将创建对应租户。创建完成后页面会展示业务租户信息,包含租户名、root 用户密码、连接字符串等信息。单击左下角 退出 按钮,即可退出创建租户流程。之后您可选择单击部署结果页面的 退出 按钮,退出部署程序;也可选择继续单击 创建业务租户 继续创建下一个业务租户。
相关文档
文中出现的各个配置项的详细介绍可参见 配置文件说明。
存在多种方法连接 OceanBase 集中式数据库,不同方法的详细介绍可参见 连接 OceanBase 集中式数据库(MySQL 模式) 章节和 连接 OceanBase 集中式数据库(Oracle 模式) 章节。


