
基于湖库一体架构,统一管理结构化、半结构化与非结构化等多模态数据,一个系统承载事务处理、实时分析与 AI 工作负载。


划线反馈
如何通过命令行手工部署 OBProxy
更新时间:2026-09-16 06:41
分享
适用版本:V1.x、V2.x、V3.x、V4.x内容类型:How-to
在 POC 性能调优和其它内外部测试场景,往往会遇到需要手工部署 OBProxy 的情况(比如需要将 OBProxy 独立部署到 OAT/OCP/MetaDB 所运行的物理机上,但是目前通过 OCP 部署 OBProxy 时限制了同一个服务器上最多只能运行有一个 OBProxy 进程)。
本文主要介绍通过命令行手工部署 OBProxy 的详细步骤和注意事项。
手工部署 OBProxy 的详细步骤和注意事项
说明
以下的安装步骤均假设 OBProxy 进程默认的运行用户为 admin 用户,如果是其它用户,请根据实际情况调整对应的命令即可。
场景一:需要安装的 OBProxy 版本为V1.x/V3.x
准备 OBProxy 进程的日志目录。
[root@localhost]# mkdir -p /home/admin/logs/obproxy
[root@localhost]# chown admin:admin /home/admin/logs/obproxy
下载并安装对应的 OBProxy RPM 包。
[root@localhost:~]# ls -l obproxy-3.2.11.0-20240704210949.el7.x86_64.rpm
-rw-r--r-- 1 root root 16956716 Sep 12 12:08 obproxy-3.2.11.0-20240704210949.el7.x86_64.rpm
[root@localhost:~]# rpm -ivh obproxy-3.2.11.0-20240704210949.el7.x86_64.rpm
warning: Unable to get systemd shutdown inhibition lock: Unit is masked.
Preparing...                          ################################# [100%]
Updating / installing...
1:obproxy-3.2.11.0-20240704210949.e################################# [100%]
确认该 OBProxy 要连接的业务 OceanBase 数据库集群中是否已创建 proxyro@sys 用户。
说明
proxyro 用户是 ODP 访问 OceanBase 集群的用户,当 ODP 配置项
observer_sys_password值与业务 OceanBase 数据库集群中 proxyro@sys 用户密码一致时,才可使用 OBProxy 连接对应 OceanBase 数据库集群。-- 通过 root@sys 连接到对应的业务 OceanBase 数据库集群后,执行如下的 SQL 语句查看用户。 MySQL [oceanbase]> select user,password from mysql.user;若输出结果显示已有 proxyro 用户,可继续执行后续步骤。若输出结果中无 proxyro 用户,可参考下述命令创建 proxyro 用户。
MySQL [oceanbase]> CREATE USER proxyro IDENTIFIED BY '******';
Query OK, 0 rows affected

MySQL [oceanbase]> GRANT SELECT ON *.* TO proxyro;
Query OK, 0 rows affected

MySQL [oceanbase]> SHOW GRANTS FOR proxyro;
+----------------------------------+
| Grants for proxyro@%             |
+----------------------------------+
| GRANT SELECT ON *.* TO 'proxyro' |
+----------------------------------+
1 row in set
获取该 OBProxy 要连接的业务 OceanBase 数据库集群的 rootservice list。
说明
一般手工安装的 OBProxy 多使用
rsList模式来启动,因此这边只介绍使用rsList模式来启动 OBProxy 的方法。-- 通过 root@sys 连接到对应的业务 OceanBase 数据库集群后,执行如下的 SQL 语句来获取 rsList。 MySQL [oceanbase]> show parameters like 'rootservice_list'; +-------+----------+---------------+----------+------------------+-----------+-------------------------------------------------------------------------+------------------------------------------------------------------------------+----------+---------+---------+-------------------+ | zone | svr_type | svr_ip | svr_port | name | data_type | value | info | section | scope | source | edit_level | +-------+----------+---------------+----------+------------------+-----------+-------------------------------------------------------------------------+------------------------------------------------------------------------------+----------+---------+---------+-------------------+ | zone1 | observer | xx.xxx.xx.111 | 2882 | rootservice_list | NULL | xx.xxx.xx.111:2882:2881;xx.xxx.xx.115:2882:2881;xx.xxx.xx.168:2882:2881 | a list of servers against which election candidate is checked for validation | OBSERVER | CLUSTER | DEFAULT | DYNAMIC_EFFECTIVE | | zone3 | observer | xx.xxx.xx.168 | 2882 | rootservice_list | NULL | xx.xxx.xx.111:2882:2881;xx.xxx.xx.115:2882:2881;xx.xxx.xx.168:2882:2881 | a list of servers against which election candidate is checked for validation | OBSERVER | CLUSTER | DEFAULT | DYNAMIC_EFFECTIVE | | zone2 | observer | xx.xxx.xx.115 | 2882 | rootservice_list | NULL | xx.xxx.xx.111:2882:2881;xx.xxx.xx.115:2882:2881;xx.xxx.xx.168:2882:2881 | a list of servers against which election candidate is checked for validation | OBSERVER | CLUSTER | DEFAULT | DYNAMIC_EFFECTIVE | +-------+----------+---------------+----------+------------------+-----------+-------------------------------------------------------------------------+------------------------------------------------------------------------------+----------+---------+---------+-------------------+ 3 rows in set (0.02 sec) MySQL [oceanbase]> show parameters like 'cluster'; +-------+----------+---------------+----------+---------+-----------+-------------+---------------------+----------+---------+---------+-------------------+ | zone | svr_type | svr_ip | svr_port | name | data_type | value | info | section | scope | source | edit_level | +-------+----------+---------------+----------+---------+-----------+-------------+---------------------+----------+---------+---------+-------------------+ | zone2 | observer | xx.xxx.xx.115 | 2882 | cluster | NULL | oio_cluster | Name of the cluster | OBSERVER | CLUSTER | DEFAULT | DYNAMIC_EFFECTIVE | | zone3 | observer | xx.xxx.xx.168 | 2882 | cluster | NULL | oio_cluster | Name of the cluster | OBSERVER | CLUSTER | DEFAULT | DYNAMIC_EFFECTIVE | | zone1 | observer | xx.xxx.xx.111 | 2882 | cluster | NULL | oio_cluster | Name of the cluster | OBSERVER | CLUSTER | DEFAULT | DYNAMIC_EFFECTIVE | +-------+----------+---------------+----------+---------+-----------+-------------+---------------------+----------+---------+---------+-------------------+ 3 rows in set (0.02 sec)使用上面获取的 rsList 和 cluster_name 信息来启动 OBProxy 进程。
[root@localhost:~]# su - admin
[admin@localhost:~]$ cd /opt/taobao/install/obproxy-3.2.11.0/
[admin@localhost:/opt/taobao/install/obproxy-3.2.11.0]$ ls
bin  control-config  etc  log  minidump  sharding-config  start_obproxy.sh  tools

# 注意:
# 1) 这边需要去掉步骤 3 中获取的 rootservice_list 字符串中的 :2882 。
# 2) 这边使用的端口号必须是本机上未被占用的任意空闲端口号,比如 3883 。
# 3) $sha1_value 需根据实际设置的密码进行替换,且此处设置的是 sha1 后的值,而非原始值。
[admin@localhost:/opt/taobao/install/obproxy-3.2.11.0]$ ./bin/obproxy -r "xx.xxx.xx.111:2881;xx.xxx.xx.115:2881;xx.xxx.xx.168:2881" -p 3883 -o "obproxy_sys_password=$sha1_value,enable_strict_kernel_release=false,enable_cluster_checkout=false,enable_metadb_used=false" -c oio_cluster
./bin/obproxy -r xx.xxx.xx.111:2881;xx.xxx.xx.115:2881;xx.xxx.xx.168:2881 -p 3883 -o obproxy_sys_password=$sha1_value,enable_strict_kernel_release=false,enable_cluster_checkout=false,enable_metadb_used=false -c oio_cluster
rs list: xx.xxx.xx.111:2881;xx.xxx.xx.115:2881;xx.xxx.xx.168:2881
listen port: 3883
optstr: enable_strict_kernel_release=false,enable_cluster_checkout=false,enable_metadb_used=false
cluster_name: oio_cluster

[admin@localhost:/opt/taobao/install/obproxy-3.2.11.0]$ ps -ef | grep obproxy
...
admin     50488      1  6 12:21 ?        00:00:00 ./bin/obproxy -r xx.xxx.xx.111:2881;xx.xxx.xx.115:2881;xx.xxx.xx.168:2881 -p 3883 -o enable_strict_kernel_release=false,enable_cluster_checkout=false,enable_metadb_used=false -c oio_cluster
admin     52687  40821  0 12:21 pts/0    00:00:00 grep --color=auto obproxy
...
修改 ODP 中密码相关配置。
需将
observer_sys_password值配置为与业务 OceanBase 数据库集群中 proxyro@sys 用户密码一致,才可使用 OBProxy 连接对应 OceanBase 数据库集群。同时建议修改 ODP root@proxysys 用户的密码(obproxy_sys_password)。通过 root@proxysys 连接到 ODP,
-p需指定为上文启动 ODP 时配置的obproxy_sys_password原始值:[admin@localhost:~]$ mysql -h127.0.0.1 -uroot@proxysys -P3883 -pxxx执行如下命令修改密码相关配置,此处需设置为真实密码字符串,无需进行 sha1 转换:
MySQL [oceanbase]> alert proxyconfig set observer_sys_password="******";
MySQL [oceanbase]> alert proxyconfig set obproxy_sys_password="******";
测试是否可以通过新装的 OBProxy 连接到业务 OceanBase 数据库集群。
[root@localhost:~]# mysql -h127.0.0.1 -uroot@sys#oio_cluster -P3883 -pxxx -A -c oceanbase
Welcome to the MariaDB monitor.  Commands end with ; or \g.
Your MySQL connection id is 4
Server version: 5.6.25 OceanBase 3.2.4.8 (r108020012024081520-0926a91a4b1e4c197b17ea1202335b821b5f376b) (Built Aug 16 2024 11:06:28)

Copyright (c) 2000, 2018, Oracle, MariaDB Corporation Ab and others.

Type 'help;' or '\h' for help. Type '\c' to clear the current input statement.

MySQL [oceanbase]> select * from __all_server;
+----------------------------+----------------------------+---------------+----------+----+-------+------------+-----------------+--------+-----------------------+-------------------------------------------------------------------------------------------+-----------+--------------------+--------------+----------------+-------------------+
| gmt_create                 | gmt_modified               | svr_ip        | svr_port | id | zone  | inner_port | with_rootserver | status | block_migrate_in_time | build_version                                                                             | stop_time | start_service_time | first_sessid | with_partition | last_offline_time |
+----------------------------+----------------------------+---------------+----------+----+-------+------------+-----------------+--------+-----------------------+-------------------------------------------------------------------------------------------+-----------+--------------------+--------------+----------------+-------------------+
| 2024-05-05 22:35:16.515537 | 2024-09-10 11:33:25.531867 | xx.xxx.xx.111 |     2882 |  1 | zone1 |       2881 |               1 | active |                     0 | 3.2.4.8_108020012024081520-0926a91a4b1e4c197b17ea1202335b821b5f376b(Aug 16 2024 11:06:28) |         0 |   1725939135464195 |            0 |              1 |                 0 |
| 2024-05-05 22:35:16.474704 | 2024-09-10 11:37:11.024623 | xx.xxx.xx.115 |     2882 |  2 | zone2 |       2881 |               0 | active |                     0 | 3.2.4.8_108020012024081520-0926a91a4b1e4c197b17ea1202335b821b5f376b(Aug 16 2024 11:06:28) |         0 |   1725939429360863 |            0 |              1 |                 0 |
| 2024-05-05 22:35:16.471598 | 2024-09-10 11:41:36.269839 | xx.xxx.xx.168 |     2882 |  3 | zone3 |       2881 |               0 | active |                     0 | 3.2.4.8_108020012024081520-0926a91a4b1e4c197b17ea1202335b821b5f376b(Aug 16 2024 11:06:28) |         0 |   1725939694615396 |            0 |              1 |                 0 |
+----------------------------+----------------------------+---------------+----------+----+-------+------------+-----------------+--------+-----------------------+-------------------------------------------------------------------------------------------+-----------+--------------------+--------------+----------------+-------------------+
3 rows in set (0.00 sec)
场景二:需要安装的 OBProxy 版本为 V4.x
准备 OBProxy 进程的日志目录。
[root@localhost]# mkdir -p /home/admin/logs/obproxy
[root@localhost]# chown admin:admin /home/admin/logs/obproxy
下载并安装对应的 OBProxy RPM 包。
[root@localhost ~]# ls -l obproxy-4.3.1.0-602024090512.el7.aarch64.rpm
-r-xr-x--- 1 root root 38467384 Sep 12 13:38 obproxy-4.3.1.0-602024090512.el7.aarch64.rpm
[root@localhost ~]# rpm -ivh obproxy-4.3.1.0-602024090512.el7.aarch64.rpm
warning: obproxy-4.3.1.0-602024090512.el7.aarch64.rpm: Header V4 RSA/SHA1 Signature, key ID 3b1a88d1: NOKEY
Verifying...                          ################################# [100%]
Preparing...                          ################################# [100%]
Updating / installing...
1:obproxy-4.3.1.0-602024090512.el7 ################################# [100%]
确认该 OBProxy 要连接的业务 OceanBase 数据库集群中是否已创建 proxyro@sys 用户。
说明
proxyro 用户是 ODP 访问 OceanBase 集群的用户,当 ODP 配置项
observer_sys_password值与业务 OceanBase 数据库集群中 proxyro@sys 用户密码一致时,才可使用 OBProxy 连接对应 OceanBase 数据库集群。-- 通过 root@sys 连接到对应的业务 OceanBase 数据库集群后,执行如下的 SQL 语句查看用户。 MySQL [oceanbase]> select user,password from mysql.user;若输出结果显示已有 proxyro 用户,可继续执行后续步骤。若输出结果中无 proxyro 用户,可参考下述命令创建 proxyro 用户。
MySQL [oceanbase]> CREATE USER proxyro IDENTIFIED BY '******';
Query OK, 0 rows affected

MySQL [oceanbase]> GRANT SELECT ON *.* TO proxyro;
Query OK, 0 rows affected

MySQL [oceanbase]> SHOW GRANTS FOR proxyro;
+----------------------------------+
| Grants for proxyro@%             |
+----------------------------------+
| GRANT SELECT ON *.* TO 'proxyro' |
+----------------------------------+
1 row in set
获取该 OBProxy 要连接的业务 OceanBase 数据库集群的 rootservice list。
说明
一般手工安装的 OBProxy 多使用 rsList 模式来启动,因此这边只介绍使用 rsList 模式来启动 OBProxy 的方法。
MySQL [(none)]> show parameters like 'rootservice_list';
+-------+----------+----------------+----------+------------------+-----------+----------------------------------------------------------------------------+------------------------------------------------------------------------------+----------+---------+---------+-------------------+---------------+-----------+
| zone  | svr_type | svr_ip         | svr_port | name             | data_type | value                                                                      | info                                                                         | section  | scope   | source  | edit_level        | default_value | isdefault |
+-------+----------+----------------+----------+------------------+-----------+----------------------------------------------------------------------------+------------------------------------------------------------------------------+----------+---------+---------+-------------------+---------------+-----------+
| zone1 | observer | xxx.xxx.xxx.62 |     2882 | rootservice_list | STR_LIST  | xxx.xxx.xxx.62:2882:2881;xxx.xxx.xxx.63:2882:2881;xxx.xxx.xxx.64:2882:2881 | a list of servers against which election candidate is checked for validation | OBSERVER | CLUSTER | DEFAULT | DYNAMIC_EFFECTIVE |               |         0 |
| zone3 | observer | xxx.xxx.xxx.64 |     2882 | rootservice_list | STR_LIST  | xxx.xxx.xxx.62:2882:2881;xxx.xxx.xxx.63:2882:2881;xxx.xxx.xxx.64:2882:2881 | a list of servers against which election candidate is checked for validation | OBSERVER | CLUSTER | DEFAULT | DYNAMIC_EFFECTIVE |               |         0 |
| zone2 | observer | xxx.xxx.xxx.63 |     2882 | rootservice_list | STR_LIST  | xxx.xxx.xxx.62:2882:2881;xxx.xxx.xxx.63:2882:2881;xxx.xxx.xxx.64:2882:2881 | a list of servers against which election candidate is checked for validation | OBSERVER | CLUSTER | DEFAULT | DYNAMIC_EFFECTIVE |               |         0 |
+-------+----------+----------------+----------+------------------+-----------+----------------------------------------------------------------------------+------------------------------------------------------------------------------+----------+---------+---------+-------------------+---------------+-----------+
3 rows in set (0.012 sec)

MySQL [(none)]> show parameters like 'cluster';
+-------+----------+----------------+----------+---------+-----------+-------------+---------------------+----------+---------+---------+-------------------+---------------+-----------+
| zone  | svr_type | svr_ip         | svr_port | name    | data_type | value       | info                | section  | scope   | source  | edit_level        | default_value | isdefault |
+-------+----------+----------------+----------+---------+-----------+-------------+---------------------+----------+---------+---------+-------------------+---------------+-----------+
| zone2 | observer | xxx.xxx.xxx.63 |     2882 | cluster | STRING    | kunpeng_clu | Name of the cluster | OBSERVER | CLUSTER | DEFAULT | DYNAMIC_EFFECTIVE | obcluster     |         0 |
| zone1 | observer | xxx.xxx.xxx.62 |     2882 | cluster | STRING    | kunpeng_clu | Name of the cluster | OBSERVER | CLUSTER | DEFAULT | DYNAMIC_EFFECTIVE | obcluster     |         0 |
| zone3 | observer | xxx.xxx.xxx.64 |     2882 | cluster | STRING    | kunpeng_clu | Name of the cluster | OBSERVER | CLUSTER | DEFAULT | DYNAMIC_EFFECTIVE | obcluster     |         0 |
+-------+----------+----------------+----------+---------+-----------+-------------+---------------------+----------+---------+---------+-------------------+---------------+-----------+
3 rows in set (0.013 sec)
使用上面获取的 rsList 和 cluster_name 信息来启动 OBProxy 进程。
[root@localhost ~]# su - admin
[admin@localhost ~]$ cd /opt/taobao/install/obproxy-4.3.1.0/
[admin@localhost obproxy-4.3.1.0]$ ls
bin  lib  log  minidump  start_obproxy.sh
[admin@localhost obproxy-4.3.1.0]$ ls -tlr
total 16
-rw-r--r-- 1 admin admin 13380 Sep  5 12:45 start_obproxy.sh
drwxr-sr-x 2 admin admin    40 Sep 12 13:40 bin
drwxr-xr-x 2 admin admin    52 Sep 12 13:40 lib
lrwxrwxrwx 1 admin admin    33 Sep 12 13:40 minidump -> /home/admin/logs/obproxy/minidump
lrwxrwxrwx 1 admin admin    28 Sep 12 13:40 log -> /home/admin/logs/obproxy/log

# 注意:
# 1) 这边需要去掉步骤 3 中获取的 rootservice_list 字符串中的 :2882 。
# 2) 这边使用的端口号必须是本机上未被占用的任意空闲端口号,比如 3883 。
[admin@localhost obproxy-4.3.1.0]$ ./bin/obproxy -r "xxx.xxx.xxx.62:2881;xxx.xxx.xxx.63:2881;xxx.xxx.xxx.64:2881" -p 3883 -o "obproxy_sys_password=$sha1_value,enable_strict_kernel_release=false,enable_cluster_checkout=false,enable_metadb_used=false" -c kunpeng_clu
./bin/obproxy -r xxx.xxx.xxx.62:2881;xxx.xxx.xxx.63:2881;xxx.xxx.xxx.64:2881 -p 3883 -o obproxy_sys_password=$sha1_value,enable_strict_kernel_release=false,enable_cluster_checkout=false,enable_metadb_used=false -c kunpeng_clu
rs list: xxx.xxx.xxx.62:2881;xxx.xxx.xxx.63:2881;xxx.xxx.xxx.64:2881
listen port: 3883
optstr: enable_strict_kernel_release=false,enable_cluster_checkout=false,enable_metadb_used=false
cluster_name: kunpeng_clu
[admin@localhost obproxy-4.3.1.0]$ ps -ef | grep obproxy
admin    1824901       1  4 13:51 ?        00:00:00 ./bin/obproxy -r xxx.xxx.xxx.62:2881;xxx.xxx.xxx.63:2881;xxx.xxx.xxx.64:2881 -p 3883 -o enable_strict_kernel_release=false,enable_cluster_checkout=false,enable_metadb_used=false -c kunpeng_clu
admin    1825010 1823918  0 13:51 pts/0    00:00:00 grep obproxy
说明
$sha1_value需根据实际设置的密码进行替换,且此处设置的是 sha1 后的值,而非原始值。该密码为 ODP 管理员账户root@proxysys的登录密码(obproxy_sys_password)。说明
OBProxy V4.0 及之后版本,支持了 OceanBase 数据库集群级别的 proxyro 账号密码配置,即访问不同 OceanBase 数据库集群可以使用不同的 proxyro 账号密码。因此对于手工部署的 OBProxy V4.x 集群,还需要将想要连接的 OceanBase 数据库集群 sys 租户的 proxyro 密码写入 OBProxy 集群级别(
LEVEL_CLUSTER)的配置observer_sys_password中去。为新部署的 OBProxy 设置集群级别的配置
observer_sys_password。如果不先设置 OBProxy 集群级别的配置
observer_sys_password会遇到报错ERROR 2013 (HY000): Lost connection to MySQL server at 'reading authorization packet', system error: 11。[root@localhost ~]# mysql -h127.0.0.1 -uroot@sys#kunpeng_clu -P3883 -pxxx -A -c oceanbase ERROR 2013 (HY000): Lost connection to MySQL server at 'reading authorization packet', system error: 11注意
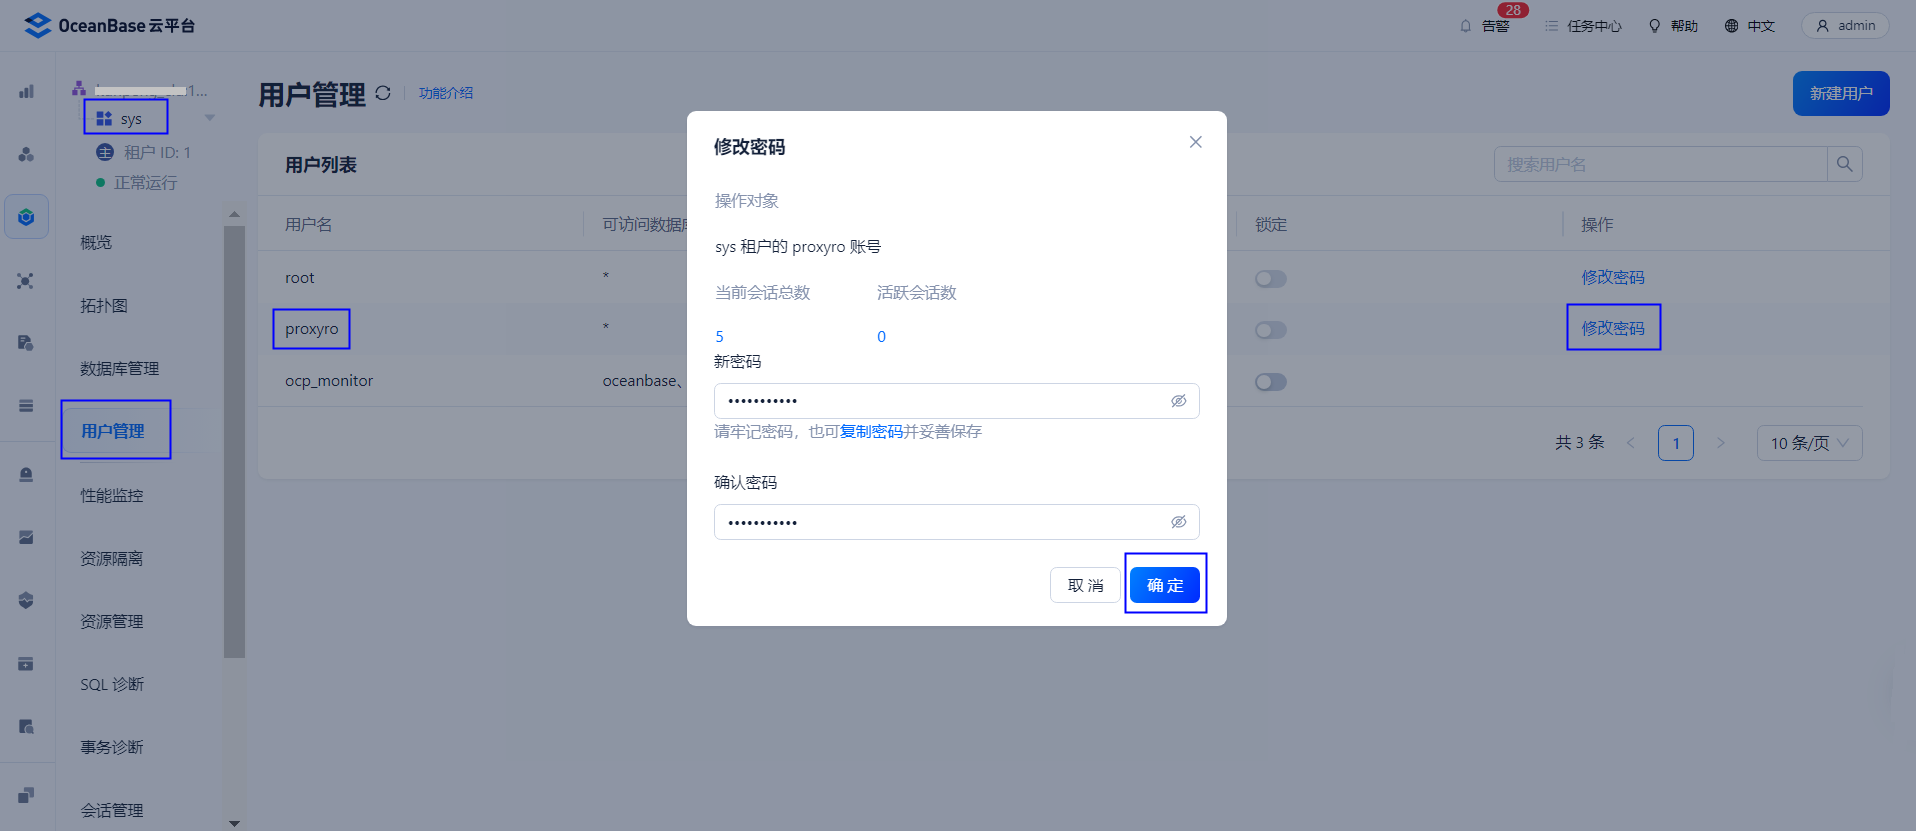
从 OCP V4.2.0 BP1 开始,因为安全要求,proxyro 用户的密码需要是随机的,所以通过 OCP V4.2.0 BP1 及之后版本创建出来的 OceanBase 数据库 V4.x 集群会设置随机 proxyro 用户密码;对于其它版本,业务 OceanBase 数据库集群 sys 租户的 proxyro 用户密码仍为缺省值(具体缺省值可以联系 OceanBase 技术支持团队)。
如果业务 OceanBase 数据库集群 sys 租户的 proxyro 用户密码为随机值,还需要先通过 OCP 重置该用户的密码,如下图所示。
使用已知的 proxyro 用户密码或成功重置后的 proxyro 用户密码信息更新 OBProxy 配置如下。
通过
root@proxysys连接到 ODP,其中-p后面指定的密码为步骤 5 中启动 OBProxy 时通过obproxy_sys_password配置项设置的密码的原始值(非 sha1 值):[root@localhost ~]# mysql -h127.1 -uroot@proxysys -P3883 -p********** Welcome to the MariaDB monitor. Commands end with ; or \g. Your MySQL connection id is 19 Server version: 5.6.25 Copyright (c) 2000, 2018, Oracle, MariaDB Corporation Ab and others. Type 'help;' or '\h' for help. Type '\c' to clear the current input statement. MySQL [(none)]> select * from proxy_config where name like '%observer_sys_password%'; +------+------+-------+-------------+--------------+------------------------+------------------------------------------+------+-------+-------------+---------------+--------------+ | vid | vip | vport | tenant_name | cluster_name | name | value | info | range | need_reboot | visible_level | config_level | +------+------+-------+-------------+--------------+------------------------+------------------------------------------+------+-------+-------------+---------------+--------------+ | -1 | | 0 | | | observer_sys_password1 | ee0e5138c912aed80b683c05303684be347ce81d | | | | | LEVEL_GLOBAL | | -1 | | 0 | | | observer_sys_password | ee0e5138c912aed80b683c05303684be347ce81d | | | | | LEVEL_GLOBAL | +------+------+-------+-------------+--------------+------------------------+------------------------------------------+------+-------+-------------+---------------+--------------+ 2 rows in set (0.002 sec) MySQL [(none)]> replace into proxy_config(cluster_name, name, value, config_level) values ('kunpeng_clu', 'observer_sys_password', 'xxx', 'LEVEL_CLUSTER'); Query OK, 0 rows affected (0.003 sec) MySQL [(none)]> select * from proxy_config where name like '%observer_sys_password%'; +------+------+-------+-------------+--------------+------------------------+------------------------------------------+------+-------+-------------+---------------+---------------+ | vid | vip | vport | tenant_name | cluster_name | name | value | info | range | need_reboot | visible_level | config_level | +------+------+-------+-------------+--------------+------------------------+------------------------------------------+------+-------+-------------+---------------+---------------+ | -1 | | 0 | | | observer_sys_password1 | ee0e5138c912aed80b683c05303684be347ce81d | | | | | LEVEL_GLOBAL | | -1 | | 0 | | | observer_sys_password | ee0e5138c912aed80b683c05303684be347ce81d | | | | | LEVEL_GLOBAL | | -1 | | 0 | | kunpeng_clu | observer_sys_password | 38185ab7dedd24a2644c55556f923c35f180fedb | | | | | LEVEL_CLUSTER | +------+------+-------+-------------+--------------+------------------------+------------------------------------------+------+-------+-------------+---------------+---------------+ 3 rows in set (0.002 sec)
测试是否可以通过新装的 OBProxy 连接到业务OB集群。
[root@kunpengtg225a1014 ~]# mysql -h127.0.0.1 -uroot@sys#kunpeng_clu -P3883 -pxxx -A -c oceanbase
Welcome to the MariaDB monitor.  Commands end with ; or \g.
Your MySQL connection id is 20
Server version: 5.6.25 OceanBase 4.3.2.1 (r101000042024081121-89c76c598a759ff17aee712b40460d7a1c0327f2) (Built Aug 11 2024 22:12:44)

Copyright (c) 2000, 2018, Oracle, MariaDB Corporation Ab and others.

Type 'help;' or '\h' for help. Type '\c' to clear the current input statement.

MySQL [oceanbase]> select * from __all_server;
+----------------------------+----------------------------+----------------+----------+----+-------+------------+-----------------+--------+-----------------------+-------------------------------------------------------------------------------------------+-----------+--------------------+--------------+----------------+-------------------+
| gmt_create                 | gmt_modified               | svr_ip         | svr_port | id | zone  | inner_port | with_rootserver | status | block_migrate_in_time | build_version                                                                             | stop_time | start_service_time | first_sessid | with_partition | last_offline_time |
+----------------------------+----------------------------+----------------+----------+----+-------+------------+-----------------+--------+-----------------------+-------------------------------------------------------------------------------------------+-----------+--------------------+--------------+----------------+-------------------+
| 2024-09-10 23:22:45.927581 | 2024-09-10 23:26:36.681889 | xxx.xxx.xxx.62 |     2882 |  1 | zone1 |       2881 |               1 | ACTIVE |                     0 | 4.3.2.1_101000042024081121-89c76c598a759ff17aee712b40460d7a1c0327f2(Aug 11 2024 22:12:44) |         0 |   1725981995392294 |            0 |              1 |                 0 |
| 2024-09-10 23:22:45.936900 | 2024-09-10 23:26:36.683998 | xxx.xxx.xxx.63 |     2882 |  2 | zone2 |       2881 |               0 | ACTIVE |                     0 | 4.3.2.1_101000042024081121-89c76c598a759ff17aee712b40460d7a1c0327f2(Aug 11 2024 22:12:44) |         0 |   1725981996125334 |            0 |              1 |                 0 |
| 2024-09-10 23:22:45.946382 | 2024-09-10 23:26:36.687162 | xxx.xxx.xxx.64 |     2882 |  3 | zone3 |       2881 |               0 | ACTIVE |                     0 | 4.3.2.1_101000042024081121-89c76c598a759ff17aee712b40460d7a1c0327f2(Aug 11 2024 22:12:44) |         0 |   1725981995767208 |            0 |              1 |                 0 |
+----------------------------+----------------------------+----------------+----------+----+-------+------------+-----------------+--------+-----------------------+-------------------------------------------------------------------------------------------+-----------+--------------------+--------------+----------------+-------------------+
3 rows in set (0.007 sec)
备注二:
OBProxy 集群的两种启动模式:
- 测试模式:无需依赖 ConfigServer。
- RsList 启动:直接指定单个 OB 集群 RsList IP(RootServer 的 IP 列表)的启动方式,OBProxy 可以通过该 RsList 获取到整个集群元信息。这种方式只能访问单个 OceanBase 数据库集群且不可更改。
- 生产模式中 ConfigUrl 启动:指定 ConfigUrl 作为启动参数的启动方式,OBProxy 根据用户连接串中的集群名从 ConfigUrl 获取对应集群的 RsList,然后根据该 RsList 获取到整个集群元信息。这种方式可以访问多个 OceanBase 数据库集群。
要想查看当前 OBProxy 集群具体的启动模式,可以通过默认的 2883 端口连接到 OBProxy 中去,检查下面两个配置项,看看哪个不为空,那么就是以不为空的参数对应的模式启动的。
MySQL [oceanbase]> show proxyconfig like 'obproxy_config_server_url';
+---------------------------+----------------------------------------------------------------------------------------------------------------------+---------------------------------------+-------------+---------------+
| name                      | value| info| need_reboot | visible_level |
+---------------------------+----------------------------------------------------------------------------------------------------------------------+---------------------------------------+-------------+---------------+
| obproxy_config_server_url | http://xxx.xxx.xxx:81/services?User_ID=alibaba&UID=test&Action=GetObProxyConfig&ObproxyClusterName=xxx | url of config info(rs list and so on) | true        | SYS           |
+---------------------------+----------------------------------------------------------------------------------------------------------------------+---------------------------------------+-------------+---------------+
1 row in set (0.000 sec)

MySQL [oceanbase]> show proxyconfig like 'rootservice_list';
+------------------+-------+------------------------------------------------------------------------------------------------------------------+-------------+---------------+
| name             | value | info| need_reboot | visible_level |
+------------------+-------+------------------------------------------------------------------------------------------------------------------+-------------+---------------+
| rootservice_list |       | a list of servers against which election candidate is checked for validation, format ip1:sql_port1;ip2:sql_port2 | true| SYS           |
+------------------+-------+------------------------------------------------------------------------------------------------------------------+-------------+---------------+
1 row in set (0.000 sec)
适用版本
OBProxy 所有版本。


