
基于湖库一体架构,统一管理结构化、半结构化与非结构化等多模态数据,一个系统承载事务处理、实时分析与 AI 工作负载。


划线反馈
OCP 告警:服务器 CPU 软中断未打散
更新时间:2025-03-20 02:16
分享
适用版本:V3.1.x、V3.2.x、V4.0.x、V4.1.x内容类型:Troubleshoot
本文为您介绍 OCP 告警:服务器 CPU 软中断未打散的处理方法。
适用版本
OCP V3.x、V4.x 版本。
问题现象
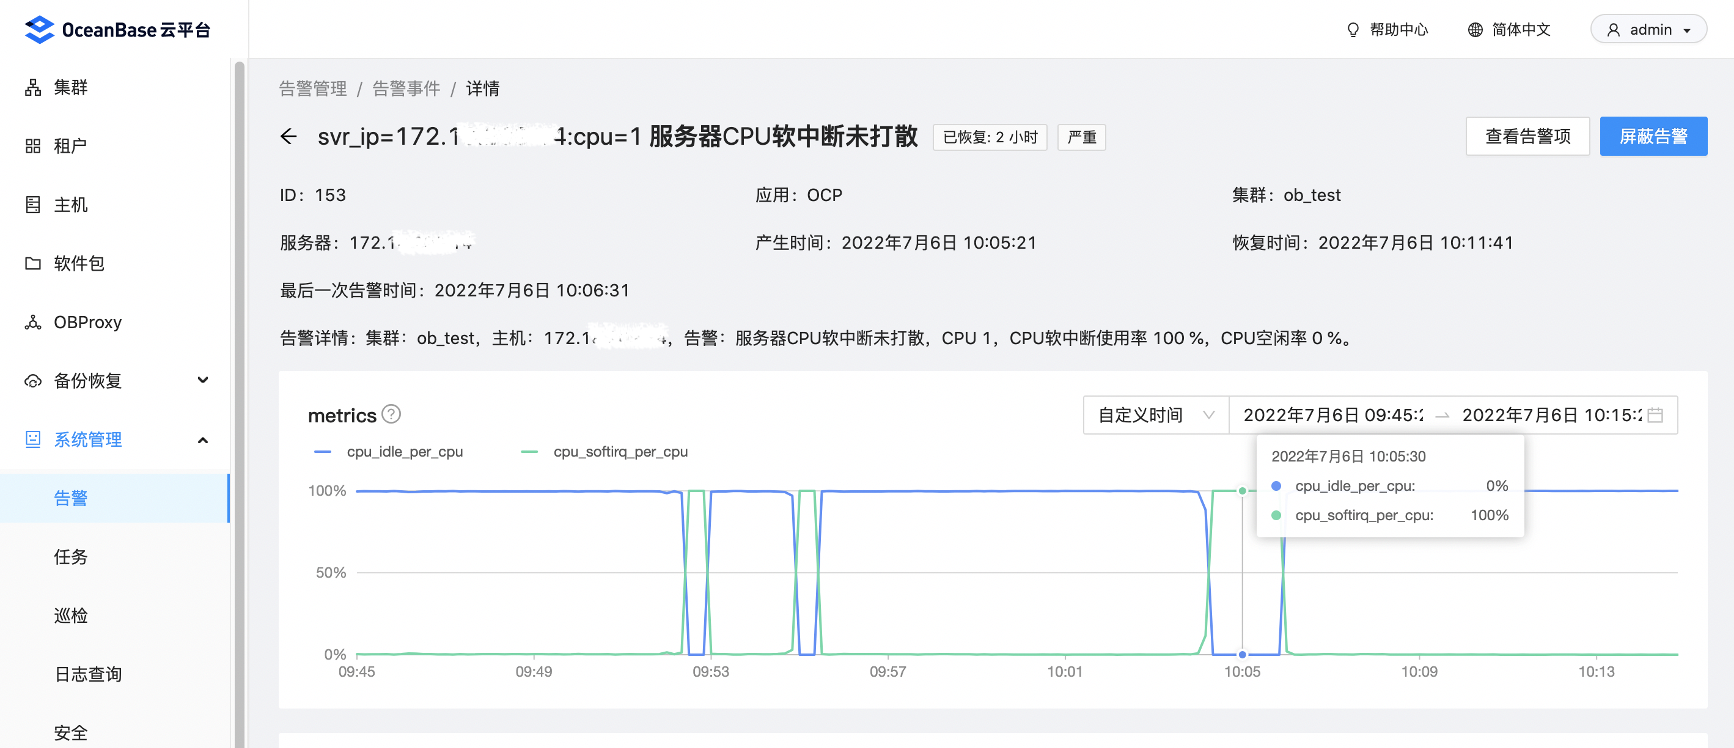
OCP 告警:服务器 CPU 软中断未打散,CPU 1,CPU 软中断使用率 100%。
问题诊断
登录到问题服务器,使用 mpstat 命令监控 CPU 1 的详细统计。
$ mpstat -P ALL 5      # 显示所有 CPU 核的统计,interval =5s
....

$ mpstat -P 1 5    # 只显示 CPU 1 的统计,interval =5s
11:57:24 AM  CPU    %usr   %nice    %sys %iowait    %irq   %soft  %steal  %guest  %gnice   %idle
11:57:29 AM    1    0.00    0.00    0.00    0.00    0.00   98.75    0.00    0.00    0.00   1.25
11:57:34 AM    1    0.00    0.00    0.00    0.00    0.00  100.00    0.00    0.00    0.00   0.00
11:57:39 AM    1    0.00    0.00    0.00    0.00    0.00  100.00    0.00    0.00    0.00   0.00
11:57:44 AM    1    0.00    0.00    0.00    0.00    0.00   99.35    0.00    0.00    0.00   0.65
通过以上命令,确认了软中断请求集中在 CPU 1 上,导致 CPU 1 的使用率达到了 100%。
从
/proc/interrupts文件中查看服务器的软中断统计。$ head -n 10 /proc/interrupts CPU0 CPU1 CPU2 CPU3 CPU4 CPU5 CPU6 CPU7 CPU8 CPU9 CPU10 CPU11 CPU12 CPU13 CPU14 CPU15 CPU16 CPU17 CPU18 CPU19 CPU20 CPU21 CPU22 CPU23 CPU24 CPU25 CPU26 CPU27 CPU28 CPU29 CPU30 CPU31 0: 154 0 0 0 0 0 0 0 0 0 0 0 0 0 0 0 0 0 0 0 0 0 0 0 0 0 0 0 0 0 0 0 IR-IO-APIC-edge timer 1: 2 0 0 0 0 0 0 0 0 0 0 0 0 0 0 0 0 0 0 0 0 0 0 0 0 0 0 0 0 0 0 0 IR-IO-APIC-edge i8042 4: 91220 0 0 0 0 0 0 0 0 0 0 0 0 0 0 0 0 0 0 0 0 0 0 0 0 0 0 0 0 0 0 0 IR-IO-APIC-edge serial 8: 1 0 0 0 0 0 0 0 0 0 0 0 0 0 0 0 0 0 0 0 0 0 0 0 0 0 0 0 0 0 0 0 IR-IO-APIC-edge rtc0 9: 2 0 0 0 0 0 0 0 0 0 0 0 0 0 0 0 0 0 0 0 0 0 0 0 0 0 0 0 0 0 0 0 IR-IO-APIC-fasteoi acpi 12: 5 0 0 0 0 0 0 0 0 0 0 0 0 0 0 0 0 0 0 0 0 0 0 0 0 0 0 0 0 0 0 0 IR-IO-APIC-edge i8042 16: 121 0 0 0 0 0 0 0 0 0 0 0 0 0 0 0 0 0 0 0 0 0 0 0 0 0 0 0 0 0 0 0 IR-IO-APIC-fasteoi ehci_hcd:usb1 18: 0 0 0 0 0 0 0 0 0 0 0 0 0 0 0 0 0 0 0 0 0 0 0 0 0 0 0 0 0 0 0 0 IR-IO-APIC-fasteoi i801_smbus 19: 0 0 0 0 0 0 0 0 0 0 0 0 0 0 0 0 0 0 0 0 0 0 0 0 0 0 0 0 0 0 0 0 IR-IO-APIC-fasteoi i801_smbus建议将文件内容下载并导入 excel 中,更方便查看:
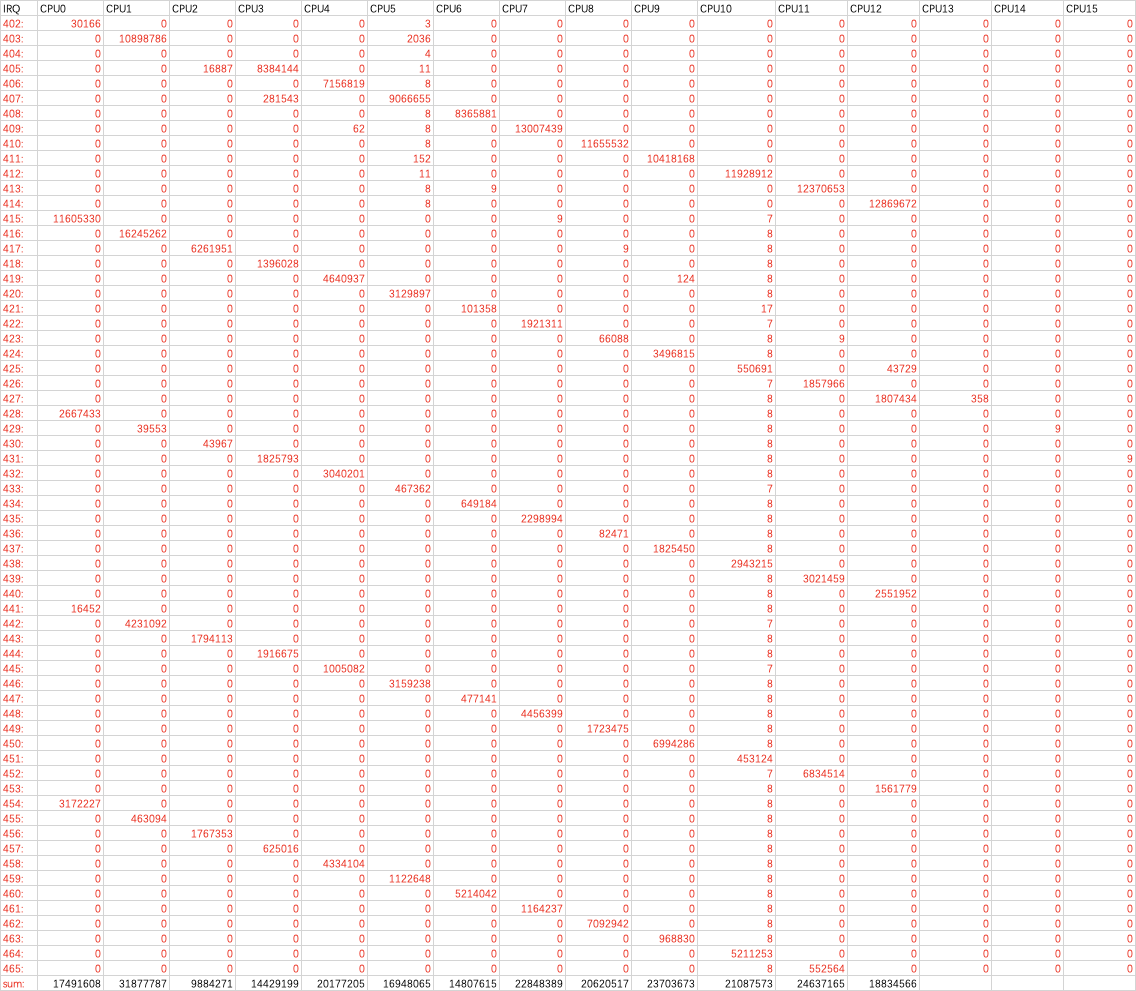
CPU 1 上的软中断请求主要集中在某一个特定的中断号区间,本案例中为 402~416 和 532~546,其标识信息为 IR-PCI-MSI-edge,即网卡软中断。
使用以下命令查看网卡的 IRQ 中断范围和其可以使用的 CPU 列表。
cat /sys/class/net/$网卡/device/local_cpulist
ls /sys/class/net/$网卡/device/msi_irqs/
在本案例中,查询结果如下图:
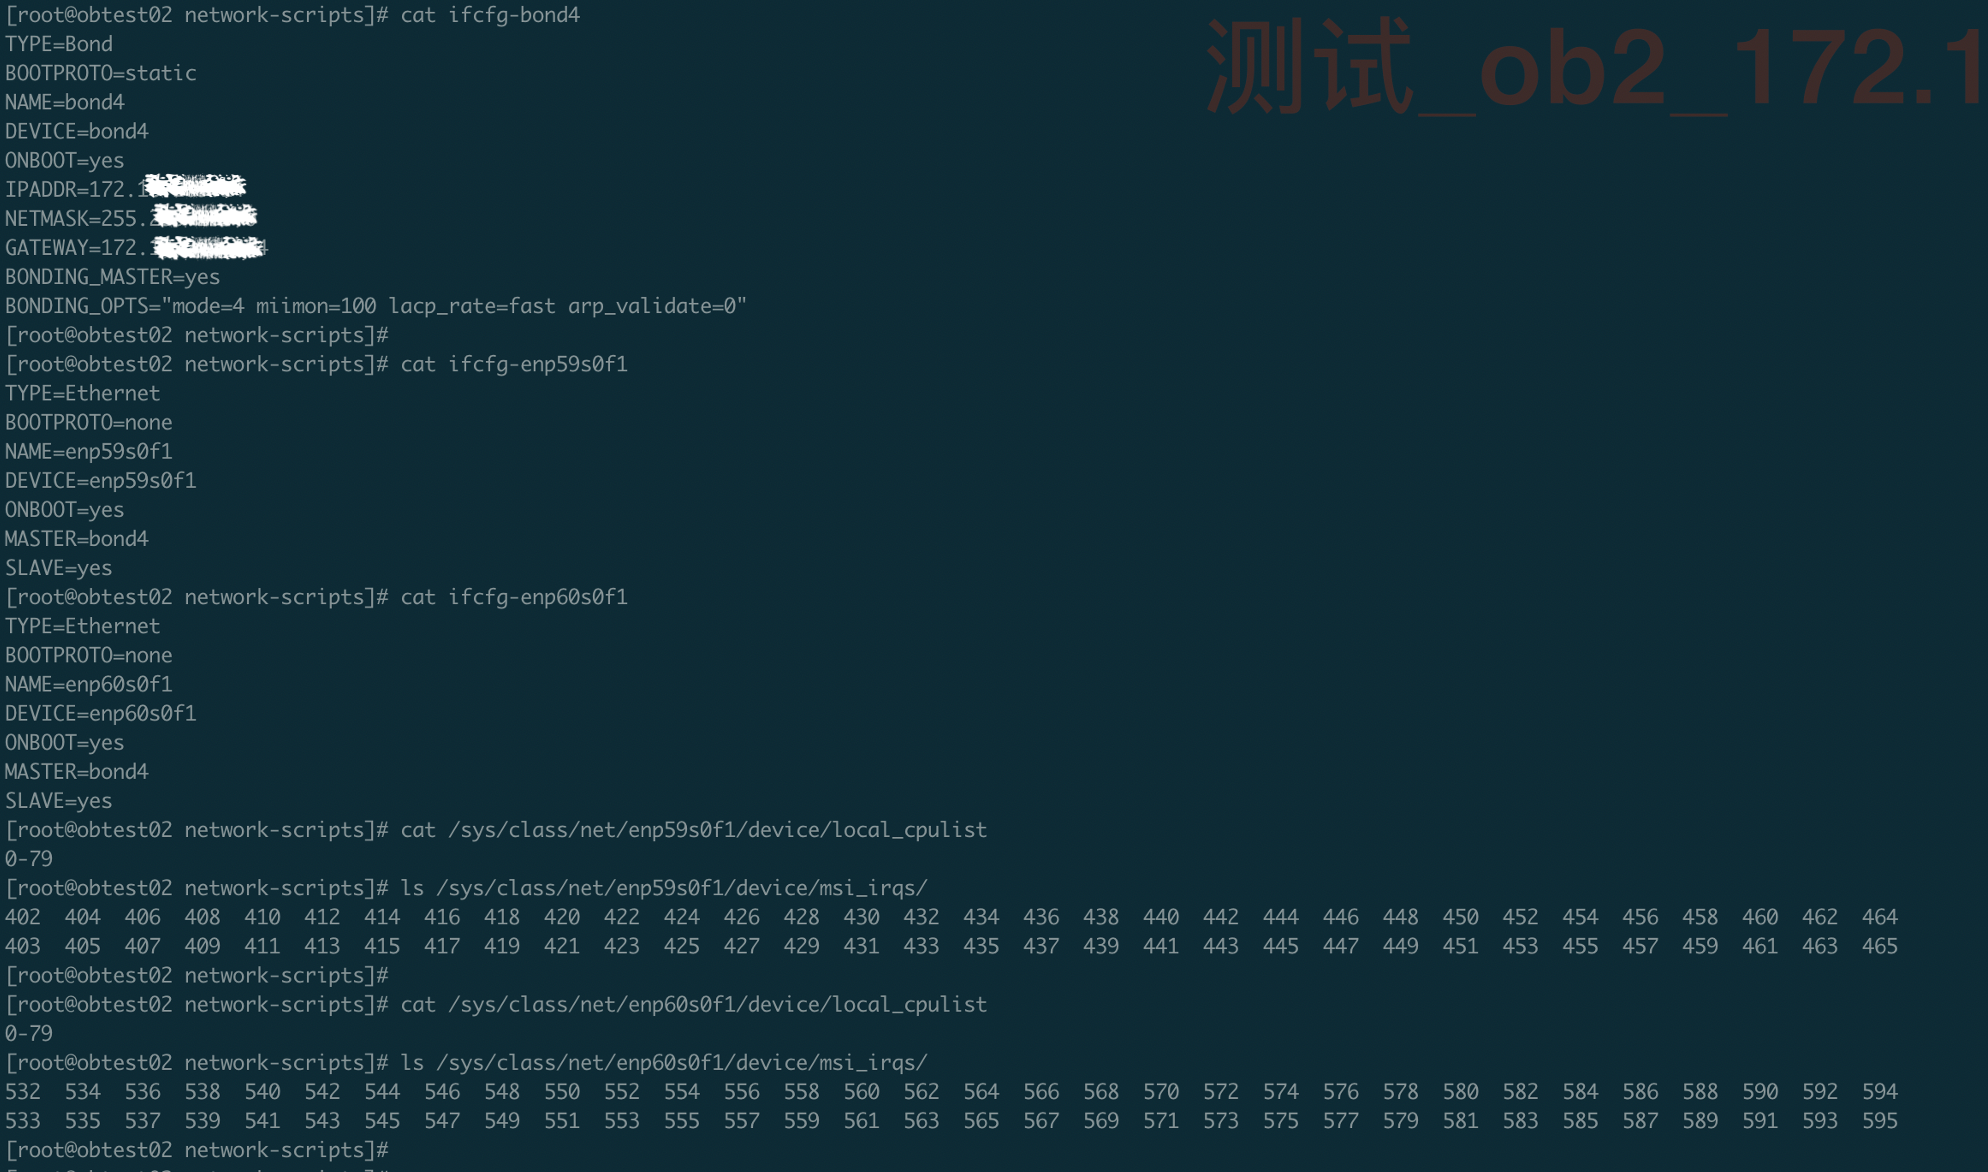
从上可以看出,网卡 enp59s0f1 的 IRQ 范围是 402~465,网卡 enp60s0f1 的 IRQ 范围是:532~595,两个网卡可以绑定的 CPU 均为 0~79。
至此,我们确认了 CPU 1 上的软中断请求主要是网卡软中断,但为什么这些软中断集中在 CPU 1 而不是均匀的打散到 0~79 个CPU 上呢?
使用以下命令查看网卡软中断的 CPU 绑定。
cd /proc/irq/$IRQ_编号/
cat /proc/irq/$IRQ_编号/smp_affinity
cat /proc/irq/$IRQ_编号/smp_affinity_list
这里以 IRQ 402 为例进行展示:
$ cat /proc/irq/402/smp_affinity
0000,00000000,00000002    # 16进制,最低位表示 CPU 0。2 = 0010,代表 CPU 1

$ cat /proc/irq/402/smp_affinity_list
1    # CPU 1
排查发现,网卡的 IRQ 编号绑定到了 CPU 0~12,并没有打散到 CPU 0~79。即使是同一个网卡,其不同的 IRQ 编号对应的请求时不平均的,更多的是集中在了某几个编号上,而这几个编号恰巧绑定到了同一个 CPU 上。
解决方法
使用 OAT/antman 部署时,会使用期自带的脚本 set_nic_irq_ob.sh 对网卡和磁盘的 IRQ 进行 CPU 绑定和打散操作,绑定的 CPU 个数为 core_num=$((${total_core_num}/8 + 3)),即总的 CPU 核数的 1/8 再加 3。可以通过修改脚本来增加 CPU 的绑定个数,以达到软中断进一步打散的目的。
在以下位置找到
set_nic_irq_ob.sh。OAT: ./task_engine/shells/Antman/clonescripts/db_ob_v1/dist/set_nic_irq_ob.sh antman: ./clonescripts/db_ob_v1/dist/set_nic_irq_ob.sh修改
set_nic_irq_ob.sh中关于 CPU 绑定个数与范围的代码,比如将 core_num 直接设置为 32。irqbind_init() { total_core_num=`grep -c processor /proc/cpuinfo` # core_num=$((${total_core_num}/8 + 3)) core_num=32 # 修改为自己想要设置的值执行修改后的脚本重新绑定。
sh set_nic_irq_ob.sh start
sh set_nic_irq_ob.sh show


