
基于湖库一体架构,统一管理结构化、半结构化与非结构化等多模态数据,一个系统承载事务处理、实时分析与 AI 工作负载。


使用 obd 图形化界面部署社区版实践
更新时间:2026-04-15 16:30:41
编辑
分享
本文以通过 obd 图形化界面部署为例,介绍如何进行部署前的资源准备和配置,以及如何快速部署一个社区版分布式集群。
说明
obd 支持部署社区版和企业版 OceanBase 数据库,本文以部署社区版 OceanBase 数据库为例介绍使用 obd 图形化界面部署 OceanBase 数据库的操作。
服务器配置
本示例中使用的服务器配置如下所示。
| 类目 | 配置 |
|---|---|
| 服务器数量 | 4 台 |
| CPU | 8 核 x86_64 |
| 操作系统 | CentOS Linux release 8.5.2111 |
| 内核 | 4.18.0-348.7.1 |
| 可用内存 | 32 GB |
| 磁盘 | SSD 存储,空间大小:安装目录 196 GB、日志保存目录 2 TB 及数据保存目录 2 TB。 |
说明
生产环境下,所用服务器需满足最小可用资源要求(4 核 16 GB 内存),长期使用要求可用内存不低于 32 GB。需要注意,要求中的内存限制是指执行
free -g命令后,输出中的available列对应的值。在 CPU 核心数较少的环境中,obd 默认设置的最低 CPU_Count 为 8。CPU 核心数配置过低会对 OceanBase 数据库的性能产生负面影响。
部署模式
本文采用三副本部署模式,推荐使用四台机器,您可以根据自己实际情况选择合适的部署方案。本文中四台机器的使用情况如下:
| 角色 | 机器 | 备注 |
|---|---|---|
| obd | 10.10.10.4 | 安装在中控机上的自动化部署软件 |
| OBServer 节点 | 10.10.10.1 | OceanBase 数据库 Zone1 |
| OBServer 节点 | 10.10.10.2 | OceanBase 数据库 Zone2 |
| OBServer 节点 | 10.10.10.3 | OceanBase 数据库 Zone3 |
| ODP(又称 OBProxy) | 10.10.10.1、10.10.10.2、10.10.10.3 | OceanBase 数据库专用的代理服务器 |
| OBAgent | 10.10.10.1、10.10.10.2、10.10.10.3 | OceanBase 数据库监控采集框架 |
| obconfigserver | 10.10.10.4 | 可提供 OceanBase 的元数据注册,存储和查询服务 |
| Prometheus | 10.10.10.4 | 一个开源的服务监控系统和时序数据库,其提供了通用的数据模型以及快捷数据采集、存储和查询接口 |
| Grafana | 10.10.10.4 | 一款开源的数据可视化工具,它可以将数据源中的各种指标数据进行可视化展示,以便更直观地了解系统运行状态和性能指标 |
检查服务器软硬件配置
为确保部署能够顺利完成,在进行部署之前,需要对 OceanBase 数据库使用的服务器软硬件进行检查。
说明
每个 OBServer 节点机器均需做如下检查。
硬件环境
查看 CPU 是否支持 AVX 指令
说明
仅在所用服务器为 x86 架构时有此限制,若您使用其他架构服务器,可忽略本小节内容。
OceanBase 数据库要求服务器的 CPU 支持 AVX 指令。可通过以下命令检查 CPU 是否支持 AVX 指令。
lscpu | grep Flags | grep avx
返回结果如下所示,若输出中存在 avx 字段,说明该服务器支持 AVX 指令;若输出中不存在 avx 字段,则说明该服务器不支持 AVX 指令,您需更换为支持 AVX 的服务器。
Flags: fpu vme de pse tsc msr pae mce cx8 apic sep mtrr pge mca cmov pat pse36 clflush mmx fxsr sse sse2 ss ht syscall nx pdpe1gb rdtscp lm constant_tsc arch_perfmon rep_good nopl xtopology nonstop_tsc cpuid aperfmperf tsc_known_freq pni pclmulqdq monitor ssse3 fma cx16 pdcm pcid sse4_1 sse4_2 x2apic movbe popcnt aes xsave avx f16c rdrand hypervisor lahf_lm abm 3dnowprefetch cpuid_fault invpcid_single ssbd ibrs_enhanced fsgsbase tsc_adjust bmi1 hle avx2 smep bmi2 erms invpcid rtm avx512f avx512dq rdseed adx smap avx512ifma clflushopt clwb avx512cd sha_ni avx512bw avx512vl xsaveopt xsavec xgetbv1 xsaves avx_vnni avx512_bf16 wbnoinvd ida arat hwp hwp_notify hwp_act_window hwp_epp hwp_pkg_req avx512vbmi umip pku ospke waitpkg avx512_vbmi2 gfni vaes vpclmulqdq avx512_vnni avx512_bitalg avx512_vpopcntdq rdpid bus_lock_detect cldemote movdiri movdir64b enqcmd fsrm md_clear serialize tsxldtrk avx512_fp16 flush_l1d arch_capabilities
查看内存
运行以下命令,查看服务器的可用内存是否满足官网《OceanBase 数据库》文档 软硬件要求 中的可用内存要求。
[root@test001 ~]# free -g
返回结果如下所示,available 列所对应的 Mem 值为 32,满足可用内存要求。
              total        used        free      shared  buff/cache   available
Mem:             36           4          32           0           0          32
Swap:             0           0           0
若查看结果显示的内存不满足部署 OceanBase 数据库的内存要求,可以考虑执行如下命令清空 Linux 缓存: PageCache、dentries 和 inodes。
sudo sysctl -w vm.drop_caches=3
#或
sudo echo 3 > /proc/sys/vm/drop_caches
软件环境
查看操作系统
运行以下命令,查看操作系统信息。操作系统需要满足官网《OceanBase 数据库》文档 软硬件要求 中要求。
[root@test001 ~]# cat /etc/os-release
返回结果如下所示,可以看出所用操作系统为 CentOS Linux(NAME 字段),版本为 8(VERSION 字段)。
NAME="CentOS Linux"
VERSION="8"
ID="centos"
ID_LIKE="rhel fedora"
VERSION_ID="8"
PLATFORM_ID="platform:el8"
PRETTY_NAME="CentOS Linux 8"
ANSI_COLOR="0;31"
CPE_NAME="cpe:/o:centos:centos:8"
HOME_URL="https://centos.org/"
BUG_REPORT_URL="https://bugs.centos.org/"
CENTOS_MANTISBT_PROJECT="CentOS-8"
CENTOS_MANTISBT_PROJECT_VERSION="8"
查看内核
OceanBase 数据库目前有提供 X86 版(el7 和 el8)和 ARM 版(el7 和 el8)的安装包。部署之前,请查看服务器的内核以便获取正确的安装包。
运行以下命令,查看内核信息:
[root@test001 ~]# uname -a
返回结果如下所示,机器的内核为 4.18.0-348.7.1,其操作系统版本为 el8,CPU 架构为 x86_64,因此,需要使用后缀为 el8.x86_64 的安装包,例如 oceanbase-ce-4.3.5.2-102020032025070315.el8.x86_64.rpm。
Linux test001 4.18.0-348.7.1.el8_5.x86_64 #1 SMP Wed Dec 22 13:25:12 UTC 2021 x86_64 x86_64 x86_64 GNU/Linux
部署前配置
为确保 OceanBase 数据库社区版能够顺利安装和更好地使用,需要在部署前进行以下配置。
说明
每个 OBServer 节点机器均需做如下配置。
目录规划
部署 OceanBase 数据库社区版需要规划以下三个目录,同时要求文件系统类型为 XFS 或 EXT4。
- 安装目录:用于存放 OceanBase 数据库运行软件以及运行过程中系统日志的目录,为保证性能,空间要求 25G 以上。
- 日志保存目录:用于存放 OceanBase 数据库日志,空间要求最小为内存大小的两倍,推荐配置为内存大小的三倍以上。
- 数据保存目录:用于存储数据,空间要求最小为内存大小的两倍以上,取决于所需存储的数据大小。
注意
如果一个挂载点的目录文件容量大于 16T,仅支持 XFS 类型。
为了保证系统运行的稳定性,推荐以上三个目录分别使用不同的物理盘。如果受限于物理资源,OceanBase 数据库也支持数据保存目录和日志保存目录共用一块盘,但不推荐用于写入压力比较大的业务场景。
有关磁盘 IOPS 的要求如下:
- 如果安装目录、日志保存目录及数据保存目录分别在不同的磁盘,则要求每个磁盘的 IOPS 不低于 1000。
- 如果安装目录、日志保存目录及数据保存目录在同一磁盘,则要求该磁盘的 IOPS 不低于 3000。
磁盘挂载
如果您所拥有的机器没有需要独立挂载的磁盘,或磁盘已经全部挂载完成,可以跳过此步骤,直接进行下一步目录准备。
在 root 用户下,进行磁盘挂载操作,具体如下:
查看磁盘信息
使用
fdisk -l命令识别可用磁盘及分区[root@test001 ~]# fdisk -l返回结果如下:
Disk /dev/nvme0n1: 3.5 TiB, 3840755982336 bytes, 7501476528 sectors
Units: sectors of 1 * 512 = 512 bytes
Sector size (logical/physical): 512 bytes / 512 bytes
I/O size (minimum/optimal): 4096 bytes / 4096 bytes

Disk /dev/nvme1n1: 3.5 TiB, 3840755982336 bytes, 7501476528 sectors
Units: sectors of 1 * 512 = 512 bytes
Sector size (logical/physical): 512 bytes / 512 bytes
I/O size (minimum/optimal): 4096 bytes / 4096 bytes

Disk /dev/sda: 60 GiB, 64424509440 bytes, 125829120 sectors
Units: sectors of 1 * 512 = 512 bytes
Sector size (logical/physical): 512 bytes / 512 bytes
I/O size (minimum/optimal): 512 bytes / 512 bytes
Disklabel type: gpt
Disk identifier: 3DC9B58D-90DC-4B90-869A-33592EA28B9E

Device      Start       End   Sectors  Size Type
/dev/sda1    2048      6143      4096    2M BIOS boot
/dev/sda2    6144    415743    409600  200M EFI System
/dev/sda3  415744 125829086 125413343 59.8G Linux filesystem


Disk /dev/sdb: 200 GiB, 214748364800 bytes, 419430400 sectors
Units: sectors of 1 * 512 = 512 bytes
Sector size (logical/physical): 512 bytes / 512 bytes
I/O size (minimum/optimal): 512 bytes / 512 bytes
使用 lsblk 命令查看磁盘信息
[root@test001 ~]# lsblk返回结果如下:
NAME    MAJ:MIN RM  SIZE RO TYPE MOUNTPOINT
sda       8:0    0   60G  0 disk
├─sda1    8:1    0    2M  0 part
├─sda2    8:2    0  200M  0 part /boot/efi
└─sda3    8:3    0 59.8G  0 part /
sdb       8:16   0  200G  0 disk /home
sr0      11:0    1    4M  0 rom
nvme0n1 259:0    0  3.5T  0 disk
nvme1n1 259:0    0  3.5T  0 disk
根据上述查询,可以看到待挂载的磁盘为
/dev/nvme0n1和/dev/nvme1n1。安装 LVM 工具
[root@test001 ~]# yum install lvm2创建物理卷(PV)
将分区初始化为物理卷
注意
分区初始化为物理券时,会重新格式化分区(数据会丢失),需谨慎操作。
[root@test001 ~]# pvcreate /dev/nvme0n1
[root@test001 ~]# pvcreate /dev/nvme1n1
返回结果如下:
Physical volume "/dev/nvme0n1" successfully created.
Physical volume "/dev/nvme1n1" successfully created.
验证 PV 创建结果
[root@test001 ~]# pvs返回结果如下:
PV           VG Fmt  Attr PSize PFree
/dev/nvme0n1    lvm2 ---  3.49t 3.49t
/dev/nvme1n1    lvm2 ---  3.49t 3.49t
创建卷组(VG)
合并多个物理卷为一个 VG
[root@test001 ~]# vgcreate vgob1 /dev/nvme0n1
[root@test001 ~]# vgcreate vgob2 /dev/nvme1n1
返回结果如下:
Volume group "vgob1" successfully created
Volume group "vgob2" successfully created
查看 VG 信息
[root@test001 ~]# vgs返回结果如下:
VG   #PV #LV #SN Attr   VSize VFree
vgob1  1   0   0 wz--n- 3.49t 3.49t
vgob2  1   0   0 wz--n- 3.49t 3.49t
创建逻辑卷(LV)
从 VG 中划分逻辑卷
创建 data 逻辑卷
[root@test001 ~]# lvcreate -L 2t -n data vgob1返回结果如下:
Logical volume "data" created.创建 log 逻辑卷
[root@test001 ~]# lvcreate -L 2t -n log vgob2返回结果如下:
Logical volume "log" created.
看 LV 信息
[root@test001 ~]# lvs返回结果如下:
LV   VG    Attr       LSize Pool Origin Data%  Meta%  Move Log Cpy%Sync Convert
data vgob1 -wi-a----- 2.00t
log  vgob2 -wi-a----- 2.00t
格式化和挂载
格式化为 EXT4 文件系统
格式化 data 逻辑卷为 EXT4 文件
[root@test001 ~]# mkfs.ext4 /dev/vgob1/data返回结果如下:
mke2fs 1.46.0 (29-Jan-2020)
Discarding device blocks: done
Creating filesystem with 268435456 4k blocks and 67108864 inodes
Filesystem UUID: eb4708c8-e3e3-49b4-9444-b9c81d4be84e
Superblock backups stored on blocks:
      32768, 98304, 163840, 229376, 294912, 819200, 884736, 1605632, 2654208,
      4096000, 7962624, 11239424, 20480000, 23887872, 71663616, 78675968,
      102400000, 214990848

Allocating group tables: done
Writing inode tables: done
Creating journal (262144 blocks): done
Writing superblocks and filesystem accounting information: done
格式化 log 逻辑卷为 EXT4 文件
[root@test001 ~]# mkfs.ext4 /dev/vgob2/log返回结果如下:
mke2fs 1.46.0 (29-Jan-2020)
Discarding device blocks: done
Creating filesystem with 536870912 4k blocks and 134217728 inodes
Filesystem UUID: c48c39cd-bdb9-4635-9304-721dcf013492
Superblock backups stored on blocks:
      32768, 98304, 163840, 229376, 294912, 819200, 884736, 1605632, 2654208,
      4096000, 7962624, 11239424, 20480000, 23887872, 71663616, 78675968,
      102400000, 214990848, 512000000

Allocating group tables: done
Writing inode tables: done
Creating journal (262144 blocks): done
Writing superblocks and filesystem accounting information: done
创建挂载点
[root@test001 ~]# mkdir -p /data/log1
[root@test001 ~]# mkdir -p /data/1
临时挂载
[root@test001 ~]# mount /dev/vgob2/log /data/log1
[root@test001 ~]# mount /dev/vgob1/data /data/1
设置开机自动挂载。
编辑
/etc/fstab文件,添加挂载配置:[root@test001 ~]# vim /etc/fstab在配置文件中添加如下内容:
/dev/vgob2/log /data/log1  ext4  defaults,noatime,nodiratime,nodelalloc,barrier=0  0  0
/dev/vgob1/data /data/1  ext4  defaults,noatime,nodiratime,nodelalloc,barrier=0  0  0
查看磁盘挂载情况。
使用以下命令查看磁盘挂载情况。
[root@test001 ~]# df -h返回结果如下,可以看到磁盘已经挂载到目录
/data/1和/data/log1下。Filesystem Size Used Avail Use% Mounted on devtmpfs 4.8G 0 4.8G 0% /dev tmpfs 4.8G 0 4.8G 0% /dev/shm tmpfs 4.8G 500K 4.8G 1% /run tmpfs 4.8G 0 4.8G 0% /sys/fs/cgroup /dev/sda3 59G 4.8G 52G 9% / /dev/sda2 200M 5.8M 195M 3% /boot/efi /dev/sdb 196G 3.2G 183G 2% /home tmpfs 970M 0 970M 0% /run/user/1001 /dev/mapper/vgob1-data 2.0T 28K 1.9T 1% /data/1 /dev/mapper/vgob2-log 2.0T 28K 1.9T 1% /data/log1
目录准备
查看文件系统,是否是 EXT4 或 XFS
[root@test001 ~]# df -Th返回结果如下:
Filesystem             Type      Size  Used Avail Use% Mounted on
devtmpfs               devtmpfs  4.8G     0  4.8G   0% /dev
tmpfs                  tmpfs     4.8G     0  4.8G   0% /dev/shm
tmpfs                  tmpfs     4.8G  512K  4.8G   1% /run
tmpfs                  tmpfs     4.8G     0  4.8G   0% /sys/fs/cgroup
/dev/sda3              ext4       59G  5.0G   52G   9% /
/dev/sdb               ext4      196G  113G   74G  61% /home
/dev/sda2              vfat      200M  5.8M  195M   3% /boot/efi
/dev/mapper/vgob2-log  ext4     2.0T  2.1G  1.9T   1% /data/log1
/dev/mapper/vgob1-data ext4      2.0T  2.1G  1.9T   1% /data/1
tmpfs                  tmpfs     970M     0  970M   0% /run/user/1001
根据上述目录查看情况,在部署时选择安装目录为
/home,日志保存目录为/data/log1,数据保存目录为/data/1。查看目录所在的 IOPS 是否满足要求
说明
此处因安装目录、日志保存目录及数据保存目录分别在不同的磁盘,所以需要在对应的目录下都查询 IOPS 情况。如果安装目录、日志保存目录及数据保存目录为同一磁盘,只需切换到该磁盘的挂载目录下,查询 IOPS 情况。
若服务器中无 fio 工具,可执行
yum install -y fio命令安装。
查看安装目录 IOPS
切换到安装目录下,执行以下操作:
[root@test001 /home]# fio -filename=./testfile -direct=1 -iodepth 1 -thread -rw=write -ioengine=psync -bs=4k -size=20G -numjobs=1 -runtime=180 -group_reporting -name=sqe_100write_4k --fsync=1 --fallocate=posix返回结果如下:
sqe_100write_4k: (g=0): rw=write, bs=(R) 4096B-4096B, (W) 4096B-4096B, (T) 4096B-4096B, ioengine=psync, iodepth=1
fio-3.34
Starting 1 thread
Jobs: 1 (f=1): [W(1)][100.0%][w=6648KiB/s][w=1662 IOPS][eta 00m:00s]
sqe_100write_4k: (groupid=0, jobs=1): err= 0: pid=145805: Thu May  8 10:39:32 2025
write: IOPS=2012, BW=8051KiB/s (8244kB/s)(1415MiB/180001msec); 0 zone resets
   clat (usec): min=84, max=3732, avg=174.51, stdev=71.93
   lat (usec): min=84, max=3732, avg=174.77, stdev=71.98
   clat percentiles (usec):
   |  1.00th=[   89],  5.00th=[   90], 10.00th=[   91], 20.00th=[   95],
   | 30.00th=[  100], 40.00th=[  141], 50.00th=[  184], 60.00th=[  210],
   | 70.00th=[  221], 80.00th=[  231], 90.00th=[  265], 95.00th=[  285],
   | 99.00th=[  351], 99.50th=[  371], 99.90th=[  441], 99.95th=[  515],
   | 99.99th=[  824]
   bw (  KiB/s): min= 3432, max=17608, per=100.00%, avg=8056.18, stdev=4234.76, samples=359
   iops        : min=  858, max= 4402, avg=2014.04, stdev=1058.69, samples=359
lat (usec)   : 100=30.58%, 250=57.09%, 500=12.28%, 750=0.04%, 1000=0.02%
lat (msec)   : 2=0.01%, 4=0.01%
fsync/fdatasync/sync_file_range:
   sync (usec): min=64, max=5690, avg=319.43, stdev=230.86
   sync percentiles (usec):
   |  1.00th=[   68],  5.00th=[   69], 10.00th=[   70], 20.00th=[   72],
   | 30.00th=[   95], 40.00th=[  194], 50.00th=[  379], 60.00th=[  412],
   | 70.00th=[  457], 80.00th=[  474], 90.00th=[  578], 95.00th=[  685],
   | 99.00th=[  996], 99.50th=[ 1205], 99.90th=[ 1336], 99.95th=[ 1385],
   | 99.99th=[ 1713]
cpu          : usr=0.86%, sys=11.80%, ctx=714705, majf=0, minf=0
IO depths    : 1=200.0%, 2=0.0%, 4=0.0%, 8=0.0%, 16=0.0%, 32=0.0%, >=64=0.0%
   submit    : 0=0.0%, 4=100.0%, 8=0.0%, 16=0.0%, 32=0.0%, 64=0.0%, >=64=0.0%
   complete  : 0=0.0%, 4=100.0%, 8=0.0%, 16=0.0%, 32=0.0%, 64=0.0%, >=64=0.0%
   issued rwts: total=0,362308,0,362308 short=0,0,0,0 dropped=0,0,0,0
   latency   : target=0, window=0, percentile=100.00%, depth=1

Run status group 0 (all jobs):
WRITE: bw=8051KiB/s (8244kB/s), 8051KiB/s-8051KiB/s (8244kB/s-8244kB/s), io=1415MiB (1484MB), run=180001-180001msec

Disk stats (read/write):
sdb: ios=0/935811, merge=0/335611, ticks=0/164939, in_queue=217509, util=99.97%
执行完成上述操作后,请在目录下面删除 testfile 文件,以防磁盘空间不够。
[root@test001 /home]# rm -rf testfile查看日志保存目录 IOPS
切换到日志保存目录下,执行以下操作:
[root@test001 /data/log1]# fio -filename=./testfile -direct=1 -iodepth 1 -thread -rw=write -ioengine=psync -bs=4k -size=20G -numjobs=1 -runtime=180 -group_reporting -name=sqe_100write_4k --fsync=1 --fallocate=posix返回结果如下:
sqe_100write_4k: (g=0): rw=write, bs=(R) 4096B-4096B, (W) 4096B-4096B, (T) 4096B-4096B, ioengine=psync, iodepth=1
fio-3.34
Starting 1 thread
Jobs: 1 (f=1): [W(1)][100.0%][w=6648KiB/s][w=1662 IOPS][eta 00m:00s]
sqe_100write_4k: (groupid=0, jobs=1): err= 0: pid=145805: Thu May  8 10:39:32 2025
write: IOPS=2012, BW=8051KiB/s (8244kB/s)(1415MiB/180001msec); 0 zone resets
   clat (usec): min=84, max=3732, avg=174.51, stdev=71.93
   lat (usec): min=84, max=3732, avg=174.77, stdev=71.98
   clat percentiles (usec):
   |  1.00th=[   89],  5.00th=[   90], 10.00th=[   91], 20.00th=[   95],
   | 30.00th=[  100], 40.00th=[  141], 50.00th=[  184], 60.00th=[  210],
   | 70.00th=[  221], 80.00th=[  231], 90.00th=[  265], 95.00th=[  285],
   | 99.00th=[  351], 99.50th=[  371], 99.90th=[  441], 99.95th=[  515],
   | 99.99th=[  824]
   bw (  KiB/s): min= 3432, max=17608, per=100.00%, avg=8056.18, stdev=4234.76, samples=359
   iops        : min=  858, max= 4402, avg=2014.04, stdev=1058.69, samples=359
lat (usec)   : 100=30.58%, 250=57.09%, 500=12.28%, 750=0.04%, 1000=0.02%
lat (msec)   : 2=0.01%, 4=0.01%
fsync/fdatasync/sync_file_range:
   sync (usec): min=64, max=5690, avg=319.43, stdev=230.86
   sync percentiles (usec):
   |  1.00th=[   68],  5.00th=[   69], 10.00th=[   70], 20.00th=[   72],
   | 30.00th=[   95], 40.00th=[  194], 50.00th=[  379], 60.00th=[  412],
   | 70.00th=[  457], 80.00th=[  474], 90.00th=[  578], 95.00th=[  685],
   | 99.00th=[  996], 99.50th=[ 1205], 99.90th=[ 1336], 99.95th=[ 1385],
   | 99.99th=[ 1713]
cpu          : usr=0.86%, sys=11.80%, ctx=714705, majf=0, minf=0
IO depths    : 1=200.0%, 2=0.0%, 4=0.0%, 8=0.0%, 16=0.0%, 32=0.0%, >=64=0.0%
   submit    : 0=0.0%, 4=100.0%, 8=0.0%, 16=0.0%, 32=0.0%, 64=0.0%, >=64=0.0%
   complete  : 0=0.0%, 4=100.0%, 8=0.0%, 16=0.0%, 32=0.0%, 64=0.0%, >=64=0.0%
   issued rwts: total=0,362308,0,362308 short=0,0,0,0 dropped=0,0,0,0
   latency   : target=0, window=0, percentile=100.00%, depth=1

Run status group 0 (all jobs):
WRITE: bw=8051KiB/s (8244kB/s), 8051KiB/s-8051KiB/s (8244kB/s-8244kB/s), io=1415MiB (1484MB), run=180001-180001msec

Disk stats (read/write):
sdb: ios=0/935811, merge=0/335611, ticks=0/164939, in_queue=217509, util=99.97%
执行完成上述操作后,请在目录下面删除 testfile 文件,以防磁盘空间不够。
[root@test001 /data/log1]# rm -rf testfile查看数据保存目录 IOPS
切换到数据保存目录下,执行以下操作:
[root@test001 /data/1]# fio -filename=./testfile -direct=1 -iodepth 1 -thread -rw=write -ioengine=psync -bs=4k -size=20G -numjobs=1 -runtime=180 -group_reporting -name=sqe_100write_4k --fsync=1 --fallocate=posix返回结果如下:
sqe_100write_4k: (g=0): rw=write, bs=(R) 4096B-4096B, (W) 4096B-4096B, (T) 4096B-4096B, ioengine=psync, iodepth=1
fio-3.34
Starting 1 thread
Jobs: 1 (f=1): [W(1)][100.0%][w=6648KiB/s][w=1662 IOPS][eta 00m:00s]
sqe_100write_4k: (groupid=0, jobs=1): err= 0: pid=145805: Thu May  8 10:39:32 2025
write: IOPS=2012, BW=8051KiB/s (8244kB/s)(1415MiB/180001msec); 0 zone resets
   clat (usec): min=84, max=3732, avg=174.51, stdev=71.93
   lat (usec): min=84, max=3732, avg=174.77, stdev=71.98
   clat percentiles (usec):
   |  1.00th=[   89],  5.00th=[   90], 10.00th=[   91], 20.00th=[   95],
   | 30.00th=[  100], 40.00th=[  141], 50.00th=[  184], 60.00th=[  210],
   | 70.00th=[  221], 80.00th=[  231], 90.00th=[  265], 95.00th=[  285],
   | 99.00th=[  351], 99.50th=[  371], 99.90th=[  441], 99.95th=[  515],
   | 99.99th=[  824]
   bw (  KiB/s): min= 3432, max=17608, per=100.00%, avg=8056.18, stdev=4234.76, samples=359
   iops        : min=  858, max= 4402, avg=2014.04, stdev=1058.69, samples=359
lat (usec)   : 100=30.58%, 250=57.09%, 500=12.28%, 750=0.04%, 1000=0.02%
lat (msec)   : 2=0.01%, 4=0.01%
fsync/fdatasync/sync_file_range:
   sync (usec): min=64, max=5690, avg=319.43, stdev=230.86
   sync percentiles (usec):
   |  1.00th=[   68],  5.00th=[   69], 10.00th=[   70], 20.00th=[   72],
   | 30.00th=[   95], 40.00th=[  194], 50.00th=[  379], 60.00th=[  412],
   | 70.00th=[  457], 80.00th=[  474], 90.00th=[  578], 95.00th=[  685],
   | 99.00th=[  996], 99.50th=[ 1205], 99.90th=[ 1336], 99.95th=[ 1385],
   | 99.99th=[ 1713]
cpu          : usr=0.86%, sys=11.80%, ctx=714705, majf=0, minf=0
IO depths    : 1=200.0%, 2=0.0%, 4=0.0%, 8=0.0%, 16=0.0%, 32=0.0%, >=64=0.0%
   submit    : 0=0.0%, 4=100.0%, 8=0.0%, 16=0.0%, 32=0.0%, 64=0.0%, >=64=0.0%
   complete  : 0=0.0%, 4=100.0%, 8=0.0%, 16=0.0%, 32=0.0%, 64=0.0%, >=64=0.0%
   issued rwts: total=0,362308,0,362308 short=0,0,0,0 dropped=0,0,0,0
   latency   : target=0, window=0, percentile=100.00%, depth=1

Run status group 0 (all jobs):
WRITE: bw=8051KiB/s (8244kB/s), 8051KiB/s-8051KiB/s (8244kB/s-8244kB/s), io=1415MiB (1484MB), run=180001-180001msec

Disk stats (read/write):
sdb: ios=0/935811, merge=0/335611, ticks=0/164939, in_queue=217509, util=99.97%
执行完成上述操作后,请在目录下面删除 testfile 文件,以防磁盘空间不够。
[root@test001 /data/1]# rm -rf testfile
根据上述查询结果得知,每块磁盘的 IOPS 都符合相应的要求。
配置时钟同步
部署分布式 OceanBase 集群时,需要保证集群内各机器的时间同步,否则集群无法启动,服务在运行时也会出现异常。OceanBase 集群允许的时间偏差不能超过 2s。当超过 2s 时,会出现无主情况。恢复时钟同步后,重启 OceanBase 集群,可以恢复正常。
说明
此处仅以一台机器操作为例,您需按照如下步骤为集群内的所有机器配置时钟同步。
安装 chrony 服务
[root@test001 ~]# yum -y install chrony配置 chrony 文件
[root@test001 ~]# vim /etc/chrony.conf示例如下:
# Use Alibaba NTP server
# Public NTP
# Alicloud NTP
##使用阿里云的多个 NTP 服务器同步时间,提高时间同步的可靠性和容错能力
##minpoll 4 表示设置 NTP 客户端与服务器之间的最小同步间隔为 16 秒(当时间偏差较小时)
##maxpoll 10 表示设置 NTP 客户端与服务器之间的最大同步间隔为 1024 秒(当时间偏差较大时)
##iburst 表示在首次连接或重新连接时,快速发送 4 个 NTP 数据包(间隔 2 秒),加速时间同步,减少首次同步时间偏差
server ntp.cloud.aliyuncs.com minpoll 4 maxpoll 10 iburst
server ntp.aliyun.com minpoll 4 maxpoll 10 iburst
server ntp1.aliyun.com minpoll 4 maxpoll 10 iburst
server ntp1.cloud.aliyuncs.com minpoll 4 maxpoll 10 iburst
server ntp10.cloud.aliyuncs.com minpoll 4 maxpoll 10 iburst
server ntp11.cloud.aliyuncs.com minpoll 4 maxpoll 10 iburst
server ntp12.cloud.aliyuncs.com minpoll 4 maxpoll 10 iburst
server ntp2.aliyun.com minpoll 4 maxpoll 10 iburst
server ntp2.cloud.aliyuncs.com minpoll 4 maxpoll 10 iburst
server ntp3.aliyun.com minpoll 4 maxpoll 10 iburst
server ntp3.cloud.aliyuncs.com minpoll 4 maxpoll 10 iburst
server ntp4.aliyun.com minpoll 4 maxpoll 10 iburst
server ntp4.cloud.aliyuncs.com minpoll 4 maxpoll 10 iburst
server ntp5.aliyun.com minpoll 4 maxpoll 10 iburst
server ntp5.cloud.aliyuncs.com minpoll 4 maxpoll 10 iburst
server ntp6.aliyun.com minpoll 4 maxpoll 10 iburst
server ntp6.cloud.aliyuncs.com minpoll 4 maxpoll 10 iburst
server ntp7.cloud.aliyuncs.com minpoll 4 maxpoll 10 iburst
server ntp8.cloud.aliyuncs.com minpoll 4 maxpoll 10 iburst
server ntp9.cloud.aliyuncs.com minpoll 4 maxpoll 10 iburst

# Ignore stratum in source selection.
stratumweight 0.05

# Record the rate at which the system clock gains/losses time.
##根据实际时间计算出服务器增减时间的比率,并记录到 /var/lib/chrony/drift 中,在系统重启后为系统做出最佳时间补偿调整
driftfile /var/lib/chrony/drift

# Enable kernel RTC synchronization.
##将启用一个内核模式,在该模式中,系统时间每 11 分钟会拷贝到实时时钟(RTC)。
rtcsync

# In first three updates step the system clock instead of slew
# if the adjustment is larger than 10 seconds.
makestep 10 3

# Allow NTP client access from local network.
#allow 192.168/16

# Listen for commands only on localhost.
bindcmdaddress 127.0.0.1
bindcmdaddress ::1

# Disable logging of client accesses.
noclientlog

# Send a message to syslog if a clock adjustment is larger than 0.5 seconds.
logchange 0.5

##指定日志文件的目录
logdir /var/log/chrony
#log measurements statistics tracking
启动 chronyd 服务
设置开机自启:
[root@test001 ~]# systemctl enable chronyd启动 chronyd 服务:
[root@test001 ~]# systemctl start chronyd强制同步时间
仅在首次配置后需要执行如下命令强制同步时间。
[root@test001 ~]# chronyc makestep查看时间跟踪状态
[root@test001 ~]# chronyc tracking返回结果如下,您需关注 Last offset(最后一次同步的时间偏差)和 RMS offset(平均时间偏差(均方根值))字段。通过比较每台机器执行结果中的字段值可判断机器键的时间偏差值。
Reference ID    : 64643D58 (xx.xx.xx.xx)
Stratum         : 2
Ref time (UTC)  : Fri Jul 18 09:44:59 2025
System time     : 0.000022816 seconds fast of NTP time
Last offset     : -0.000012218 seconds
RMS offset      : 0.000051287 seconds
Frequency       : 6.951 ppm slow
Residual freq   : -0.000 ppm
Skew            : 0.010 ppm
Root delay      : 0.000890165 seconds
Root dispersion : 0.011471443 seconds
Update interval : 1041.4 seconds
Leap status     : Normal
用户及参数配置
部署前还需对机器做如下配置:
创建用户
说明
不推荐在 root 用户下部署 OceanBase 数据库,建议创建其他用户用于部署,推荐使用 admin 用户。用户需为数据库相关目录的所有者。
配置 limits.conf
配置 sysctl.conf
关闭防火墙和 SELinux
obd 支持通过主机命令组对主机和对应用户执行初始化操作,您可选择通过 obd 命令进行上述配置配置,也可选择手动配置。推荐通过 obd 命令配置。
obd 命令操作
手动配置
安装 obd
执行如下命令在线安装 obd。您也可以访问 OceanBase 软件下载中心,下载 obd 包后通过安装包安装。更多安装 obd 的方法介绍可参见 安装 obd。
安装 yum-utils:
[root@test001 ~]$ yum install -y yum-utils添加 OceanBase 镜像源:
[root@test001 ~]$ yum-config-manager --add-repo https://mirrors.aliyun.com/oceanbase/OceanBase.repo安装 obd,默认安装最新版本:
[root@test001 ~]$ yum install -y ob-deploy配置应用环境:
[root@test001 ~]$ source /etc/profile.d/obd.sh说明
如需部署企业版 OceanBase 数据库,可联系技术支持人员获取安装包,并执行
obd mirror clone命令上传至 obd 本地镜像库,上传后可执行obd mirror list local命令查看本地镜像库中的安装包。创建用户并初始化用户
说明
初始化用户命令为 obd V3.5.0 新增命令,具体介绍可参见 主机命令组 中
obd host user init部分内容。ODP 节点及其他组件节点也需执行下述命令部署并初始化用户。
[root@test001 ~]$ obd host user init -u admin --host=10.10.10.1 -p ********此处以为
10.10.10.1机器创建并初始化admin用户为例,您需根据实际情况配置待创建并初始化的用户(-u)、待创建用户的主机 IP(--host)、用户密码(-p)信息。该命令执行时会先尝试使用设置的用户(示例中为
admin)登录目标机器(10.10.10.1),若无法连接,则需输入拥有 sudo 权限的用户及密码。obd 会使用输入的用户登录目标机器,并对指定用户执行如下初始化操作:设置 ulimit 参数:修改系统资源限制参数,涉及修改的参数可参见官网《OceanBase 数据库》文档 配置 limits.conf。创建用户成功后,可在目标机器上登录创建的用户执行
ulimit -a命令查看配置是否生效。配置免密 sudo 权限:为指定用户配置免密执行 sudo 命令的权限。
说明
配置 sudo 免密是为了方便操作,您可在部署集群完成后手动去除 sudo 免密。
启用密码登录:确保用户可以通过密码方式登录系统。
修改目录所有者:若目标机器中存在
/data/1和/data/log1目录,将目录的所有者修改为指定的用户。
初始化主机
[root@test001 ~]$ obd host init admin 10.10.10.1 -p ********此处以为使用
admin用户登录10.10.10.1机器并执行初始化操作为例,您需根据实际情况配置登录用户、待初始化主机 IP、登录用户密码(-p)信息。命令具体介绍可参见 主机命令组 中obd host init部分内容。使用该命令可自动修改部署 OceanBase 数据库时建议修改的内核参数、关闭防火墙和 SELinux 功能、修改
/data/1和/data/log1目录属主(如存在对应目录),并安装 network 组件。具体修改的内核参数可查看官网《OceanBase 数据库》文档 配置 sysctl.conf。输出如下:
get system config ok
+-------------------------------------------------------------------------------------------------+
|                                   System Parameter Change List                                  |
+---------------+-------------------------------------------+---------------+---------------------+
| ip            | name                                      | current_value | expected_value      |
+---------------+-------------------------------------------+---------------+---------------------+
| 10.10.10.1    | fs.aio-max-nr                             | 65536         | 1048576             |
| 10.10.10.1    | net.core.somaxconn                        | 128           | 2048                |
| 10.10.10.1    | net.core.netdev_max_backlog               | 1000          | 10000               |
| 10.10.10.1    | net.core.rmem_default                     | 212992        | 16777216            |
| 10.10.10.1    | net.core.wmem_default                     | 212992        | 16777216            |
| 10.10.10.1    | net.core.rmem_max                         | 212992        | 16777216            |
| 10.10.10.1    | net.core.wmem_max                         | 212992        | 16777216            |
| 10.10.10.1    | net.ipv4.conf.default.rp_filter           | 0             | 1                   |
| 10.10.10.1    | net.ipv4.conf.default.accept_source_route | 1             | 0                   |
| 10.10.10.1    | net.ipv4.tcp_rmem                         | 6291456       | 4096 87380 16777216 |
| 10.10.10.1    | net.ipv4.tcp_wmem                         | 16384         | 4096 65536 16777216 |
| 10.10.10.1    | net.ipv4.tcp_max_syn_backlog              | 1024          | 16384               |
| 10.10.10.1    | net.ipv4.tcp_fin_timeout                  | 60            | 15                  |
| 10.10.10.1    | vm.min_free_kbytes                        | 67584         | 2097152             |
| 10.10.10.1    | fs.file-max                               | 3205772       | 6573688             |
| 10.10.10.1    | fs.pipe-user-pages-soft                   | 16384         | 0                   |
| 10.10.10.1    | vm.max_map_count                          | 65530         | 655360              |
| 10.10.10.1    | nofile                                    | 65535         | 655350              |
+---------------+-------------------------------------------+---------------+---------------------+
chown dir ok
modify system parameters
10.10.10.1: ( fs.aio-max-nr,net.core.somaxconn,net.core.netdev_max_backlog,net.core.rmem_default,net.core.wmem_default... ) have been successfully modified!
You must reboot the following servers to ensure the ulimit parameters take effect: (10.10.10.1).
Trace ID: f9491158-71db-11f0-81f0-00163e513302
If you want to view detailed obd logs, please run: obd display-trace f9491158-71db-11f0-81f0-00163e513302
查看 admin 用户情况
[root@test001 ~]$ sudo -l -U admin返回结果如下,表示 admin 用户拥有了免密 sudo 的权限。
Matching Defaults entries for admin on test001:
    !visiblepw, always_set_home, match_group_by_gid, always_query_group_plugin, env_reset, env_keep="COLORS DISPLAY HOSTNAME HISTSIZE
    KDEDIR LS_COLORS", env_keep+="MAIL PS1 PS2 QTDIR USERNAME LANG LC_ADDRESS LC_CTYPE", env_keep+="LC_COLLATE LC_IDENTIFICATION
    LC_MEASUREMENT LC_MESSAGES", env_keep+="LC_MONETARY LC_NAME LC_NUMERIC LC_PAPER LC_TELEPHONE", env_keep+="LC_TIME LC_ALL LANGUAGE
    LINGUAS _XKB_CHARSET XAUTHORITY", secure_path=/sbin\:/bin\:/usr/sbin\:/usr/bin

User admin may run the following commands on test001:
    (ALL) NOPASSWD: ALL
验证 ulimit 配置是否生效
切换到 admin 用户下执行如下命令,查看配置是否生效。
[admin@test001 ~]# ulimit -a输出如下:
core file size          (blocks, -c) unlimited
data seg size           (kbytes, -d) unlimited
scheduling priority             (-e) 0
file size               (blocks, -f) unlimited
pending signals                 (-i) 252876
max locked memory       (kbytes, -l) 64
max memory size         (kbytes, -m) unlimited
open files                      (-n) 655350
pipe size            (512 bytes, -p) 8
POSIX message queues     (bytes, -q) 819200
real-time priority              (-r) 0
stack size              (kbytes, -s) unlimited
cpu time               (seconds, -t) unlimited
max user processes              (-u) 655360
virtual memory          (kbytes, -v) unlimited
file locks                      (-x) unlimited
上述查询结果中,您需关注如下字段值:
core file size表示核心文件的最大阈值(以块为单位),对应limits.conf配置文件中的 core 参数,需查看值是否为unlimited。open files表示最大打开文件描述符数,对应limits.conf配置文件中的 nofile 参数,需查看值是否为655350。stack size表示堆栈大小(以千字节为单位),对应limits.conf配置文件中的 stack 参数,需查看值是否为unlimited。max user processes表示最大用户进程数,对应limits.conf配置文件中的 nproc 参数,需查看值是否为655360。
验证其他配置
可执行
obd host precheck命令检查主机是否满足要求,该命令会检查sysctl.conf文件中是否存在与建议值不同的内核参数、是否关闭防火墙和 SELinux 功能、/data/1和/data/log1目录的所有者是否为指定的用户等,具体介绍可参见 主机命令组 中 obd host precheck 部分内容。obd host precheck admin 10.10.10.1 -p ********若检查项均符合要求,输出示例如下:
get system config ok
No need to change system parameters
Please run `obd host user init -u admin --host=10.10.10.1` to init user.
Please run `obd host init admin 10.10.10.1 -p *******` to init host.
Trace ID: 22baecfe-71d8-11f0-9467-00163e513302
If you want to view detailed obd logs, please run: obd display-trace 22baecfe-71d8-11f0-9467-00163e513302
若存在不符合要求的检查项,输出中将会展示对应信息,您可执行
obd host user init或obd host init命令进行初始化。存在不符合要求的检查项的示例如下:get system config ok [WARN] The owner of the ['/data/1', '/data/log1'] directory is not admin. No need to change system parameters Please run `obd host user init -u admin --host=10.10.10.1` to init user. Please run `obd host init admin 10.10.10.1 -p *******` to init host. Trace ID: 4dcae674-7be2-11f0-a2bc-00163e53f118 If you want to view detailed obd logs, please run: obd display-trace 4dcae674-7be2-11f0-a2bc-00163e53f118
创建用户
不推荐在 root 用户下部署 OceanBase 集群,建议创建其他用户用于部署,推荐使用 admin 用户。用户需为数据库相关目录的所有者。
说明
ODP 节点及其他组件节点也需参考本节创建部署用户。
执行以下命令,创建用户组 admin 以及创建用户 admin。
[root@test001 ~]# useradd -U admin -d /home/admin -s /bin/bash执行以下命令,为用户
admin设置密码。[root@test001 ~]# passwd admin为用户
admin设置 sudo 权限。说明
为 admin 用户赋与 sudo 权限不是必须操作,只是为了某些时候方便操作。您可以结合企业安全规范决定是否执行。
添加
/etc/sudoers文件的写权限:[root@test001 ~]# chmod u+w /etc/sudoers执行以下命令,打开
/etc/sudoers文件:[root@test001 ~]# vim /etc/sudoers在
/etc/sudoers文件末尾添加如下内容:## Same thing without a password # %wheel ALL=(ALL) NOPASSWD: ALL admin ALL=(ALL) NOPASSWD: ALL查看 admin 用户情况。
sudo -l -U admin返回结果如下,表示 admin 用户拥有了免密 sudo 的权限。
Matching Defaults entries for admin on test001:
    !visiblepw, always_set_home, match_group_by_gid, always_query_group_plugin, env_reset, env_keep="COLORS DISPLAY HOSTNAME HISTSIZE
    KDEDIR LS_COLORS", env_keep+="MAIL PS1 PS2 QTDIR USERNAME LANG LC_ADDRESS LC_CTYPE", env_keep+="LC_COLLATE LC_IDENTIFICATION
    LC_MEASUREMENT LC_MESSAGES", env_keep+="LC_MONETARY LC_NAME LC_NUMERIC LC_PAPER LC_TELEPHONE", env_keep+="LC_TIME LC_ALL LANGUAGE
    LINGUAS _XKB_CHARSET XAUTHORITY", secure_path=/sbin\:/bin\:/usr/sbin\:/usr/bin

User admin may run the following commands on test001:
    (ALL) NOPASSWD: ALL
设置目录权限。
部署 OceanBase 数据库的用户需为数据库相关目录的所有者,需执行如下命令将磁盘挂载所对应的目录的属主修改为 admin。
[root@test001 ~]# chown -R admin:admin /data/log1
[root@test001 ~]# chown -R admin:admin /data/1
验证目录权限。
切换到
/data目录下查看目录权限。[root@test001 /data]# ls -al返回如下结果,目录
/data/1和/data/log1的属主为 admin 用户。total 20 drwxr-xr-x 5 root root 4096 Apr 29 15:39 . dr-xr-xr-x. 20 root root 4096 Apr 29 15:39 .. drwxr-xr-x 2 root root 4096 Apr 28 15:28 0 drwxr-xr-x 3 admin admin 4096 Apr 29 15:25 1 drwxr-xr-x 3 admin admin 4096 Apr 29 15:25 log1
配置 limits.conf
在 admin 用户下进行 limits.conf 配置,具体操作如下。
打开
/etc/security/limits.conf进行配置。[admin@test001 ~]# sudo vim /etc/security/limits.conf在
/etc/security/limits.conf配置文件中添加以下内容:* soft nofile 655350 * hard nofile 655350 * soft stack unlimited * hard stack unlimited * soft nproc 655360 * hard nproc 655360 * soft core unlimited * hard core unlimited重启机器。
[admin@test001 ~]# sudo reboot再次连接机器,执行以下命令,查看配置是否生效。
[admin@test001 ~]# ulimit -a输出如下:
core file size          (blocks, -c) unlimited
data seg size           (kbytes, -d) unlimited
scheduling priority             (-e) 0
file size               (blocks, -f) unlimited
pending signals                 (-i) 252876
max locked memory       (kbytes, -l) 64
max memory size         (kbytes, -m) unlimited
open files                      (-n) 655350
pipe size            (512 bytes, -p) 8
POSIX message queues     (bytes, -q) 819200
real-time priority              (-r) 0
stack size              (kbytes, -s) unlimited
cpu time               (seconds, -t) unlimited
max user processes              (-u) 655360
virtual memory          (kbytes, -v) unlimited
file locks                      (-x) unlimited
上述查询结果中,您需关注如下字段值:
core file size表示核心文件的最大阈值(以块为单位),对应limits.conf配置文件中的 core 参数,需查看值是否为unlimited。open files表示最大打开文件描述符数,对应limits.conf配置文件中的 nofile 参数,需查看值是否为655350。stack size表示堆栈大小(以千字节为单位),对应limits.conf配置文件中的 stack 参数,需查看值是否为unlimited。max user processes表示最大用户进程数,对应limits.conf配置文件中的 nproc 参数,需查看值是否为655360。
配置 sysctl.conf
在 admin 用户下执行以下命令,打开 /etc/sysctl.conf 配置文件:
[admin@test001 ~]# sudo vim /etc/sysctl.conf
在 /etc/sysctl.conf 配置文件中添加以下内容:
# for oceanbase
## 修改内核异步 I/O 限制
fs.aio-max-nr = 1048576

## 网络优化
net.core.somaxconn = 2048
net.core.netdev_max_backlog = 10000
net.core.rmem_default = 16777216
net.core.wmem_default = 16777216
net.core.rmem_max = 16777216
net.core.wmem_max = 16777216

net.ipv4.ip_forward = 0
net.ipv4.conf.default.rp_filter = 1
net.ipv4.conf.default.accept_source_route = 0
net.ipv4.tcp_syncookies = 1
net.ipv4.tcp_rmem = 4096 87380 16777216
net.ipv4.tcp_wmem = 4096 65536 16777216
net.ipv4.tcp_max_syn_backlog = 16384
net.ipv4.tcp_fin_timeout = 15
net.ipv4.tcp_slow_start_after_idle=0

vm.swappiness = 0
vm.min_free_kbytes = 2097152
vm.overcommit_memory = 0

fs.file-max = 6573688
fs.pipe-user-pages-soft = 0

# 修改进程可以拥有的虚拟内存区域数量
vm.max_map_count = 655360

# 设置 core 文件的文件名格式以及目录
kernel.core_pattern = /data/core-%e-%p-%t
更改配置完成后,执行以下命令,加载配置,使配置生效。
[admin@test001 ~]# sudo sysctl -p
说明
内核参数 net.ipv4.ip_forward 配置为 0 时会禁用系统的 IP 转发功能。当 OceanBase 数据库与其他 Docker 容器在同一宿主机上部署时,此设置将阻断容器与外部网络的通信,因为 Docker 容器依赖宿主机的 IP 转发来实现网络连接。建议通过以下命令启用 IP 转发:
- 临时生效:
sysctl -w net.ipv4.ip_forward=1 - 永久生效:在
/etc/sysctl.conf中配置net.ipv4.ip_forward=1,保存修改后执行sysctl -p使配置生效。
关闭防火墙和 SELinux
在 admin 用户下继续执行以下操作,关闭防火墙和 SELinux。
关闭防火墙
依次执行以下命令,关闭防火墙:
[admin@test001 ~]# sudo systemctl disable firewalld
[admin@test001 ~]# sudo systemctl stop firewalld
关闭后可执行
systemctl status firewalld命令查看防火墙状态,输出如下:firewalld.service - firewalld - dynamic firewall daemon Loaded: loaded (/usr/lib/systemd/system/firewalld.service; disabled; vendor preset: enabled) Active: inactive (dead) Docs: man:firewalld(1)关闭 SELinux
执行以下命令,打开
/etc/selinux/config配置文件:[admin@test001 ~]# sudo vim /etc/selinux/config在
/etc/selinux/config配置文件中修改对应配置项为以下内容:SELINUX=disabled执行以下命令或重启服务器,使更改生效:
[admin@test001 ~]# setenforce 0执行以下命令,查看更改是否生效:
sestatus返回结果如下,说明 SELINUX 已关闭。
SELinux status: disabled
设置 SSH 免密登录
在 admin 用户下配置 obd 所在机器(中控机)到本机和各组件节点间的 SSH 免密登录。
说明
ODP 节点及其他组件节点也需参考本节设置中控机与节点间的 SSH 免密登录。
设置 SSH 免密登录是为了操作方便,若各节点中 admin 用户的密码均一致,可跳过本步骤,通过密码验证用户。
在中控机中查看密钥是否存在
[admin@test001 ~]# ls ~/.ssh/id_rsa.pub(可选)生成 SSH 公钥和私钥
若 obd 所在机器中不存在密钥,可执行如下命令生成 SSH 公钥和私钥,命令执行后一直按键盘
Enter键使用默认值即可:[admin@test001 ~]# ssh-keygen -t rsa将公钥复制到 OBServer 节点机器的
authorized_keys文件中[admin@test001 ~]# ssh-copy-id -i ~/.ssh/id_rsa.pub admin@10.10.10.1您需将公钥复制到中控机本机和集群节点机器中,此处仅以复制到
10.10.10.1机器为例。
配置负载均衡
obd 自 V3.3.0 起支持通过图形化界面部署 ODP 时配置负载均衡(VIP/DNS)。若计划部署多个 ODP 节点,可参照本节操作为 ODP 配置负载均衡。
F5 BIG-IP 本地流量管理器 (Local Traffic Manager,LTM) 是一款应用流量管理系统,可将多个 ODP 节点分别接入 F5 从而实现 ODP 的负载均衡。按照下述步骤使用 LTM 的四层功能,即可配置 ODP 对外服务的端口。
说明
执行本节操作前,请确保已完成 F5 BIG-IP 配置,并激活 License;已确认 F5 IP 地址(默认 IP 地址为 192.168.1.245);已确认 ODP 服务器 IP 地址及端口。
输入用户名、密码,登录 F5 BIG-IP ,默认用户名密码为:
admin/admin。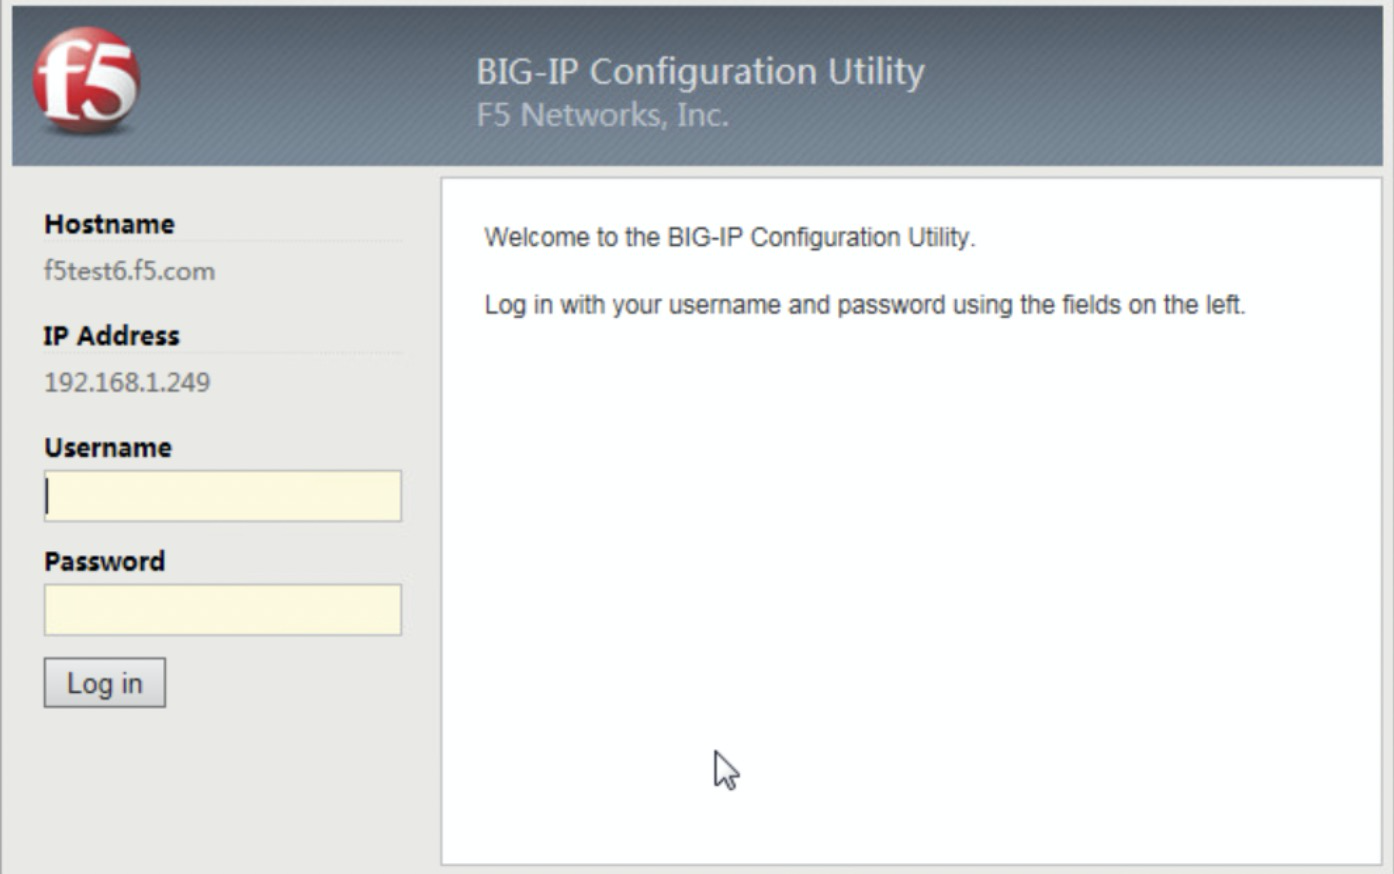
创建 Pools :
单击 Local Traffic>Monitors ,新增 Monitor 选择类型为 TCP Half Open 。
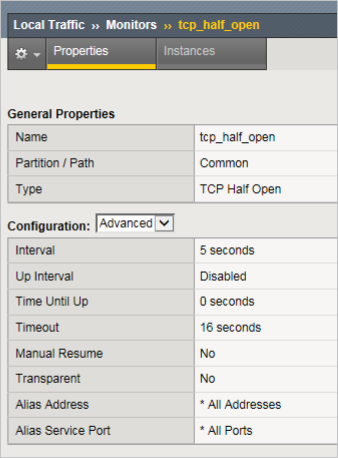
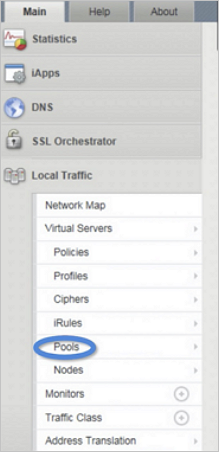
单击 Local Traffic>Pools , 单击 + ,新建 Pool。
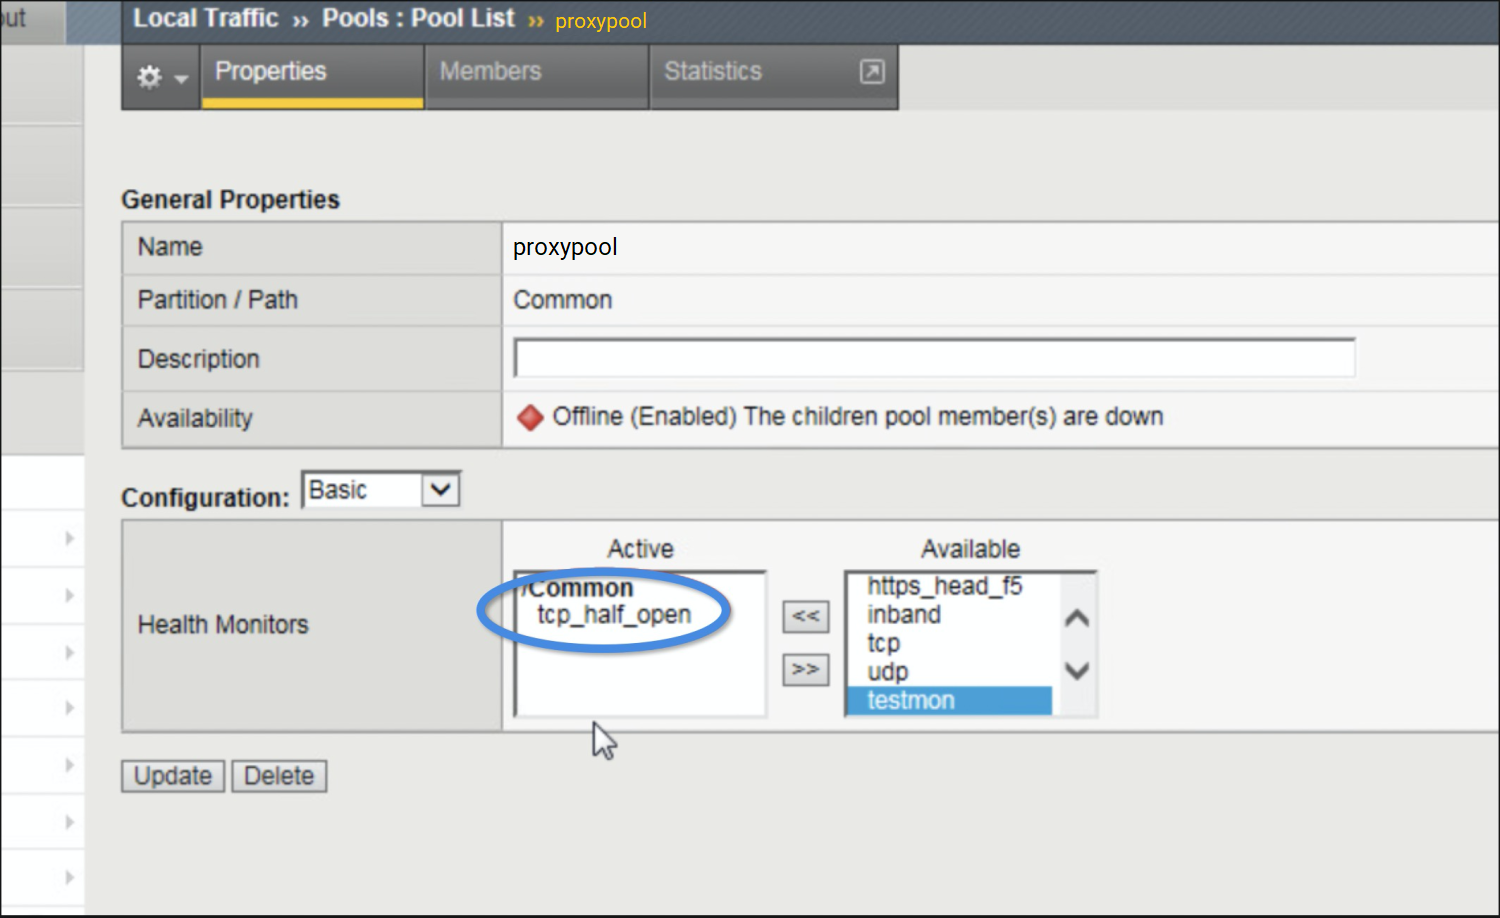
在 Available 列表中将步骤 a 中创建的 Monitor 选择至 Active 列表中。
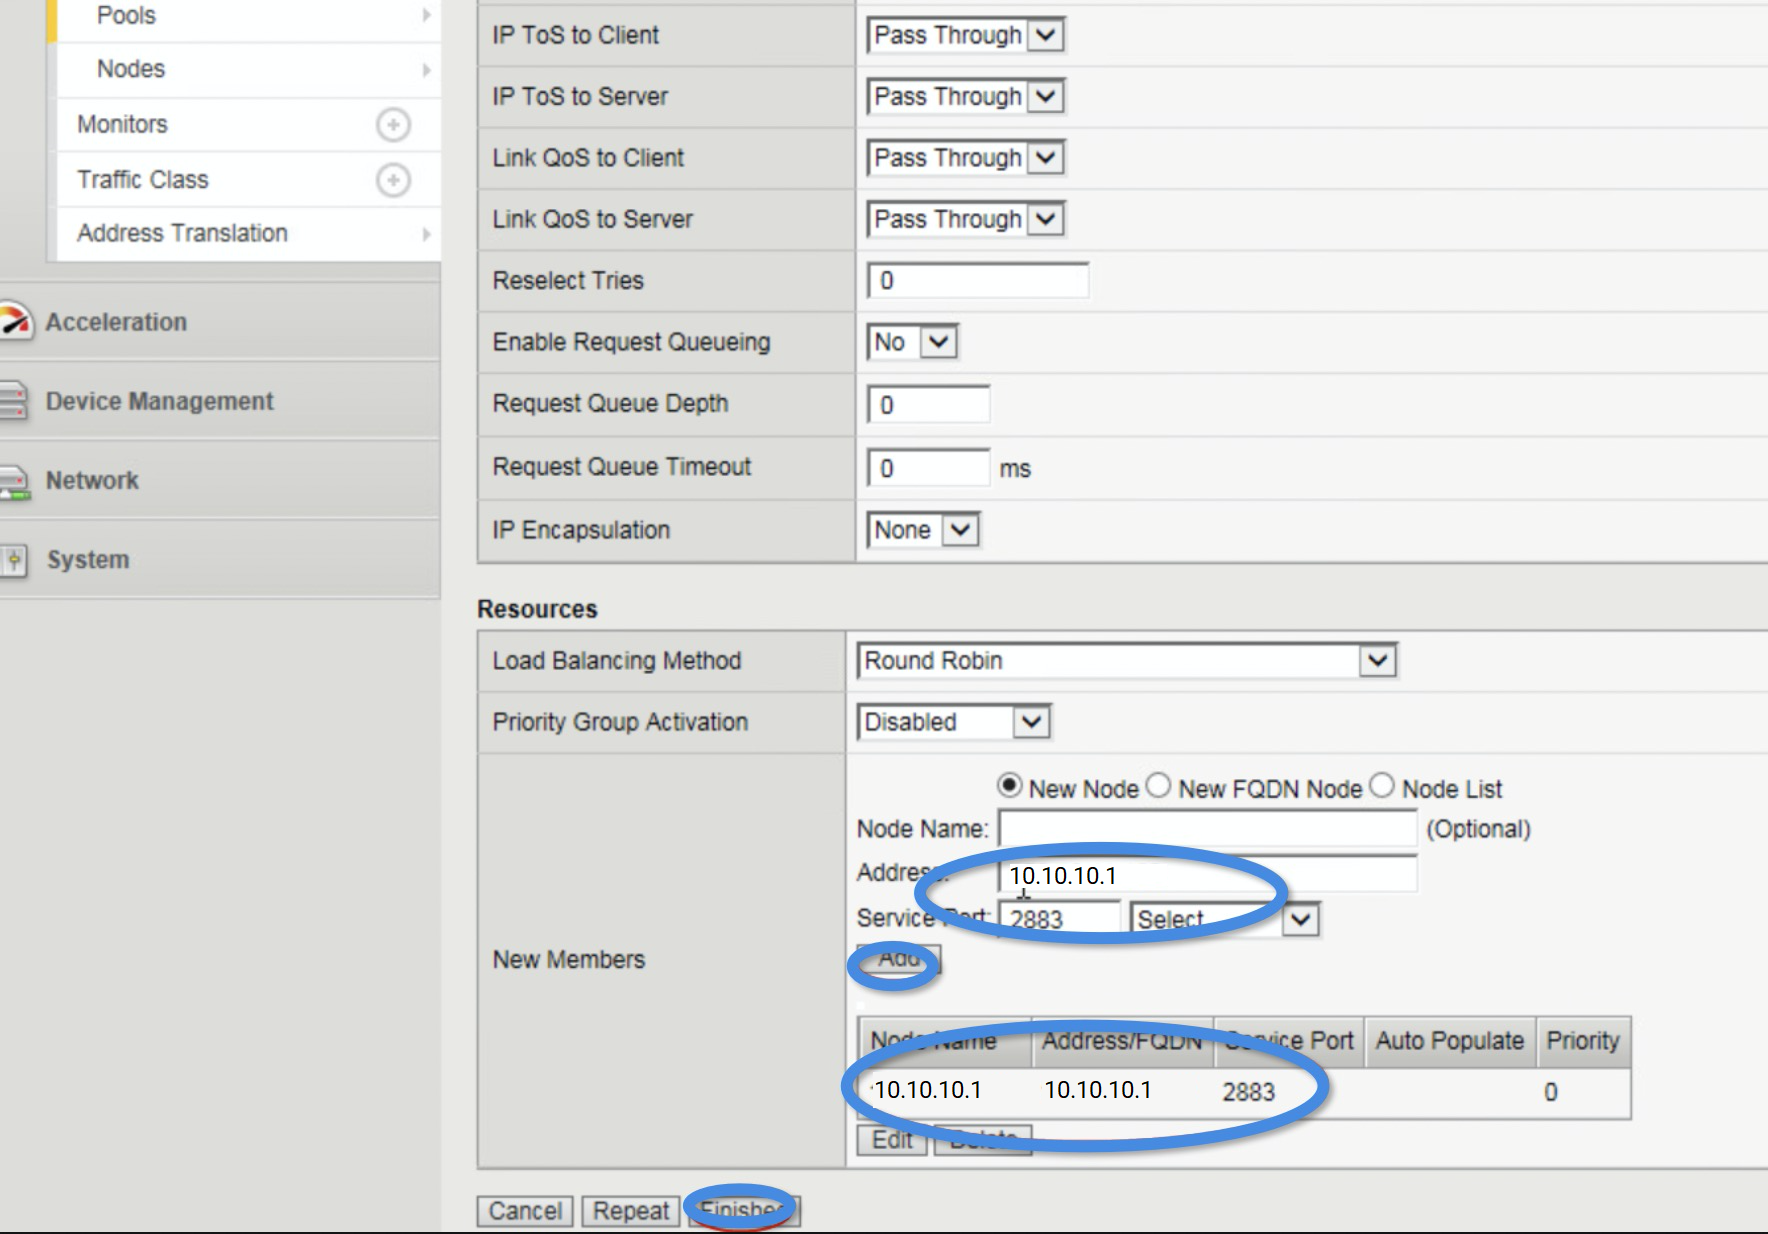
下拉页面,选择 New Node ,在 Address 和 Service Port 中填写 ODP 服务器的 IP 和端口。
单击 Add ,可添加多个节点,完成后单击 Finished 。
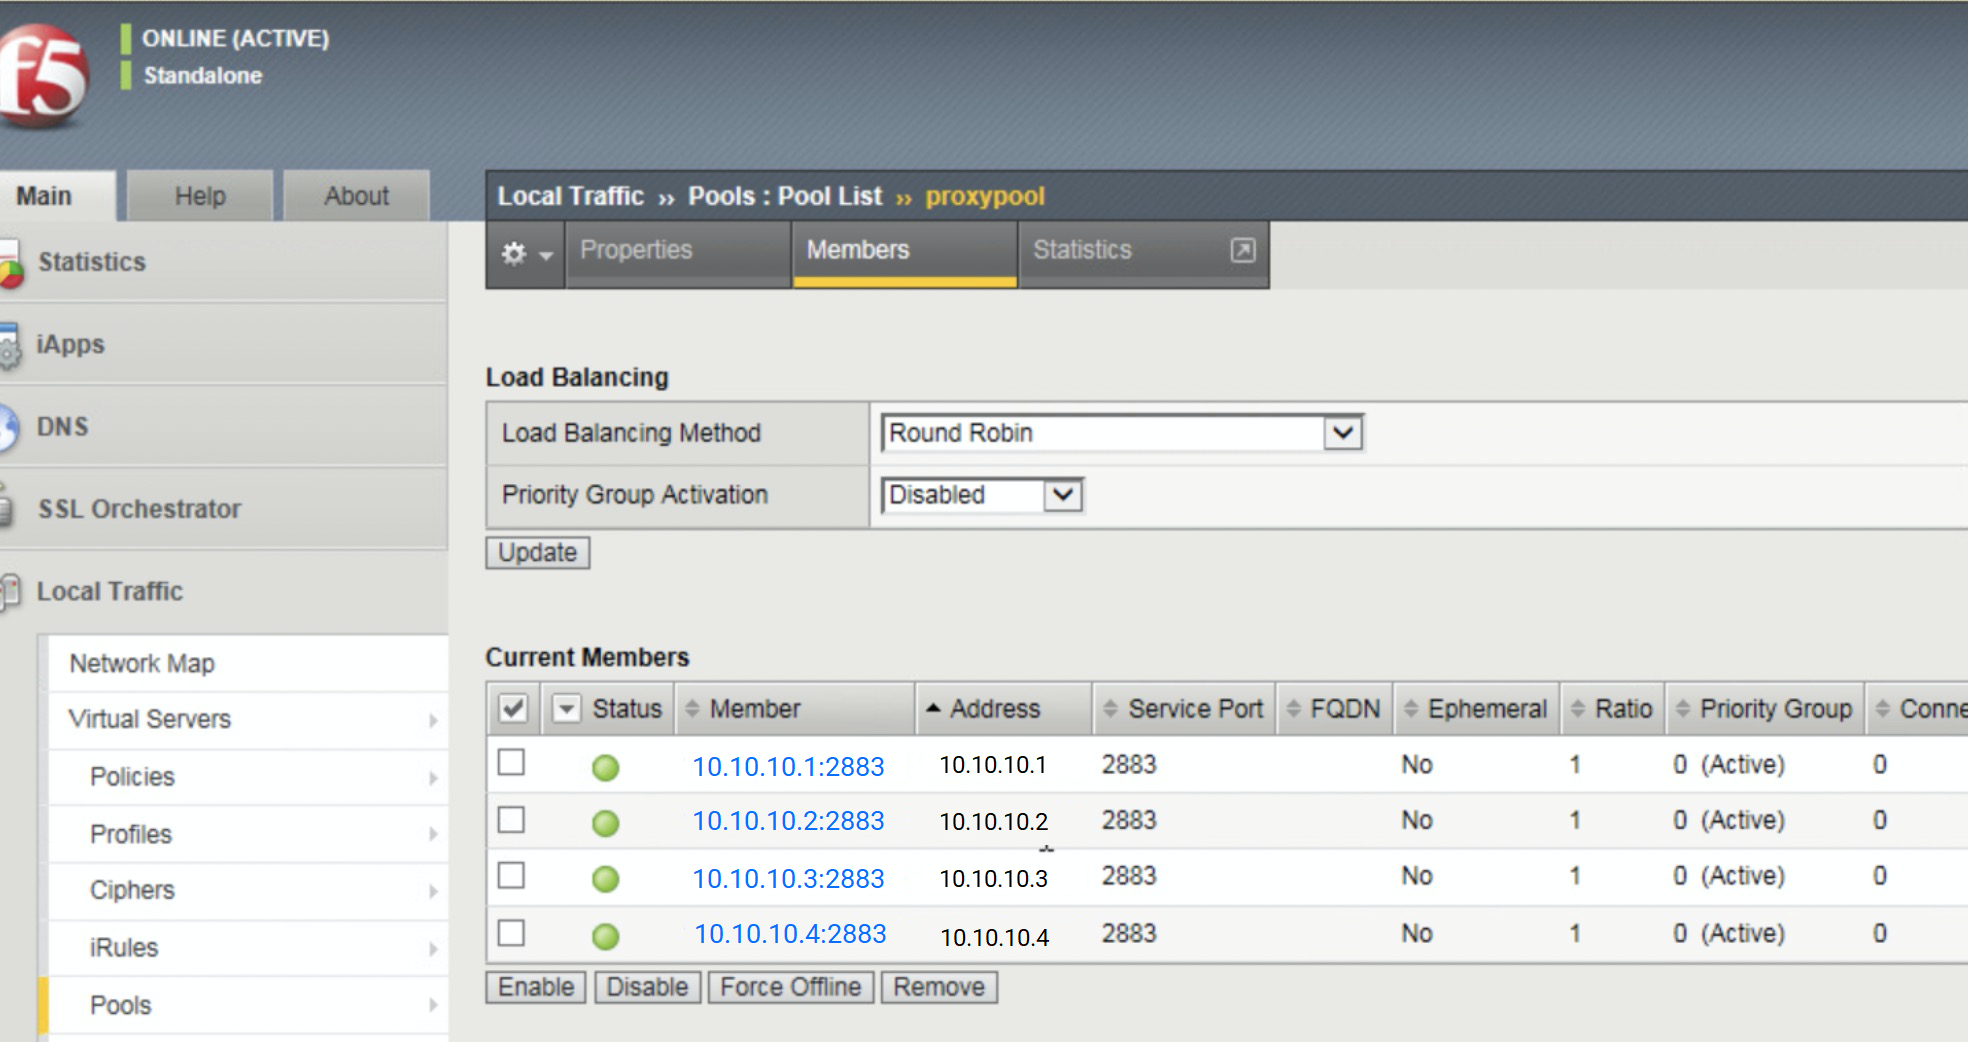
在 Local Traffic>Pools>Pool List 页面查看各 Member 状态 Status 列图标为绿色时,则添加成功。
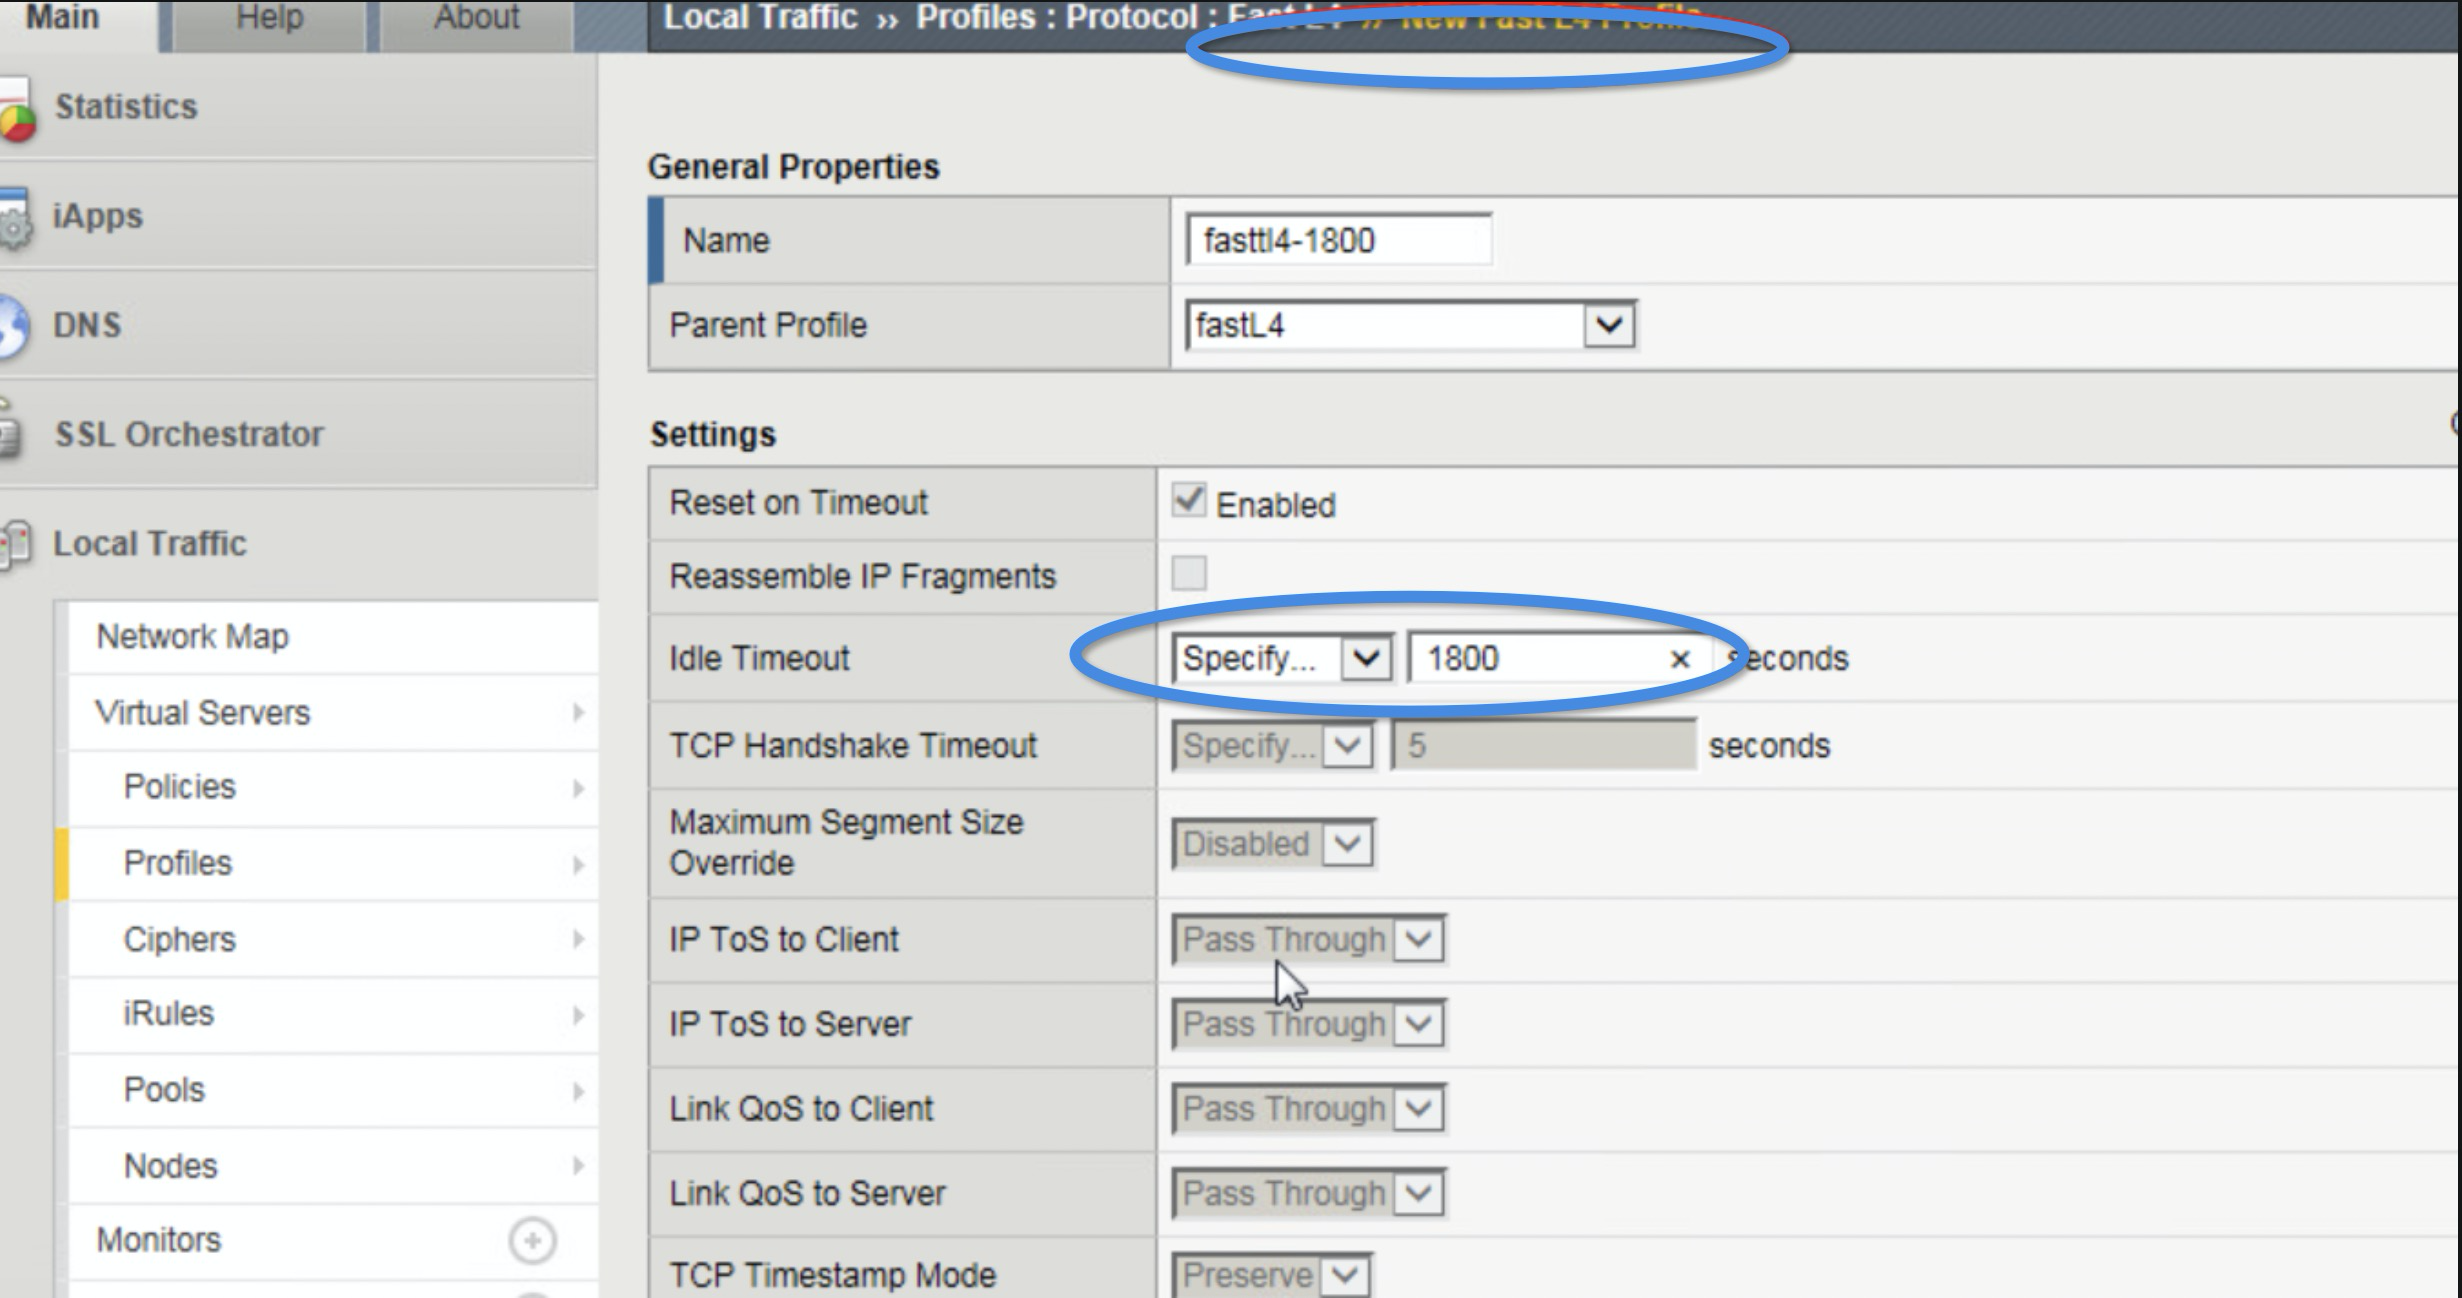
单击 Local Traffic>Profiles>FastL4 , 新增 Profile ,四层模式 Type 指定 Performance(Layer 4),不开启会话保持。 Idle Timeout 建议大于等于 1800 秒。
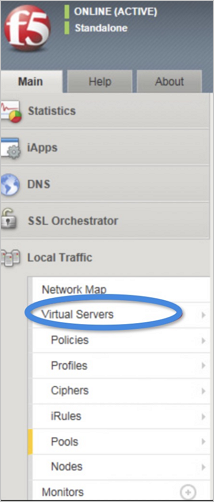
单击 Local Traffic>Virtual Servers ,新增 Server。
填写下图信息。
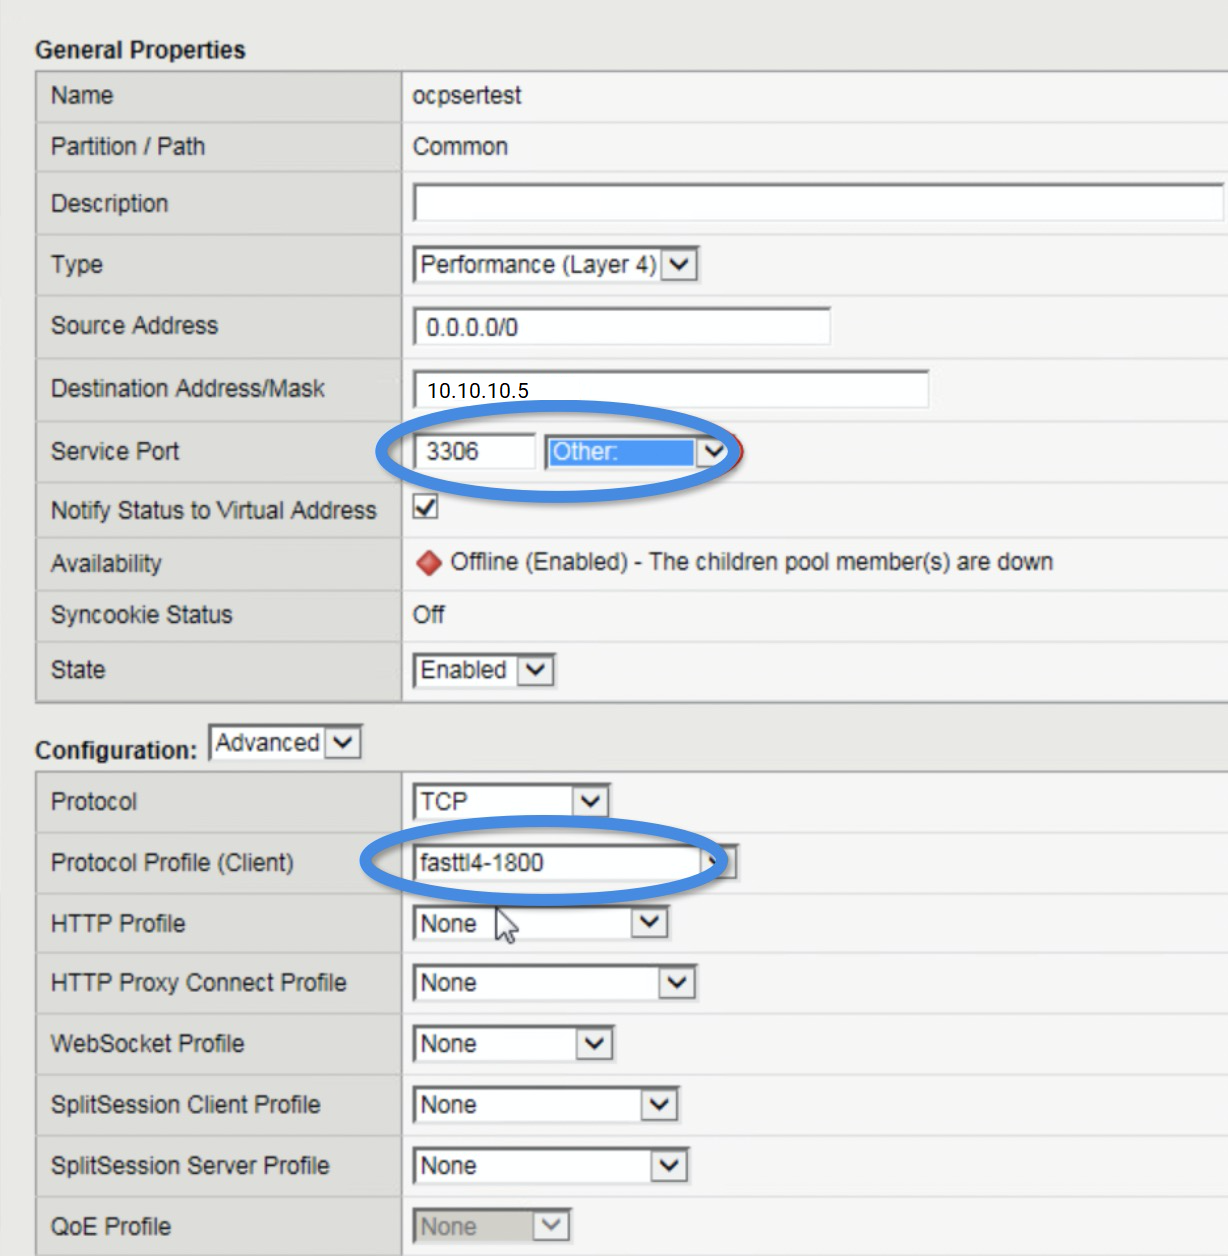
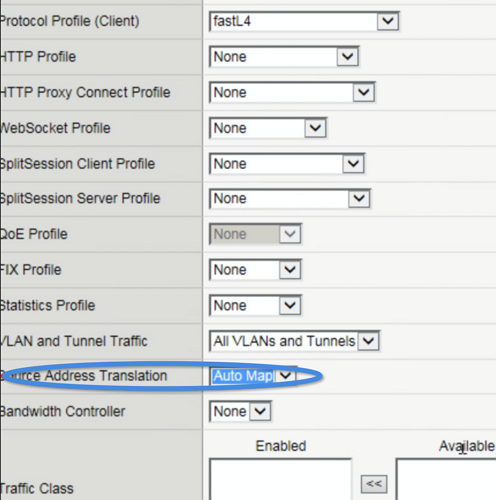
参数 说明 Type Performance(Layer 4) Source Address 0.0.0.0/0 Destination Address/Mask 为 F5 VIP 或者 Self IP,如:10.10.10.5 Service Port 端口,客户自定义 Protocol Profile(Client) 选择步骤 3 中新增的 Profile 下拉页面,将 Source Address Translation 选择为 Auto Map。
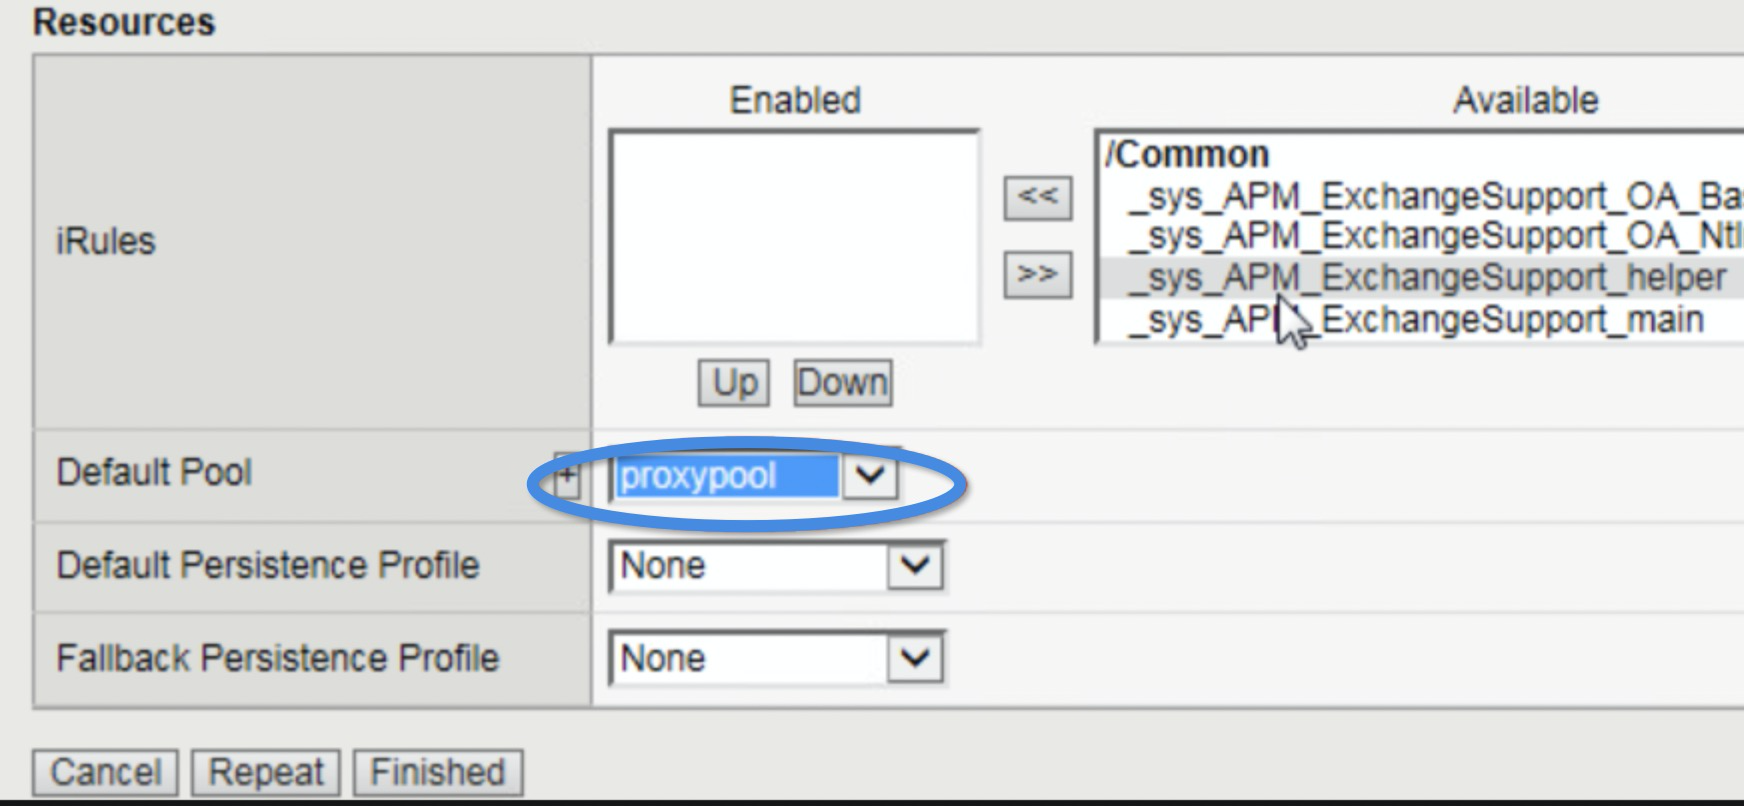
Default Pool 选择步骤 2 中创建的 Pool。
单击 Finished。
在 Local Traffic>Virtual Servers 页面 Virtual Server List 页签查看 Status 列图标为绿色时则新增成功。
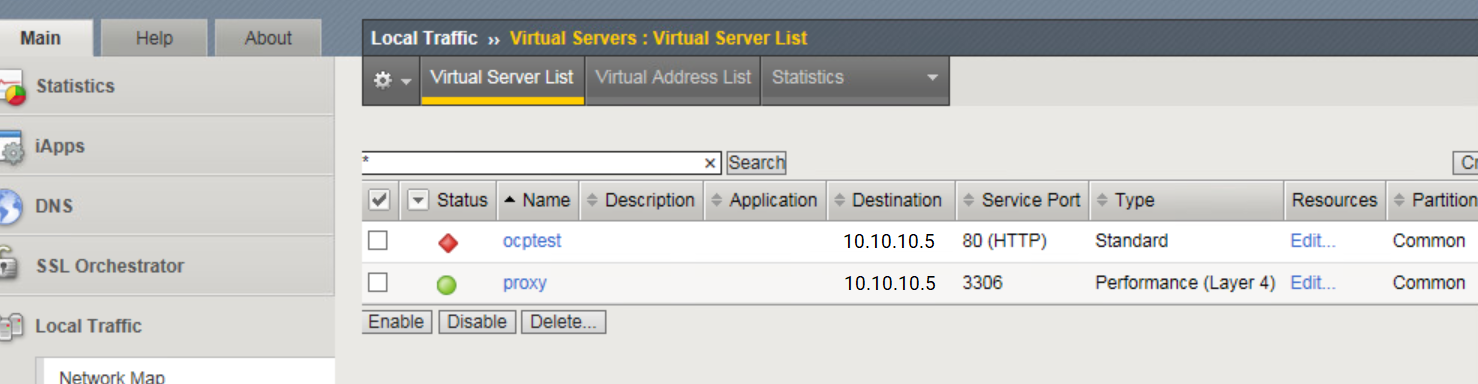
创建完成后选择一台与 F5、ODP 主机网络联通的主机,执行
telnet 10.10.10.1 2883、telnet 10.10.10.5 3306,返回如下内容时则表示 ODP 成功接入 F5。Connected to xx.xx.x.xxx.Escape character is '^]'.
使用 obd 图形化界面部署集群
(可选)安装 obd
说明
若 用户及参数配置 小节采用手动配置方式,此处需参照本步骤安装 obd。
执行如下命令在线安装 obd。您也可以访问 OceanBase 软件下载中心,下载 obd 包后通过安装包安装。更多安装 obd 的方法介绍可参见 安装 obd。
安装 yum-utils:
[admin@test001 ~]$ sudo yum install -y yum-utils添加 OceanBase 镜像源:
[admin@test001 ~]$ sudo yum-config-manager --add-repo https://mirrors.aliyun.com/oceanbase/OceanBase.repo安装 obd,默认安装最新版本:
[admin@test001 ~]$ sudo yum install -y ob-deploy配置应用环境:
[admin@test001 ~]$ source /etc/profile.d/obd.sh说明
如需部署企业版 OceanBase 数据库,可联系技术支持人员获取安装包,并执行
obd mirror clone命令上传至 obd 本地镜像库,上传后可执行obd mirror list local命令查看本地镜像库中的安装包。启动图形化界面进行部署
命令行执行
obd web命令启动图形化界面。[admin@test001 ~]$ obd web start OBD WEB in 0.0.0.0:8680 please open http://xxx.xxx.xxx.250:8680说明
图形化界面默认使用 8680 端口,您可使用
obd web -p <PORT>命令指定端口。在阿里云或其他云环境下,可能出现程序无法获取公网 IP,从而输出内网地址的情况,此 IP 非公网地址,您需要使用正确的地址访问图形化界面。
obd web命令绑定在 0.0.0.0 上,在多网卡部署的情况下,您可通过任意一个可访问的 IP 访问图形化界面。可使用 nohup 或 screen 命令设置在后台执行
obd web命令。
在图形化界面中单击 开启体验之旅

进入 OceanBase 数据库部署界面
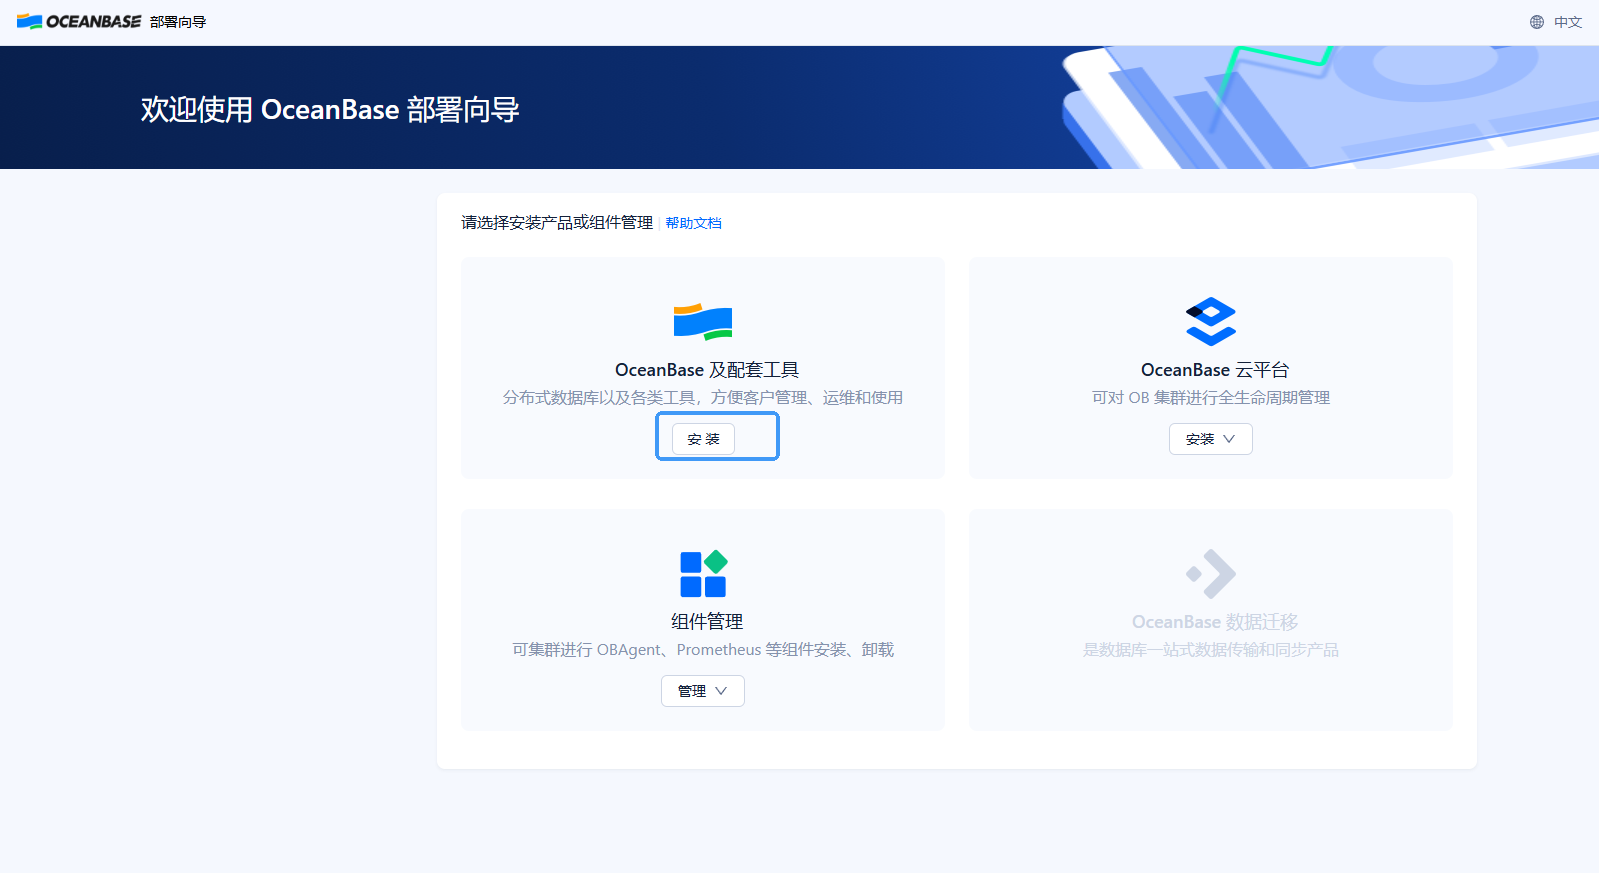
在显示的 欢迎使用 OceanBase 部署向导 界面选择 OceanBase 及配套工具 模块,单击 安装 后进入 OceanBase 数据库部署界面。
部署配置
在 部署配置 界面配置集群名称和部署组件,部署配置 界面默认展示如下。
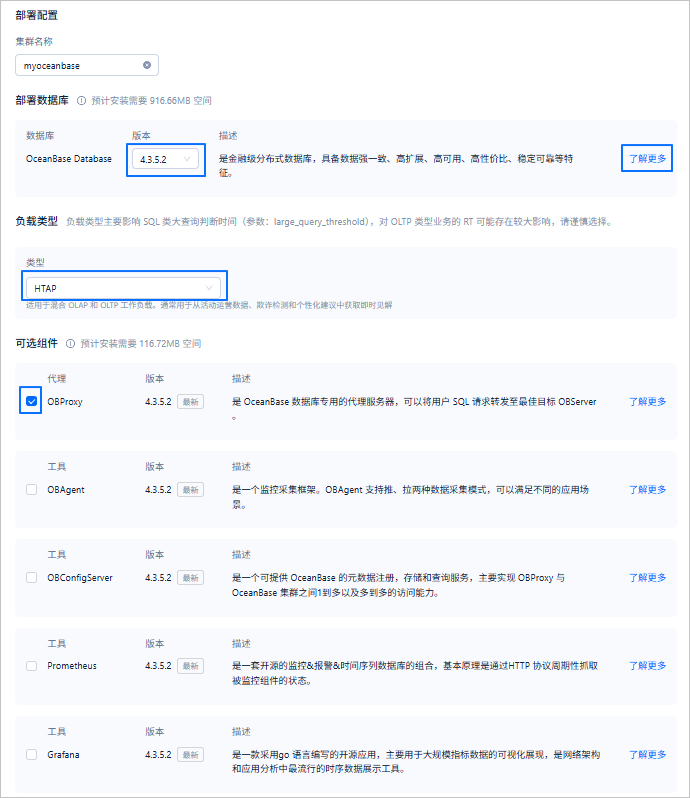
配置完成之后单击 下一步 可进入到 节点配置 页面。
节点配置
在 节点配置 界面配置数据库,部署用户以及软件安装路径,节点配置 界面内容如下。
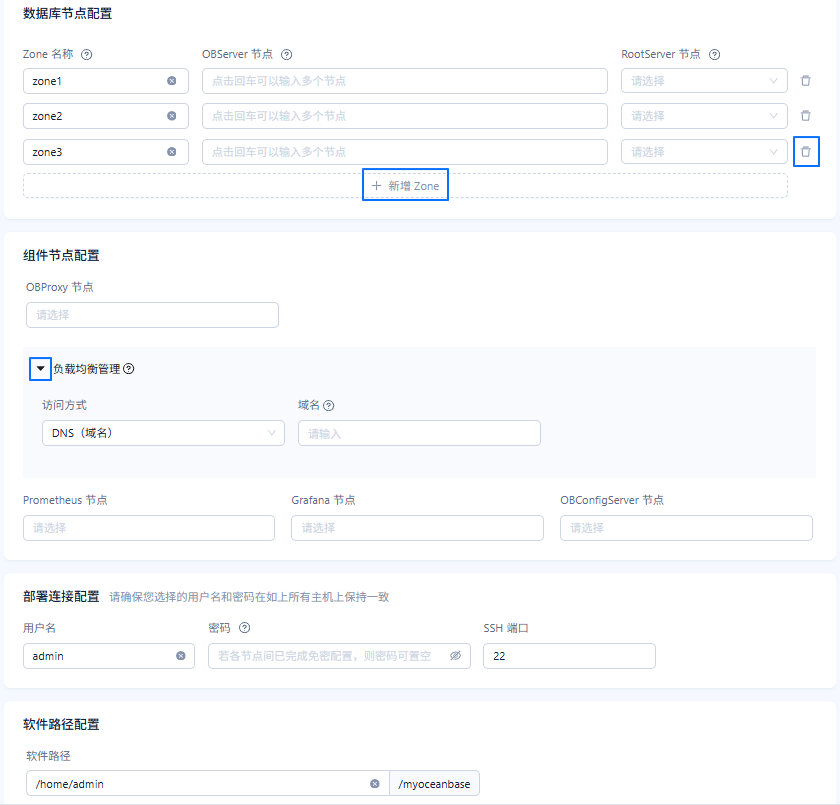
配置完成之后单击 下一步 可进入到 集群配置 页面。
集群配置
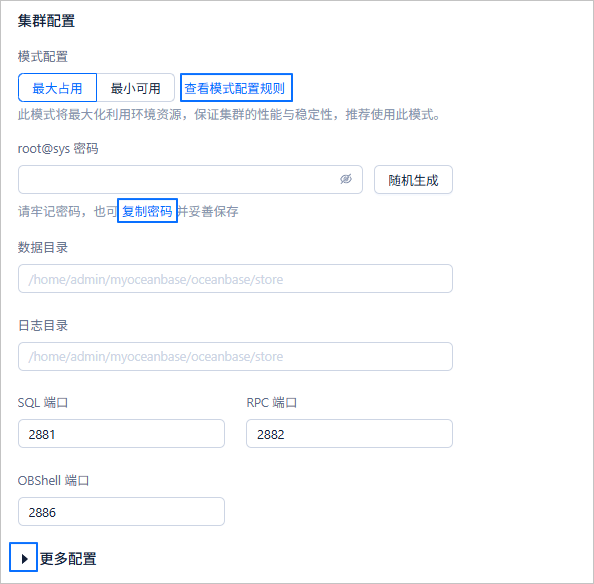
在 集群配置 界面可对集群进行配置,包括系统租户的管理员用户(root@sys)密码、数据和日志目录、数据库及各组件的端口和参数配置等,具体如下图。
集群配置
说明
本示例中,集群模式配置使用了最大占用,在实际部署时,用户可以根据自身要求选择最大占用或者最小占用。
组件配置
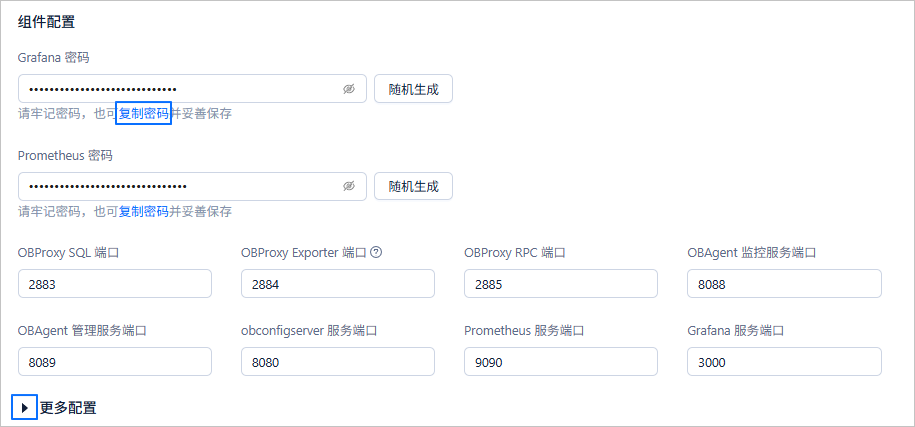
全部配置完成后,单击 下一步 即可进入到 预检查 页面。
预检查
在 预检查 页面查看所有配置信息,若发现问题可单击 上一步 进行修改;确认无误后,单击 预检查 进行检查。
若预检查报错,您可根据页面建议选择 自动修复(针对可自动修复的检查项)或者单击 了解更多方案 跳转至错误码文档,参考文档自行修改。所有报错修改后,可单击 重新检查 再次进行预检查。
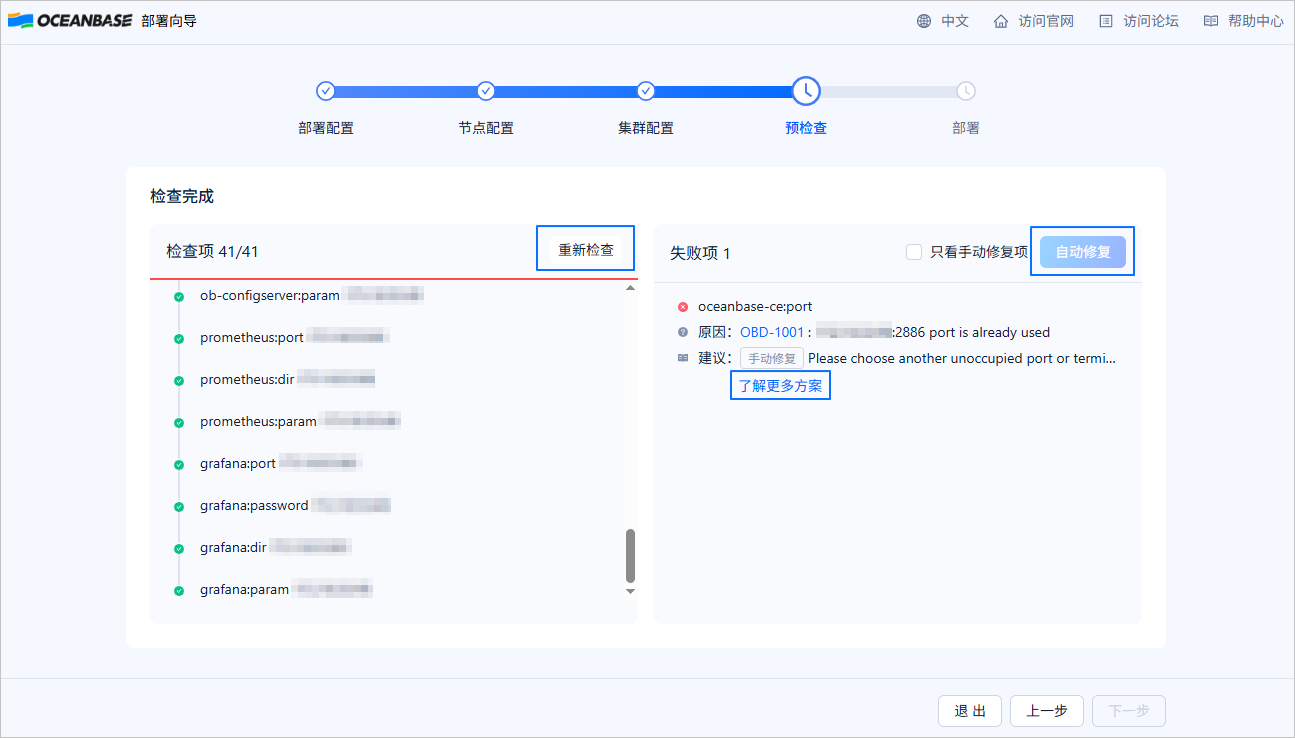
预检查通过后,单击 部署 即可开始 OceanBase 数据库的部署。
部署
在 OceanBase 集群部署成功后,单击页面上的 复制信息,妥善保存访问地址及账户密码。
信息保存完成后,单击部署成功页面右下角的 创建业务租户 按钮,进入创建业务租户流程。
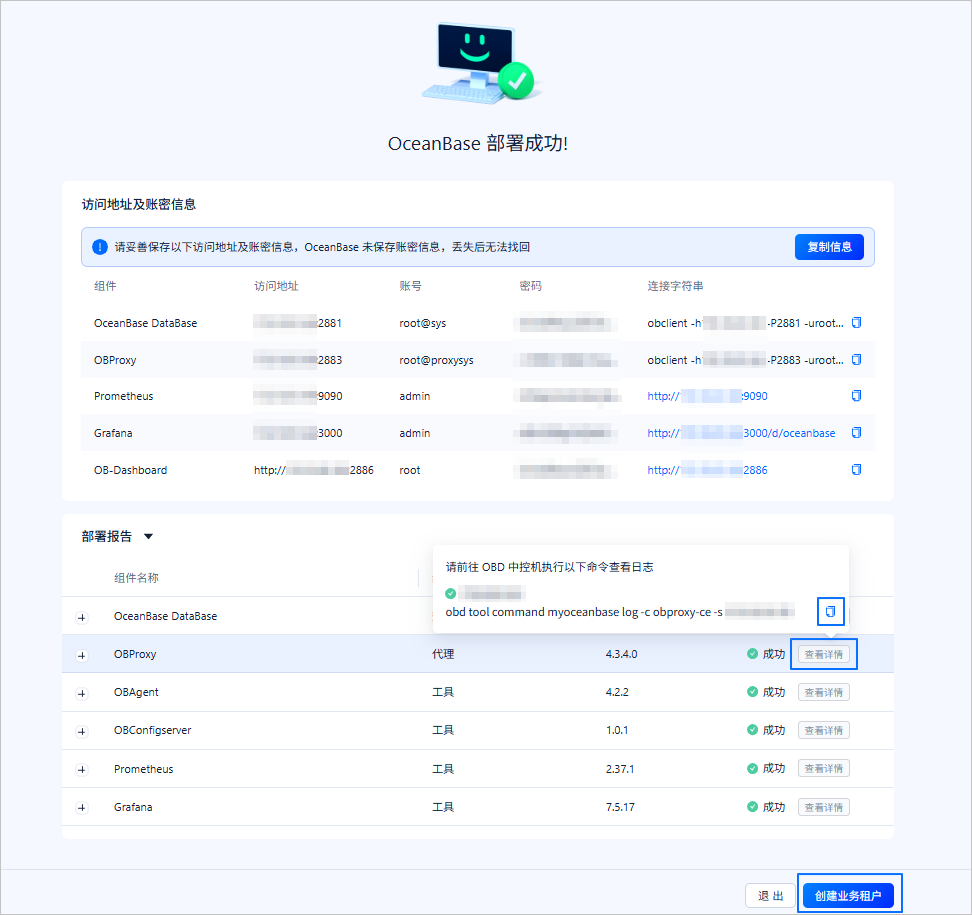
创建业务租户
在 创建业务租户 界面配置相应的参数,之后单击 下一步:创建业务租户,系统将创建对应租户。
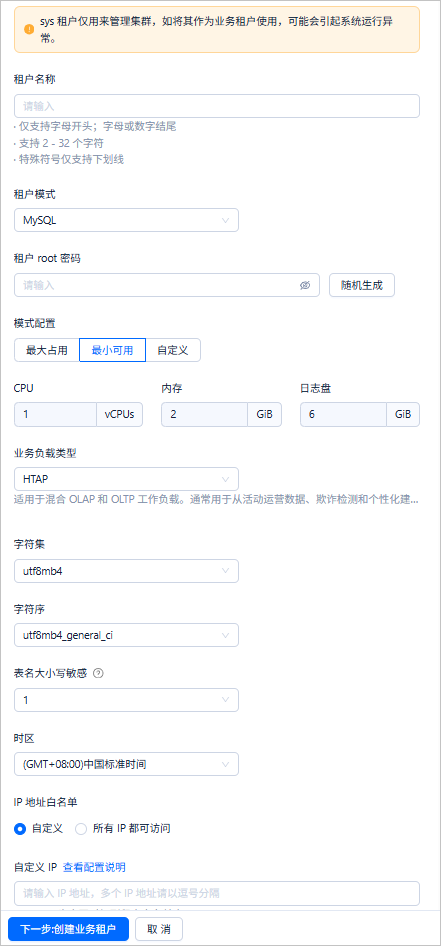
说明
本示例中,租户使用了最小规格,在实际部署时,您可以根据自身要求选择最大规格、最小规格或者自定义。
等待租户创建完成后,在页面会展示业务租户信息,包含租户名、root 用户密码、连接字符串等信息。点击 租户 root 密码 和 连接字符串 后面的 复制按钮,妥善保存对应的信息。
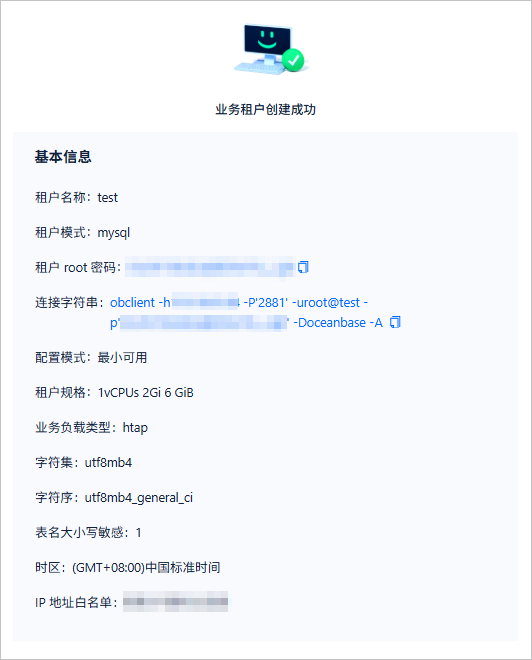
信息保存完成后,单击左下角 退出 按钮,即可退出创建租户流程。之后单击部署结果页面的 退出 按钮,退出部署程序。
验证部署结果
在黑屏界面,使用上述部署结果中输出的对应连接串连接 OceanBase 数据库对应的租户。
登录 sys 租户
使用上述部署结果中,输出的连接串连接 OceanBase 数据库的 sys 租户
obclient -h10.10.10.1 -P2881 -uroot@sys -p'******' -Doceanbase -A返回结果如下:
Welcome to the OceanBase.  Commands end with ; or \g.
Your OceanBase connection id is 3221540622
Server version: OceanBase_CE 4.3.5.2 (r102020032025070315-563ee271f78ff8521c8e0e09ae682065b065a046) (Built Jul  3 2025 15:53:52)

Copyright (c) 2000, 2018, OceanBase and/or its affiliates. All rights reserved.

Type 'help;' or '\h' for help. Type '\c' to clear the current input statement.

obclient(root@sys)[oceanbase]>
登录创建的普通租户
obclient -h10.10.10.1 -P'2881' -p'********' -uroot@test -Doceanbase -A返回结果如下:
Welcome to the OceanBase.  Commands end with ; or \g.
Your OceanBase connection id is 3221547518
Server version: OceanBase_CE 4.3.5.2 (r102020032025070315-563ee271f78ff8521c8e0e09ae682065b065a046) (Built Jul  3 2025 15:53:52)

Copyright (c) 2000, 2018, OceanBase and/or its affiliates. All rights reserved.

Type 'help;' or '\h' for help. Type '\c' to clear the current input statement.

obclient(root@test)[oceanbase]>
均可正常连接数据库,说明已经部署完成。
相关说明
图形化界面部署 OceanBase 数据库的详细介绍可参见 部署 OceanBase 集群。
连接 OceanBase 数据库的详细介绍可参见 连接 OceanBase 数据库 章节。


